
Rhinestone setting machines, ultrasonic rhinestone machines, and automatic stone pickup machines are widely used in garments, shoes, bags, decorative fabrics, and fashion accessories. Their working principle looks simple: the feeding plate arranges rhinestones, the nozzle or needle picks up one stone, the machine moves to the target position on the fabric, and then the stone is fixed by pneumatic pressing, ultrasonic energy, or thermal pressure.
However, in real maintenance work, these machines often show confusing symptoms: the nozzle does not pick stones, the feeding wheel gets stuck, the needle collides with the plate, the machine moves too fast even when the operator has reduced the speed, the wheel does not rotate smoothly, or the machine finally works but the stone cuts through the fabric.
These problems are frequently misdiagnosed. Many users immediately suspect the main board, control program, solenoid valve, cylinder, nozzle, or plate. Some replace the needle, plate, cylinder, or linkage assembly without solving the problem. In many cases, the real cause is not one damaged component, but a combination of pneumatic pressure, vacuum suction, nozzle height, pickup alignment, feeding plate condition, and process parameters.
This article uses a real troubleshooting case of a HUAGUI-type rhinestone setting machine as the basis for analysis. The machine showed several typical complaints: “nozzle not working,” “stuck with wheel,” “stone not working,” “machine is too quick,” and finally “air pressure is so strong, fabric cut by stone.” The goal of this article is to provide a clear, practical, and logical troubleshooting method for technicians, machine users, and remote support engineers.
1. Basic Working Principle of a Rhinestone Setting Machine
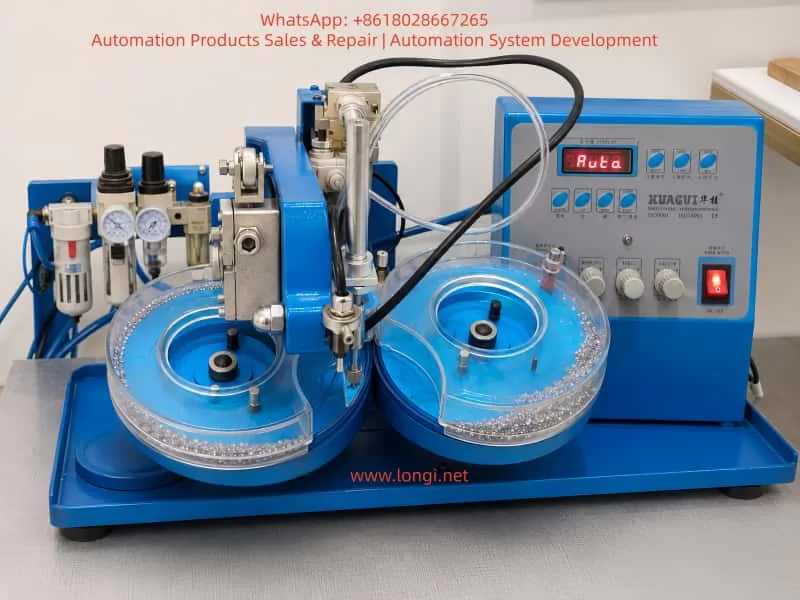
A typical rhinestone setting machine consists of several coordinated systems.
The first part is the feeding plate, often called the wheel or plate by users. The plate may be marked with sizes such as SS6, SS8, SS10, and so on. It must match the rhinestone size. Its purpose is to guide loose rhinestones into an organized path and deliver one stone to the pickup point.
The second part is the nozzle or needle. The nozzle is a small metal tip with a tiny hole inside. It uses vacuum suction to pick up one rhinestone from the feeding position. If the nozzle is blocked, bent, installed too low, or not aligned with the pickup point, the machine will fail to pick stones.
The third part is the pneumatic system. Many machines use Festo or similar air preparation units, including an air filter, regulator, pressure gauge, and water separator. Compressed air drives cylinders through solenoid valves. The cylinders then move the nozzle, press head, or mechanical linkage.
The fourth part is the vacuum system. Some machines use a small vacuum pump, while others use a pneumatic vacuum generator. Without stable vacuum suction, the nozzle cannot pick up stones.
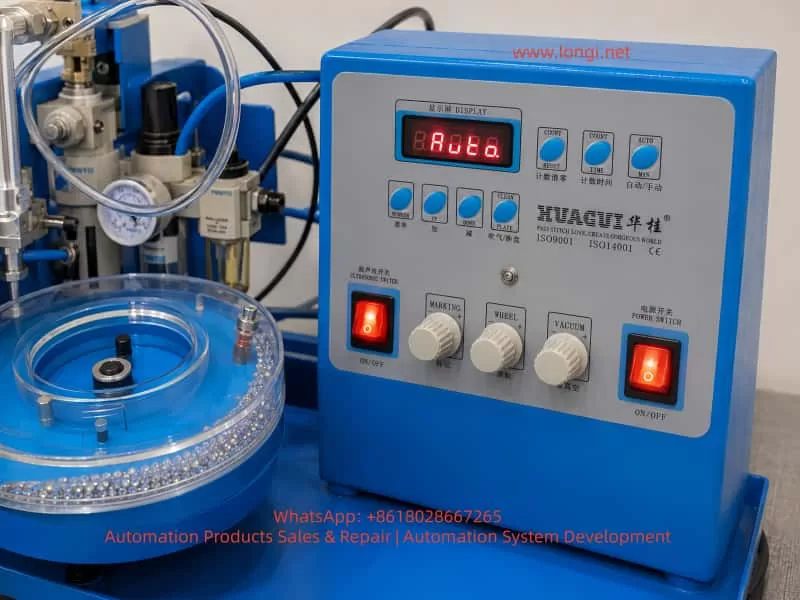
The fifth part is the pressing or ultrasonic bonding system. Some machines use ultrasonic energy to bond the rhinestone to fabric. Others use heat or mechanical pressure. Controls such as MARKING, ULTRASONIC SWITCH, or pressing time settings may affect bonding strength, pressure duration, or ultrasonic energy.
The sixth part is the control panel. Common buttons include AUTO/MAN, UP/DOWN, COUNT, TIME, CLEAN PLATE, WHEEL, VACUUM, and MARKING. It is important to understand that the speed or time settings on the panel may not directly control the actual cylinder impact speed. The real speed of the cylinder is usually controlled by pneumatic flow control valves, throttle valves, or exhaust restrictors.
Once this structure is understood, troubleshooting becomes much more logical. A nozzle problem is not always a nozzle defect. A fast movement problem is not always a panel setting problem. A wheel problem is not always a motor problem. The entire machine must be checked as a coordinated system.
2. Typical Symptoms
In field service, users often describe the problem in simple words:
“Nozzle not working.”
“Stuck with wheel.”
“Stone not working.”
“I changed the needle and plate with the same size, but the machine still does not work.”
“I made it very slow, but the machine is still very quick.”
“The wheel is not rotating easily, but before it was the same and the machine worked.”
“Everything is good now, but the air pressure is so strong that the stone cuts the fabric.”
These descriptions should not be treated as separate unrelated issues. They often represent different stages of the same troubleshooting process. At first, the machine may fail to pick stones. Then the technician finds that the nozzle and plate are misaligned. After that, the machine starts moving, but the cylinder speed is too fast. Finally, once the machine can place stones, the pressure may be too strong and damage the fabric.
The troubleshooting focus must change as the symptoms change.
3. When the Nozzle Does Not Pick Stones, Do Not Suspect the Main Board First
If the machine powers on, the display shows Auto or Manual, the buttons respond, and the cylinder can move up and down, the main board should not be the first suspect.
A completely failed main board usually causes more severe symptoms: no display, no output, no response from buttons, abnormal logic, or total failure to move. If the machine can move but cannot pick stones, the more likely causes are mechanical position, vacuum suction, nozzle blockage, feeding plate condition, or pneumatic adjustment.
When a user says “nozzle not working,” the first question should be: what exactly does “not working” mean?
If the nozzle does not move up or down, check air pressure, solenoid valve, cylinder, tubing, and control output.
If the nozzle moves but cannot pick up stones, check vacuum suction, nozzle blockage, nozzle alignment, and stone feeding.
If the nozzle moves down and hits the plate or wheel, check nozzle height, cylinder rod length, mechanical limit, and plate position.
If the nozzle can pick and place stones but damages fabric, check air pressure, downward speed, press depth, MARKING setting, ultrasonic time, and bottom support pad.
This classification prevents random part replacement.
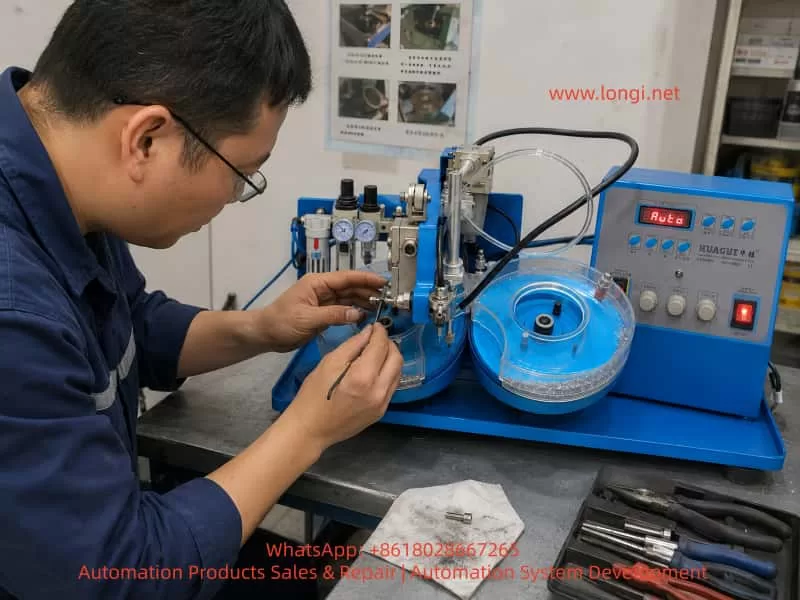
4. How to Inspect the Nozzle or Needle
The nozzle is one of the most commonly misdiagnosed parts. It may truly be damaged, but in many cases it is only blocked, bent, installed incorrectly, or adjusted to the wrong height.
First, inspect whether the nozzle tip is bent. The nozzle is usually very thin. If it has hit the feeding plate, transparent cover, or accumulated stones, it may be slightly bent. Even a small bend can move the pickup point away from the correct center.
Second, check whether the tiny hole in the nozzle is blocked. Rhinestone dust, glue powder, fabric fibers, broken stone fragments, or oil contamination can block the hole. Remove the nozzle, clean it carefully with a fine needle, and blow compressed air backward through it. Do not use an oversized needle, because enlarging the hole may reduce stable suction performance.
Third, check whether the nozzle is vertical. The nozzle holder, lock nut, and fixing screw must be secure. The black tube or cable must not pull the nozzle sideways. If the nozzle is installed at an angle, even a new nozzle will fail to pick stones correctly.
Fourth, check the lowest position of the nozzle. When the nozzle moves down to its lowest position, it must not touch the blue plate, transparent cover, wheel edge, or feeding groove. It should only approach the rhinestone and pick it up. If the nozzle touches the plate even when there are no stones inside, the height is too low.
Fifth, check whether the nozzle is centered over the pickup point. The feeding wheel delivers the rhinestone to a fixed position. The nozzle must be exactly above this position. For small stones such as SS6 or SS8, even a one-millimeter error is enough to cause pickup failure.
Therefore, replacing the needle does not automatically solve the problem. After replacing the needle or nozzle, the technician must readjust height, verticality, and pickup alignment.
5. Vacuum Suction Must Be Tested Correctly
Many users test vacuum incorrectly. They place a piece of paper under the nozzle and let the machine press down on it. This only proves that the cylinder moves. It does not prove vacuum suction.
The correct test is simple:
Set the machine to manual mode. Keep the nozzle in a safe position. Activate vacuum. Hold a very small, light piece of paper near the nozzle tip. Do not place the paper under the nozzle for pressing. The paper should be pulled toward the nozzle and held firmly by suction.
If the paper is firmly sucked, vacuum exists. If the nozzle still cannot pick stones, the problem is more likely alignment, stone feeding, stone orientation, or plate condition.
If the paper only moves slightly, vacuum is weak. Check air pressure, vacuum knob, pneumatic vacuum generator, tube leakage, nozzle blockage, and fittings.
If the paper does not move at all, vacuum is not working. In that case, adjusting the feeding plate or replacing stones will not help.
Common vacuum system problems include a closed or low VACUUM knob, insufficient air pressure, blocked vacuum generator, leaking transparent tube, loose fittings, solenoid valve failure, clogged nozzle, or air leakage between the nozzle and tube.
For remote troubleshooting, always ask the user to send a close video of the paper being sucked by the nozzle tip. Without that evidence, vacuum cannot be confirmed.
6. Feeding Plate and Wheel Problems Must Not Be Ignored
Many users underestimate the feeding wheel. They may say, “The wheel is not rotating easily, but before it was the same and the machine worked.” That is not a reliable conclusion.
The wheel does not only need to rotate. It must rotate smoothly and consistently enough to guide stones to the pickup point. If it has hard spots, broken stones, dust, excessive pressure from the transparent cover, an overtightened center screw, or incorrect plate installation, feeding will become unstable.
Too many stones inside the plate can also cause trouble. Operators often believe that adding more stones will improve feeding. In reality, small rhinestone plates cannot work well when stones are piled up at the outlet. Too many stones can cause jamming, flipping, blockage, and collision with the nozzle.
A proper test should be done with only 20 to 30 stones. First, remove all stones. Clean broken stones, dust, glue particles, and debris from the plate. Then add only a small quantity and observe whether the stones reach the pickup point smoothly.
The plate size must also match the stones. If the plate is marked SS6-SS8, it is intended for stones in that range. The nozzle, plate, and rhinestone size must match each other. Mixed sizes, broken stones, or deformed stones will cause pickup instability.
When checking the wheel manually, turn off the machine and gently rotate the wheel by hand. Some resistance is acceptable, but it must not have hard jamming points. The transparent cover must not press against the blue plate. The center screw must not be too tight. There must be no broken stones or dirt under the plate.
7. Why the Nozzle Gets Stuck with the Wheel
“Stuck with wheel” is an important symptom. It usually indicates mechanical interference between the nozzle and the feeding plate.
Common causes include:
The nozzle is installed too low. After replacing the needle, if it is inserted too deeply into the holder, the lowest position becomes too low and the nozzle hits the plate.
The cylinder rod length has changed. If the cylinder, rod end, or linkage has been replaced, even a difference of 1 to 2 mm can make the nozzle hit the plate.
The plate is not installed in the correct position. If the plate is not seated on the positioning pin or groove, or if the transparent cover is shifted, the pickup point may move away from the nozzle center.
The nozzle is bent. A bent nozzle may scrape the plate edge or transparent cover.
Too many stones are accumulated at the outlet. Instead of picking one stone, the nozzle presses into a pile of stones and gets stuck.
The correct test is to remove all stones, set the machine to manual mode, and slowly press DOWN. Observe whether the nozzle touches the plate or transparent cover at the lowest point. Only after confirming no interference should stones be added for further testing.
This step is very important. If the operator keeps running Auto mode while the nozzle is hitting the plate, a new nozzle can quickly bend, the plate can be scratched, and the problem becomes worse.
8. Why the Machine Is Still Too Fast Even After Slowing the Panel Setting
A common complaint is: “I made it very slow, but the machine is still very quick.”
This happens because panel settings and actual cylinder speed are not the same thing. The panel may control work cycle, delay time, feeding rhythm, counter timing, marking duration, or ultrasonic time. But the impact speed of the cylinder is usually controlled by pneumatic air flow.
Cylinder speed depends on air pressure, inlet and exhaust flow, flow control valves, solenoid valve exhaust, and cylinder cushioning. If the flow control valve is fully open and air pressure is high, the cylinder will move down sharply like a punch press. In that case, reducing the panel speed only increases the interval between strokes. Each stroke is still too fast.
To control cylinder speed, look for these parts:
Small pneumatic speed controllers on the cylinder ports.
Flow control valves installed in the air tube.
Throttle silencers on the solenoid valve exhaust ports.
Air fittings with small knobs or slotted adjustment screws.
Adjustment must be done slowly. Turn only one quarter of a turn each time, then test in manual mode. The goal is to make the DOWN movement slow and soft. The return stroke can be slightly faster, but the pressing stroke must not hit the fabric violently.
If adjustment has no effect, the technician may be adjusting the wrong valve, the valve may be damaged, the valve may be installed in the wrong direction, or the air circuit may bypass the speed controller.
9. Excessive Air Pressure and Fabric Cutting
Once the machine can pick and place stones, a new problem may appear: the stone cuts or damages the fabric. Users may describe it as “air pressure is so strong, fabric cut by stone.”
This means the machine has moved from mechanical repair to process adjustment.
Fabric damage is usually caused by several factors together:
Main air pressure is too high.
Cylinder down speed is too fast.
Nozzle or press head lowest position is too low.
MARKING or ultrasonic time is too high.
Fabric is too thin, soft, or elastic.
There is no soft pad under the fabric.
The rhinestone is upside down, damaged, or not a flat-back stone.
Broken stones or incorrect sizes are mixed in the plate.
For thin fabric, elastic fabric, mesh, or shiny delicate fabric, high pressure must not be used. A safe starting range for thin fabric is about 0.20 to 0.30 MPa. For thicker fabric, the test range may be around 0.35 to 0.45 MPa, but pressure should only be increased gradually.
It is important to understand that the pneumatic speed controller adjusts speed, not final pressing force. To reduce pressing force, adjust the main air regulator. The flow control valve can reduce impact, but if the main pressure is too high, the final pressing force may still be excessive.
If fabric is damaged, do four things:
Reduce main air pressure.
Slow down the cylinder’s downward movement.
Raise the nozzle or press head lowest position slightly.
Reduce MARKING or ultrasonic energy/time.
Always test on waste fabric first. Do not test on good production fabric until the parameters are stable.
The correct result is simple: the stone is fixed firmly on the fabric, but the fabric is not cut, broken, whitened, or strongly marked on the back side.
10. Adjusting the Lowest Position of the Press Head
The lowest position of the nozzle or press head is a critical adjustment. Even if air pressure is not very high, if the mechanical stroke is too deep, the stone will be forced into the fabric.
The technician should check the cylinder rod, linkage length, nozzle holder, mechanical limit screw, and rocker position. Different machines have different structures, but the principle is the same: the head should go low enough to press the stone, but not so low that it crushes the fabric.
Adjust in small steps, usually 0.5 to 1 mm at a time. Do not make a large adjustment at once.
After each adjustment, check three results:
Is the stone fixed firmly?
Is the fabric surface damaged, whitened, or cut?
Is the back side of the fabric bulged, torn, or pierced?
If the stone is firm and the fabric is not damaged, the setting is correct. If the stone is not firm but the fabric is safe, slightly increase MARKING or bonding time. Do not immediately increase air pressure.
11. MARKING and Ultrasonic Energy
Many ultrasonic rhinestone machines have an ULTRASONIC SWITCH and a MARKING knob. Depending on the machine design, MARKING may control ultrasonic time, energy, marking strength, or pressing duration.
If MARKING is too high, the fabric may show:
White marks.
Fiber damage.
Heavy indentation around the stone.
Punctures in thin fabric.
Overheated glue.
Hardening or deformation around the stone.
If MARKING is too low, the stone may not be fixed firmly and may fall off easily.
The best method is to start with a low MARKING setting and increase gradually only until the stone is fixed. Do not combine high air pressure, high down speed, and high MARKING. That combination is very likely to damage fabric.
12. The Fabric Needs Proper Bottom Support
Bottom support is often ignored. If thin fabric is placed directly on a hard metal table or hard board, the stone may act like a small cutting point. Under high pneumatic force and fast impact, the local pressure becomes very high and the fabric can be pierced.
A soft rubber pad, silicone pad, or suitable heat-resistant cushion should be placed under the fabric. The pad absorbs impact and allows the glue surface to bond more evenly.
The pad must not be too soft, or positioning may become inaccurate. It must not be too hard, or it will not protect the fabric. The correct pad depends on fabric thickness, elasticity, rhinestone size, and bonding method.
13. Do Not Replace the Rocker Linkage Too Early
Some users point to the mechanical rocker arm, linkage, or joint and ask whether it should be replaced. This part should be inspected, but it should not be the first replacement target.
Check the linkage for:
Severe wear in the pivot holes.
Loose pins.
Bent connecting rods.
Sticking during movement.
Loose screws.
Worn bushings or bearings.
Lack of lubrication.
Heavy dust or dirt.
If the only problem is that the cylinder moves too fast, replacing the linkage usually will not solve it. Fast movement is mainly controlled by air pressure and flow control valves.
However, if the linkage is very tight when moved by hand after air is disconnected, or if it has serious looseness, it should be cleaned, lubricated, repaired, or replaced. If the linkage has excessive play, the nozzle position may change every cycle, causing unstable pickup.
14. Correct Remote Troubleshooting Procedure
For users in areas without local technicians, remote troubleshooting must be structured. Otherwise, the technician may receive many videos but still cannot identify the key problem.
A good remote troubleshooting sequence is:
First, take an overview video of the machine, including the panel, air pressure gauge, feeding plate, nozzle, and machine model.
Second, switch to manual mode, remove all stones, and film the nozzle moving down slowly to its lowest point. Confirm whether it hits the plate.
Third, film a proper vacuum test using a light paper at the nozzle tip.
Fourth, film the feeding wheel rotating by hand with power off. Confirm whether it has hard jamming points.
Fifth, add only 20 to 30 stones and film the pickup point closely.
Sixth, film the nozzle picking up one stone from the plate.
Seventh, test on waste fabric and observe bonding strength, indentation, and fabric damage.
Eighth, adjust air pressure, flow control valves, nozzle height, MARKING, and bottom pad according to the result.
The key principle is single-system verification. Do not test everything at once. Do not run Auto mode while also changing panel parameters, adding many stones, and testing real fabric. If too many variables change together, the real cause cannot be identified.
15. Practical Troubleshooting Order
For combined symptoms such as nozzle failure, wheel jamming, stone pickup failure, fast movement, and fabric damage, the following order is recommended:
Confirm that the machine powers on and the panel can switch between Auto and Manual.
Stop Auto mode. Use Manual mode for all tests.
Inspect the nozzle for bending, blockage, looseness, and incorrect installation.
Remove all stones and check whether the nozzle hits the plate at its lowest point.
Perform a proper vacuum suction test with a light paper.
Clean the wheel and plate. Remove broken stones, dust, glue particles, and foreign objects.
Add only a small number of stones and check whether feeding is stable.
Align the nozzle with the stone pickup point.
Reduce main air pressure to a safe test level.
Adjust the pneumatic flow control valve to make the DOWN movement smooth.
Confirm that the nozzle can pick up one stone.
Test pressing on waste fabric.
If the fabric is damaged, reduce pressure, slow the down stroke, raise the lowest position, reduce MARKING, and use a soft support pad.
After all single tests are stable, run Auto mode for continuous testing.
This sequence avoids unnecessary part replacement and separates the fault into mechanical interference, vacuum failure, feeding instability, pneumatic impact, or process pressure problems.
16. Final Diagnostic Logic
Troubleshooting rhinestone setting machines should not be reduced to the question “Which part is broken?” In many cases, no major component is damaged. Instead, several small adjustments are wrong at the same time.
The nozzle may be new, but its height is wrong.
The plate may be the correct SS6-SS8 type, but the pickup point is not aligned.
The wheel may rotate, but it has hard spots.
The vacuum may seem present, but it has not been tested correctly.
The panel speed may be low, but the cylinder speed is not throttled.
The machine may finally place stones, but the air pressure and stroke are too strong, causing fabric damage.
Therefore, when the machine can move manually, feed stones, and pick stones, do not keep chasing main board faults or large replacement parts. When the fabric is cut by the stone, do not go back to blaming the needle or plate. At that point, the machine has entered process adjustment. The key settings are air pressure, down speed, press depth, MARKING, ultrasonic time, and bottom support.
For remote service, the most useful videos are not general machine videos. The most useful videos show the nozzle lowest point, vacuum suction, stone pickup point, wheel rotation, and fabric test result.
17. Conclusion
A rhinestone setting machine works through the coordination of nozzle, wheel, vacuum, cylinder, and pressing or ultrasonic bonding systems. A small error in any one part can make the whole machine appear “not working.” A one-millimeter nozzle offset can prevent stone pickup. Excessive air pressure can cut fabric. A slightly jammed wheel can cause unstable feeding. A fully open flow valve can make the cylinder hit like a punch press. Too much MARKING can damage delicate fabric.
The correct repair principle is:
Check mechanical position before electronics.
Use manual mode before Auto mode.
Test without stones before testing with stones.
Test with a few stones before filling the plate.
Confirm vacuum before adjusting feeding.
Confirm pickup before testing fabric.
Use waste fabric before production fabric.
For problems such as nozzle not working, wheel jamming, stone pickup failure, excessive speed, and fabric damage, the most effective solution is usually systematic adjustment rather than random part replacement. Clean the plate, align the nozzle, confirm vacuum suction, reduce air pressure, slow the cylinder, raise the press head slightly, reduce MARKING, and use a suitable soft pad under the fabric.
By following this logic step by step, most similar machines can be restored to stable operation without unnecessary replacement of the main board, linkage assembly, or other expensive parts.