
Vacuum equipment is widely used in laboratory instruments, thin-film deposition systems, gas analysis platforms, material processing equipment, surface treatment systems, semiconductor processes, leak testing devices, vacuum drying systems, and small research platforms. Although many vacuum systems appear mechanically simple, usually consisting of a mechanical pump, vacuum chamber, valves, flexible hoses, pressure sensors, pressure readouts, and several gas ports, the fault known as “unable to pump down” is one of the most common and most easily misdiagnosed problems in the field.
A typical symptom is that the vacuum pump starts normally, the equipment makes an operating sound, and the indicator lights on the control panel are illuminated, but the pressure reading does not decrease to the expected range. In some cases, the pressure remains at several hundred mbar, tens of kPa, or several hundred Torr. In other cases, the displayed value does not change at all. Sometimes the pressure drops slightly at first and then stops at an intermediate value. In some systems, the pump is clearly running, but the pressure remains close to atmospheric pressure.
When this happens, many operators immediately assume that the vacuum pump is faulty. However, field repair experience shows that pump failure is only one possibility. In many cases, the real problem is caused by valve position, gas line configuration, chamber sealing, sensor power supply, pressure readout channel selection, unit setting, range configuration, pneumatic valve actuation, or electrical interlock logic.
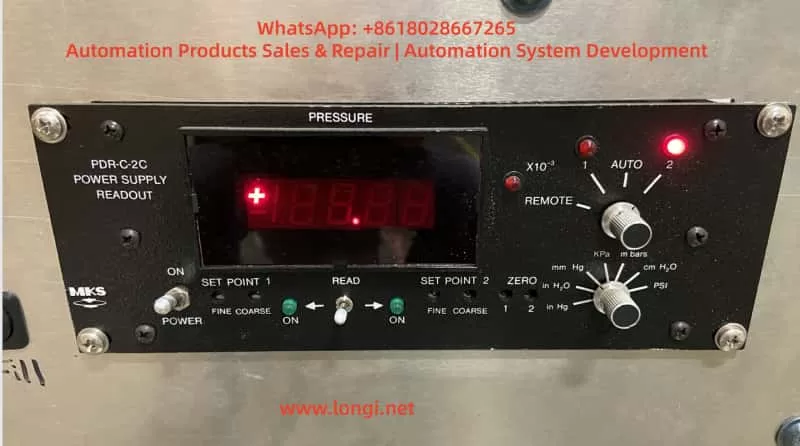
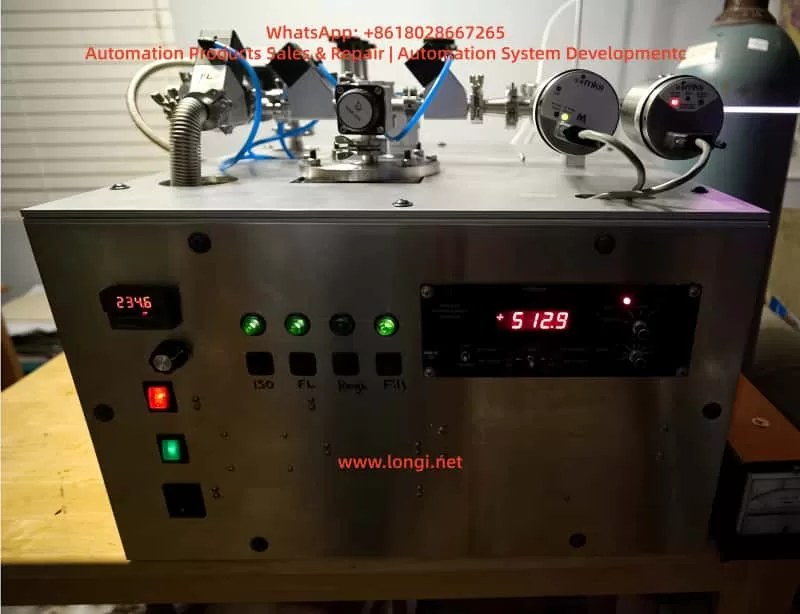
Taking a small vacuum system equipped with an MKS PDR-C-2C pressure readout, MKS capacitance manometer, Edwards/Trivac mechanical pump, several manual valves, and pneumatic valves as an example, if the front panel displays around “+512.9” and the system cannot continue pumping down, it is not correct to conclude directly that the vacuum pump is damaged. This reading may mean that the real chamber pressure is still around half an atmosphere. It may also be caused by an incorrect pressure readout channel, unclear unit selection, sensor power supply fault, signal wiring error, or a pressure gauge that is not actually connected to the active chamber volume. Vacuum faults must be diagnosed as system-chain problems, not as isolated component faults.
1. Basic Structure and Fault Chains in a Vacuum System
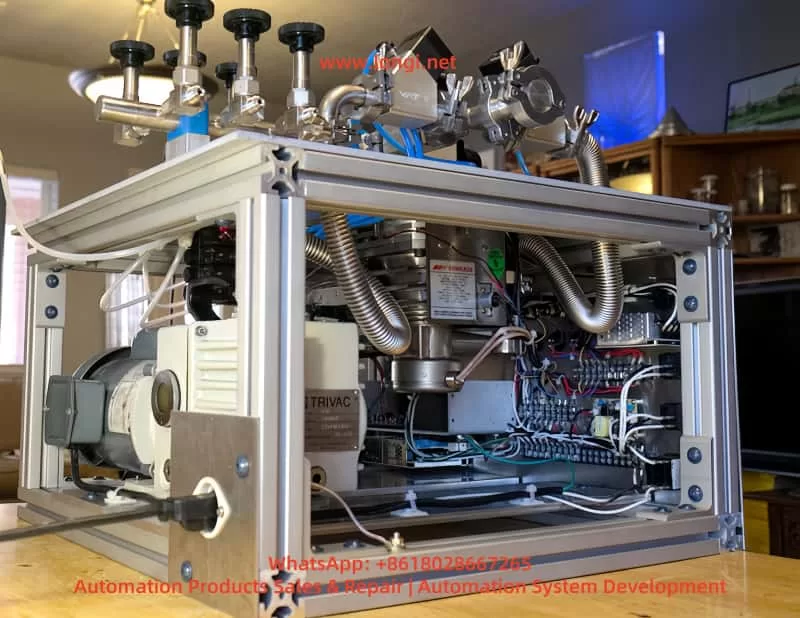
A typical small vacuum system usually consists of several functional sections.
The first section is the pumping unit. This may be an oil-sealed rotary vane mechanical pump, dry pump, diaphragm pump, scroll pump, or another roughing pump. In small laboratory systems, pumps from Edwards, Leybold, Pfeiffer, Alcatel, Busch, and similar manufacturers are common. The pump is responsible for bringing the chamber down from atmospheric pressure to the rough vacuum range. It is the basic pumping source of the system.
The second section is the chamber and piping. This includes the vacuum chamber, KF flanges, CF flanges, flexible bellows, hoses, blanking plates, centering rings, O-rings, viewports, feedthroughs, and various fittings. The chamber and piping determine whether the system can seal properly and whether the effective pumping speed of the pump can actually reach the chamber.
The third section is the valve system. This includes roughing valves, isolation valves, vent valves, process gas inlet valves, bypass valves, protection valves, and pneumatic valves. Valves determine whether the gas path is open or closed. Whether the pump is truly pumping the chamber does not depend only on whether the pump motor is running. It depends on whether the correct valves between the pump and the chamber are actually open.
The fourth section is the pressure measurement system. This includes capacitance manometers, Pirani gauges, thermocouple gauges, cold cathode gauges, ion gauges, pressure transducers, pressure readouts, and signal acquisition circuits. A pressure readout such as the MKS PDR-C-2C not only displays pressure, but also supplies power to the pressure sensor and receives its output signal. If the sensor wiring, power supply, range setting, channel selection, or unit selection is incorrect, the displayed pressure may not represent the real chamber pressure.
The fifth section is the control and interlock system. This includes power supplies, relays, PLCs, push buttons, indicator lamps, solenoid valves, compressed air supply, door switches, emergency stop circuits, water flow protection, and software control logic. In some systems, even if the pump is running, the main valve may not open because an interlock condition is not satisfied. The final symptom is still the same: the equipment cannot pump down.
Therefore, a vacuum pump-down failure is not a single-point problem. It is a complete system-chain problem. The correct diagnostic sequence should start with the question: Does the pump have basic suction capability? Then determine whether the pump is actually connected to the chamber. Then check whether the chamber leaks. Finally, verify whether the pressure reading is trustworthy.
2. An Abnormal Pressure Display Does Not Automatically Mean Pump Failure
The pressure display on most vacuum equipment comes from a pressure sensor, not directly from the pump. The number on the screen only proves that the measurement system is outputting a value. It does not prove the actual condition of the pump.
For example, an MKS PDR-C-2C pressure readout may have front-panel channel selection, unit selection, and range-related display functions. If the current display is CH2 but the actual pressure sensor is connected to CH1, the displayed number has little diagnostic value. If the unit selector position is unclear, the same number may represent mbar, kPa, mmHg, inHg, psi, or cmH2O. These units correspond to very different physical pressures.
If the panel displays “+512.9” and the unit is mbar, the pressure is approximately 512.9 mbar, which is close to half an atmosphere. For a normal mechanical pump connected to a small, sealed chamber, this is too high. Under normal conditions, the pressure should quickly decrease from atmospheric pressure to tens of mbar, a few mbar, or even lower. If the pressure remains around 500 mbar for a long time, the system may have a serious leak, a closed roughing valve, an open vent valve, disconnected gas path, weak pump, or faulty pressure measurement chain.
However, if the unit is not mbar, if the decimal point/range setting is wrong, or if the readout is displaying the wrong channel, the number “512.9” may be misleading. Repair personnel must always distinguish between real pressure and displayed pressure. Real pressure should be verified through pump inlet testing, an independent vacuum gauge, sectional pump-down testing, and pressure sensor analog output measurement. Displayed pressure must be verified by checking channel selection, unit setting, range setting, sensor power, and signal wiring.
3. The First Diagnostic Step: Check Whether the Mechanical Pump Can Pump
The first practical step in troubleshooting a vacuum system is to isolate and test the mechanical pump. This means temporarily disconnecting the pump from the full system piping and directly testing the pump inlet. This separates pump faults from system gas-line faults.
If the pump inlet is directly blanked off or connected to an independent vacuum gauge and still cannot produce a meaningful vacuum, the fault is likely inside the pump. Common mechanical pump problems include insufficient oil, emulsified oil, contaminated oil, worn vanes, damaged exhaust valve plates, stuck inlet valves, worn pump chamber, failed coupling, abnormal motor speed, incorrect motor rotation, and internal sealing failure.
For an oil-sealed rotary vane pump, oil quality is critical. The oil is not only a lubricant but also part of the sealing mechanism between the rotor and pump chamber. Darkened oil, emulsified oil, oil contaminated with solvent, water, or particles can seriously reduce ultimate vacuum.
If the pump inlet test is normal, the pump has basic pumping capability. At that point, the diagnostic focus should shift to the system gas path, valves, chamber sealing, and pressure measurement system. Many misdiagnoses happen because the pump inlet was never tested separately. A good pump may be wrongly judged as defective, leading to unnecessary oil changes, pump disassembly, or replacement, while the real fault is simply an open vent valve or a roughing valve that never opened.
The value of the pump isolation test is that it quickly defines the fault boundary. If the pump cannot pump at its own inlet, the pump is the issue. If the pump can pump at its inlet but not when connected to the equipment, the system is the issue. If the real system pressure is normal but the display is abnormal, the instrument chain is the issue.
4. Valve and Gas Line Errors Are High-Frequency Causes
In a multi-valve vacuum system, the fact that the pump is running does not mean that the chamber is being evacuated. The mechanical pump must be connected to the chamber through an open roughing path. If the roughing valve is closed, a pneumatic valve has not actuated, an isolation valve is blocking the measurement branch, or the vent valve is open, the pressure will not decrease correctly.
The roughing valve is the main valve between the mechanical pump and the chamber. If it is not open, the pump may only be evacuating a short section near the pump inlet while the main chamber remains close to atmospheric pressure. If the equipment panel shows a “Pump” indicator but the “Rough” valve has not actuated, the operator may believe the system is pumping down, while in reality the chamber is isolated.
The vent valve is another common source of failure. Its function is to introduce air or gas into the chamber when venting the system. If the vent valve is not fully closed, the mechanical pump will pump continuously while air enters the chamber. The pressure may drop slightly from atmospheric pressure but then stabilize at several hundred mbar or tens of kPa. Internal leakage of the vent valve can produce the same symptom: the handle appears closed, but the internal seal is worn, contaminated, or not seating correctly.
Process gas inlet valves can also be overlooked. Many vacuum systems have nitrogen, argon, air, oxygen, or other process gas ports. If an inlet valve is not closed, or if a regulator, needle valve, or mass flow controller leaks internally, gas continues entering the system and prevents proper pump-down.
Pneumatic valve systems add another layer of complexity. Vacuum systems with blue air tubes often use compressed air to actuate valves. A pneumatic valve needs both an electrical command and sufficient compressed air pressure. If compressed air is not connected, pressure is too low, an air tube is inserted incorrectly, the solenoid coil does not energize, or the valve spool is stuck, the valve will not physically open. The panel indicator may look normal, but the gas path may not switch as expected.
The key to diagnosing valve-related faults is to establish a gas path logic diagram. The pump inlet, roughing valve, main chamber, pressure sensor, vent port, process gas inlet, and exhaust path must all be identified. Without this logic diagram, randomly rotating valves or pressing buttons may make the system state even more confusing.
5. System Leaks Can Make Pressure Stop at an Intermediate Range
If the mechanical pump is normal and the gas path is open, but the pressure still cannot decrease properly, leakage becomes the main suspect. Leaks can be divided into large leaks and small leaks. A large leak usually prevents the system from entering the normal rough vacuum range. The pump remains under a high gas load, and the pressure stays at several hundred mbar, tens of mbar, or another intermediate value. A small leak usually allows the system to reach a lower pressure but prevents it from achieving the specified ultimate vacuum, or causes the pressure to rise too quickly after the pump is stopped.
Common leak points include chamber covers, O-rings, KF clamps, blanking plates, bellows, manual valves, pneumatic valves, feedthroughs, viewports, pressure gauge ports, and unused fittings. A displaced O-ring, dusty sealing surface, aged seal, loose flange, misaligned centering ring, or insufficient clamp force can all create a serious leak. On frequently opened laboratory equipment, missing or incorrectly installed seals are very common.
KF fittings require special attention. KF flanges seal through a centering ring, O-ring, and external clamp. If the centering ring is not centered, the O-ring is squeezed out, or the clamp is not fully tightened, the fault may not be obvious by visual inspection, but the system will not pump down. Any unused KF port without a blanking plate can become a direct large leak to atmosphere.
Bellows and hoses can also leak in hidden ways. Stainless steel bellows may fatigue and crack after repeated bending. Hose fittings may loosen after equipment movement. If the mechanical pump vibrates significantly, piping joints can gradually loosen over time.
The pressure gauge port itself may also be a leak source. Many pressure sensors are installed on chamber sidewalls or branch lines. If the sensor flange seal is poor, it can both distort the pressure reading and introduce a leak.
Leak checking should proceed from obvious to hidden and from large to small. A large leak does not require immediate helium mass spectrometer testing. Sectional blanking, staged pump-down, clamp inspection, O-ring reseating, unused port blanking, and gently pressing chamber covers while observing pressure response can locate many large leaks quickly. Helium leak testing or residual gas analysis is usually needed only after the system can reach a reasonable vacuum but still fails to meet its final specification.
6. The Pressure Sensor Location Determines Whether the Reading Is Meaningful
The measurement point in a vacuum system is critical. A pressure gauge does not necessarily measure the main chamber pressure. It measures the pressure at the location where it is installed. If there is an isolation valve, restriction, blocked line, or closed valve between the gauge and the chamber, the reading may not represent the chamber at all.
For example, if the pressure sensor is installed on a branch line and that branch valve is closed, the pressure readout may show only the trapped pressure in the sensor branch. The chamber may already be evacuated while the gauge reading remains unchanged. Conversely, the gauge branch may be evacuated while the main chamber remains at atmospheric pressure because the main valve is closed. This type of misdiagnosis is common in multi-valve systems.
Therefore, when pressure readings are abnormal, the sensor location must be confirmed. The pressure sensor must be connected to the active pumping path. One practical method is to open and close the relevant valve while observing whether the pressure reading responds immediately. If valve operation produces no pressure response, the sensor may not be connected to the active gas path, the gauge inlet may be blocked, the valve may not have moved, or the sensor may not be responding.
During repair, it is often useful to temporarily connect an independent vacuum gauge near the main chamber and compare it with the built-in MKS reading. If the independent gauge shows normal pump-down while the MKS reading does not change, the fault is probably in the pressure measurement chain. If both gauges fail to decrease, the problem is still in the pump, valves, or leakage.
7. Diagnostic Focus for the MKS PDR-C-2C Pressure Readout System
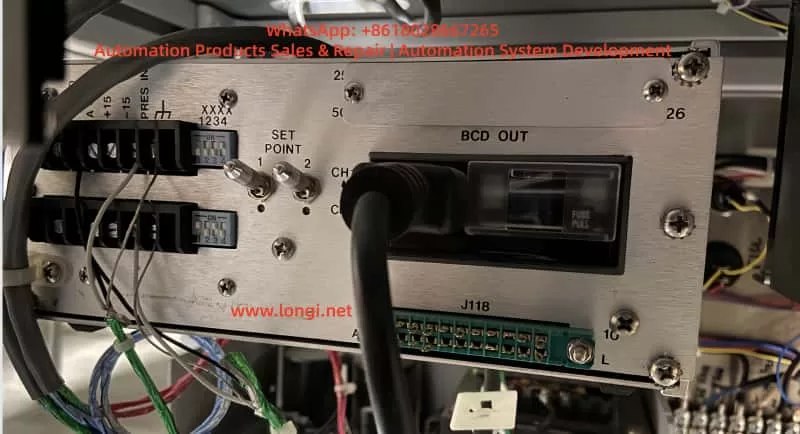
The MKS PDR-C-2C is a common pressure readout used with capacitance manometers. It normally supplies power to the pressure sensor and displays the returned pressure signal. Its rear connections may include positive and negative power, pressure signal input, analog ground, chassis ground, and channel-related wiring. The dual-channel version can read CH1 and CH2 pressure sensors. The front-panel channel selector, unit selector, and indicator lights directly affect the displayed value.
When diagnosing an MKS pressure measurement system, the following points should be checked carefully.
First, confirm the active display channel. If the CH2 indicator is lit, the display is reading the CH2 input. If the actual sensor is connected to CH1, the current reading may be invalid. During troubleshooting, the channel selector should be fixed to the channel that is actually wired. AUTO or REMOTE mode should not be used initially because it can create confusion.
Second, confirm the pressure unit. Pressure units may include mbar, kPa, mmHg, inHg, psi, and cmH2O. The same numerical value represents different physical pressures under different units. During diagnosis, one unit should be fixed, preferably mbar or kPa.
Third, confirm the range and decimal point settings. Rear-panel DIP switches or internal settings may be associated with sensor full-scale range and decimal display. If a 1000 Torr full-scale sensor is displayed using a setting intended for 10 Torr or 100 Torr, the numerical display will be wrong. The readout range must match the sensor range.
Fourth, measure the sensor power supply. Capacitance manometers usually require stable bipolar power. Loss of +15 V or -15 V can cause abnormal output. Low voltage, excessive ripple, or poor grounding can also create drift or fixed readings.
Fifth, measure the pressure signal input. Many pressure transducers output a 0–10 V analog signal corresponding to 0 to full-scale pressure. The signal voltage should change between atmospheric pressure, pump-down, and venting. If the real pressure changes but the signal voltage remains fixed, the problem may be the sensor, wiring, or the gas path connected to the sensor.
Sixth, check signal ground and shielding. Analog pressure signals require a correct reference ground. A wrong ground, broken shield, or signal cable routed together with noisy power wiring can cause unstable, shifted, or fixed readings.
Seventh, check the readout itself. Older PDR readouts may suffer from aged power supply capacitors, oxidized terminals, poor channel switch contacts, damaged input amplifiers, display board faults, DIP switch contact problems, and cracked solder joints. If the sensor output voltage is normal but the display does not follow the signal, the readout electronics should be investigated.
The key principle is that the displayed number is only the final result. Sensor power and analog signal voltage are the real evidence for determining whether the pressure measurement chain is functioning.
8. What It Means When Pressure Stops Around 500 mbar
A pressure reading that remains around 500 mbar is diagnostically useful. It indicates that the system is not completely unchanged, but that pumping capacity and gas load may have reached an equilibrium. Common causes include the following.
The roughing path may be restricted. A roughing valve may be partly open, a valve spool may be stuck, a line may be blocked, an inlet filter may be clogged, or the pump inlet may be restricted. The pump is running, but the effective pumping speed at the chamber is too low.
A vent or inlet path may not be closed. A partially open vent valve, leaking process gas inlet valve, open needle valve, or leaking mass flow controller can continuously introduce gas and stabilize pressure at an intermediate level.
The chamber may have a large leak. A damaged O-ring, loose clamp, missing blanking plate, cracked bellows, or leaking viewport can make the pump continuously draw in air.
The mechanical pump performance may be degraded. Emulsified oil, worn vanes, damaged valve plates, or internal pump leakage can allow the pump to create some negative pressure but prevent further pressure reduction.
The pressure sensor display may be wrong. Incorrect channel selection, unclear unit setting, wrong decimal point setting, signal wiring error, or a fixed sensor output can make the readout appear stable at a misleading value.
A pneumatic valve may not be actuating. The control system may start the pump, but the main valve may not open, so the pump is not actually evacuating the chamber.
An equipment interlock may not be satisfied. Door switches, emergency stop circuits, air pressure switches, water flow switches, cooling conditions, temperature protection, or cover position sensors may prevent the main valve from opening. The equipment may enter only a partial pumping state.
Therefore, a value near 500 mbar does not directly identify one failed component. It indicates either an imbalance between pumping and gas load or a measurement-chain abnormality. Further isolation is required.
9. A Standard Diagnostic Procedure
A systematic procedure for vacuum equipment that cannot pump down should include the following steps.
First, record the initial state. This includes pressure value, pressure unit, channel selection, valve positions, button status, pump sound, pump oil condition, compressed air pressure, and any alarms. The more complete the initial record, the more accurate the diagnosis.
Second, isolate and test the mechanical pump. Disconnect the pump from the equipment and test vacuum directly at the pump inlet. If the pump cannot create vacuum at its own inlet, repair the pump first. If it can, proceed to the system.
Third, inspect the main pumping path. Confirm that the pipe between the pump inlet and chamber is connected, the roughing valve is open, isolation valves are in the correct position, and pneumatic valves actually actuate.
Fourth, close all gas inlet paths. This includes vent valves, process gas inlets, bypass valves, relief valves, and unused ports. All unused ports should be blanked off.
Fifth, perform staged pump-down testing. Pump down the shortest line first, then the line after the valve, then the chamber. Observe the pressure change each time a new section is added. If pressure becomes abnormal after adding a section, focus on that section’s valve, seal, and piping.
Sixth, check chamber sealing. Inspect O-rings, clamps, flanges, blanking plates, viewports, feedthroughs, bellows, and pressure gauge ports. Frequently opened parts should be checked first.
Seventh, verify the pressure measurement system. Confirm the gauge location, readout channel, unit, range, sensor power supply, and signal voltage. Use an independent vacuum gauge for comparison if possible.
Eighth, check electrical and pneumatic interlocks. Confirm solenoid valve power, compressed air supply, valve movement, and interlock conditions. For PLC-controlled equipment, input and output states should also be checked.
Ninth, perform fine leak testing if required. If the system reaches a partial vacuum but cannot meet specification, use alcohol testing, helium leak detection, residual gas analysis, or pressure rise testing.
The core of this procedure is to identify the main fault direction before replacing parts. The pump, gas path, sealing system, and measurement chain must be verified separately.
10. Judging and Handling Mechanical Pump Faults
The mechanical pump may indeed be the source of failure. If the pump cannot create sufficient vacuum at its own inlet, the pump itself should be inspected.
Oil problems are the most common. Low oil level reduces sealing and lubrication. Excessive oil level may cause backstreaming and exhaust problems. Dark, emulsified, solvent-contaminated, or particle-contaminated oil reduces ultimate vacuum. For oil-sealed rotary vane pumps, regular oil replacement is basic maintenance.
Worn vanes reduce sealing inside the pump chamber. The pump may still sound normal, but pumping speed and ultimate pressure decrease. Pumps used with dust, vapor, or corrosive gas are more likely to suffer accelerated vane and chamber wear.
Damaged exhaust valve plates affect compression and exhaust operation. Aged, deformed, carbonized, or contaminated valve plates can reduce pump performance.
A clogged inlet filter reduces effective pumping speed. Some systems use inlet filters or traps before the pump. If these are contaminated or blocked, the pump itself may be good but the system cannot evacuate efficiently.
Incorrect motor rotation should also be checked. Three-phase pumps can rotate in the wrong direction if phase sequence is incorrect, especially after motor replacement, power rewiring, or equipment relocation.
Internal leakage or aged seals can prevent the pump from reaching ultimate pressure. In this case, seal kits, vanes, valve plates, or pump-head repair may be required.
11. Judging and Handling Chamber and Line Leaks
If the pump is normal, leakage is one of the most likely system faults. Leak handling should start with simple checks.
All recently disassembled KF fittings should be rechecked. Confirm that the centering ring is present and properly seated, the O-ring is not cracked, flattened, contaminated, or displaced, and the clamp is evenly tightened.
All unused ports should be blanked. A single open port is enough to prevent the entire system from establishing vacuum.
Chamber cover seals should be inspected. Dust, metal chips, scratches, or adhesive residue on the sealing surface can prevent the O-ring from seating. The sealing surface should be cleaned and the O-ring replaced if necessary.
Bellows should be inspected for cracks and loose fittings. Suspicious bellows can be temporarily isolated with blanking plates to see whether pressure improves.
Valve internal leakage can be tested by blanking both sides or testing each valve separately. If a closed valve still allows significant gas flow, the seat, poppet, or seal has failed.
Viewports and feedthroughs deserve attention. Glass, ceramic, and electrical feedthrough seals can leak after aging or mechanical stress.
For leaks that are not visually obvious, alcohol or isopropanol may be used as a rough diagnostic aid. While the system is under vacuum, applying a small amount near a suspected seal may produce a pressure response if the location leaks. For high-requirement systems, helium leak detection should be used.
12. Electrical Interlocks and Pneumatic System Checks
Modern vacuum equipment often uses electrical controls to operate valves. Pump operation is only one condition. Whether the main valve opens may depend on multiple interlocks.
Compressed air pressure must be checked in pneumatic valve systems. Many pneumatic valves require a minimum air pressure to switch. If pressure is too low, the valve may remain in its default position. A panel lamp does not prove that the valve has opened.
Solenoid valve power should be measured. A dead coil, loose connector, failed PLC output, or broken cable can prevent valve actuation.
The valve spool may be stuck. Solenoid valves and pneumatic valves that have not operated for a long time may stick due to contamination, corrosion, or seal aging. The coil may be energized and air pressure available, but the valve still does not switch.
Interlock inputs should be confirmed one by one. Door switches, emergency stop buttons, water flow switches, air pressure switches, temperature protection, and cover position switches can all prevent the main valve from opening. Some equipment allows the pump to start but blocks chamber evacuation.
Relays and terminals should also be inspected. In older equipment, oxidized relay contacts, loose terminals, missing wire labels, and poor connector contact are common. Such faults may appear intermittently.
Electrical diagnosis must be combined with actual valve movement. Looking only at control panel lights is not enough. The physical valve position must be confirmed.
13. Repair Logic for Pressure Measurement System Faults
When the mechanical pump and gas path are normal but the pressure display remains abnormal, the pressure measurement system should be investigated.
First, confirm sensor type and range. Capacitance manometers, Pirani gauges, and thermocouple gauges operate differently and have different output signals and pressure ranges. If the readout configuration does not match the sensor, the display will be wrong.
Second, confirm the power supply. MKS-style capacitance manometers usually require stable supply voltage. Loss or deviation of power directly affects output. If the readout power returns to normal after disconnecting the sensor, the sensor may be shorted or overloaded.
Third, check the signal voltage. As pressure changes from atmosphere to vacuum, the sensor output voltage should change. If the voltage stays at 0 V, full-scale, or an intermediate fixed value, determine whether the sensor is faulty, the wiring is open, the inlet is blocked, or the sensor is isolated from the chamber.
Fourth, inspect the readout input channel. Dual-channel equipment requires correct CH1/CH2 identification. Wrong input wiring, wrong channel selection, or poor channel switch contact can all cause incorrect display.
Fifth, inspect the display board and analog circuit. The readout’s internal power supply, capacitors, operational amplifiers, DIP switches, terminal solder joints, and display driver can all fail with age. If the sensor output voltage is normal but the display does not follow it, the readout itself should be repaired.
The central method is signal tracing. Start at the pressure sensor output, follow the signal into the readout input, then through the amplifier and display circuit. The point where the signal becomes abnormal defines the fault area.
14. Common Misdiagnoses in Vacuum Equipment Repair
Several misdiagnoses are especially common.
The first is treating pump noise as proof of vacuum. A running motor only proves that the motor is turning. It does not prove the pump is healthy or connected to the chamber.
The second is treating the displayed pressure as the real pressure. Pressure display depends on the sensor, wiring, channel, unit, and range. An abnormal display does not always mean abnormal real pressure.
The third is checking the pump while ignoring valves. Many failures are caused by a closed valve, leaking vent valve, or inactive pneumatic valve, not by the pump.
The fourth is trusting panel lamps without confirming valve movement. A lamp may indicate a command, not the completion of the mechanical action.
The fifth is ignoring unused ports and blanking plates. One open fitting can prevent the entire system from pumping down.
The sixth is ignoring pressure gauge location. If the gauge is isolated by a valve, its reading does not represent chamber pressure.
The seventh is failing to perform staged pump-down testing. When a full system cannot pump down, the system must be divided into sections. Otherwise, leak points and blocked paths are difficult to locate.
Avoiding these mistakes requires treating the vacuum system as several linked functional chains, not reducing every problem to the pump or the sensor.
15. Conclusion
Failure to pump down is a typical system-level fault in vacuum equipment. It may be caused by degraded mechanical pump performance, but it may also be caused by a closed valve, leaking vent valve, chamber seal failure, inactive pneumatic valve, abnormal pressure sensor power supply, incorrect readout channel selection, or unsatisfied electrical interlock. In systems equipped with an MKS PDR-C-2C readout, MKS capacitance manometer, multiple valves, and a mechanical pump, the pressure value on the front panel alone is not enough to identify the failed component.
The correct diagnostic method follows a clear sequence. First, isolate and test the mechanical pump to confirm its basic pumping capability. Second, inspect the main pumping path between the pump and chamber and verify actual valve positions. Third, check the chamber, flanges, O-rings, blanking plates, bellows, and valves for leakage. Fourth, verify the pressure measurement system, including channel, unit, range, sensor power supply, and analog output signal. If the equipment uses pneumatic valves and interlock control, compressed air supply, solenoid valves, and interlock conditions must also be confirmed.
For repair personnel, the key is not to assume that a running pump means proper vacuum, and not to assume that an abnormal display means a faulty sensor. The pumping chain and measurement chain must be verified separately through isolation, staged testing, comparison, and electrical measurement. Only then can the fault be accurately located in the pump, valve system, leakage path, pressure sensor, readout electronics, or control system. This approach reduces unnecessary part replacement, avoids repeated misdiagnosis, and improves the efficiency and accuracy of vacuum equipment repair.