
Introduction
The Blue Sea Huateng V5-H series of high-performance vector control inverters is widely used in industrial applications such as water pumps, fans, conveyors, and machine tools due to its high precision and reliability. However, during long-term operation, two specific issues frequently challenge maintenance personnel: the E.rEF (Reference Comparison Abnormality) fault and the LOC1 (Keypad Lock) state.
The E.rEF fault causes the inverter to shut down immediately, while LOC1 locks the operation panel, preventing parameter access and severely impacting production efficiency. This article combines the Blue Sea Huateng V5-H User Manual, practical maintenance case studies, and electronic circuit principles to provide an in-depth analysis of the causes, troubleshooting procedures, and solutions for these two issues.
Chapter 1: The Nature and Core Causes of the E.rEF Fault
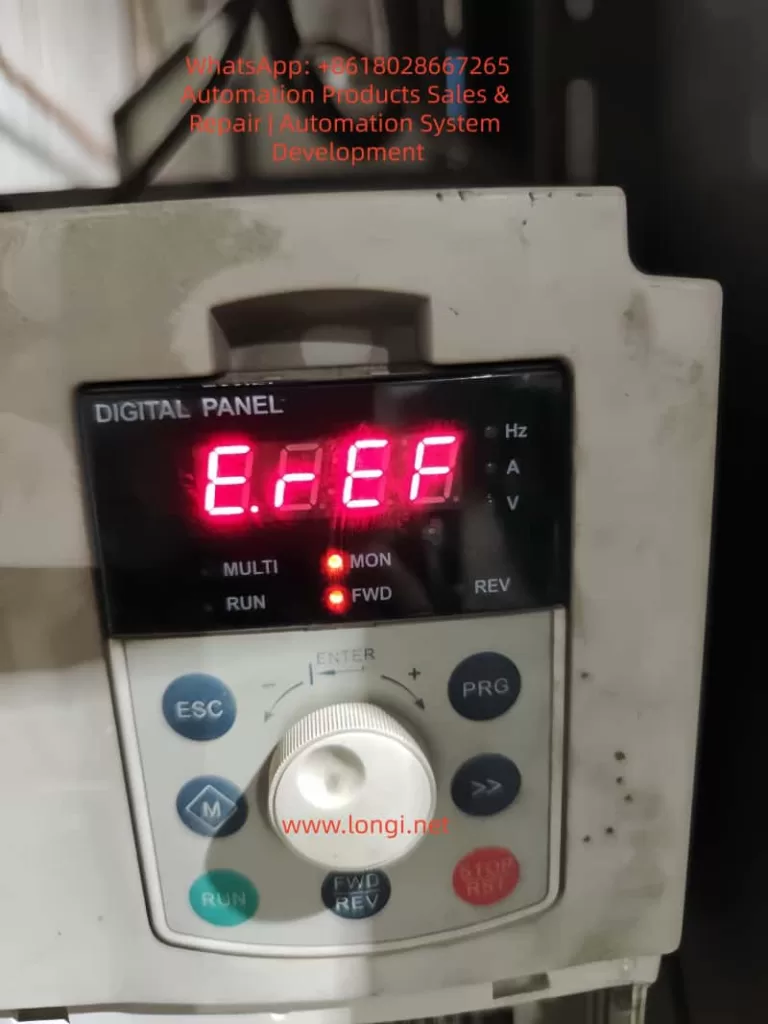
According to the Blue Sea Huateng V5-H High-Performance Vector Control Inverter User Manual (hereinafter referred to as “the Manual”), the E.rEF fault code corresponds to “Reference Comparison Abnormality.” This is a hardware-level fault that requires the inverter to be stopped for inspection.
1.1 Causes Defined in the Manual
The manual explicitly lists three core causes for E.rEF (ranked by probability):
- Internal Switching Power Supply Abnormality (approx. 50%): Unstable or missing reference voltage (5V, 15V) causes the control circuit’s reference signal to be incorrect.
- Signal Sampling/Comparison Circuit Abnormality (approx. 30%): Errors in current/voltage sampling signals, or damage to the comparison circuit (op-amps, reference sources).
- Internal Connector Looseness (approx. 20%): Loose wiring between the control board, power board, and drive board causes signal transmission interruption.
1.2 Fault Logic Chain Analysis
The control core of the inverter is the CPU (e.g., ARM or DSP). Its operation relies on a stable reference voltage (e.g., 5V for CPU power supply, 2.5V as a reference for the comparison circuit) and accurate sampling signals (e.g., motor current, DC bus voltage).
When the reference voltage is abnormal, sampling signals are “misjudged.” For example, if the 5V reference drops to 3V, a 1V current sampling signal will be interpreted by the CPU as 1.67V (1V/3V×5V). If this exceeds the threshold, the E.rEF protection mechanism is triggered.
Chapter 2: Step-by-Step Troubleshooting for E.rEF (Simple to Complex)
Troubleshooting E.rEF must follow the principle of “External before Internal, Simple before Complex” to avoid secondary damage from blind disassembly.
2.1 Step 1: Power-Off Internal Connection Check (Most Common Cause)
Scenario: Long-term vibration (pumps, fans) or humid environments cause internal wiring to loosen or oxidize.
Tools: Screwdriver, 95% Alcohol, Tweezers.
Procedure:
- Power Off & Discharge: Disconnect input power (L1/L2/L3) and wait 5 minutes. Use a multimeter to verify the voltage between P+ and N- is <36V.
- Open Cover: Remove screws (check for hidden screws under heat sinks).
- Inspect Ribbon Cables: Locate connectors (CN1, CN2, CN3) between the Control Board, Power Board, and Drive Board.
- Gently reseat ribbon cables to ensure they are not loose.
- If gold fingers are oxidized (blackened), clean with an alcohol swab.
- Secure Cables: Use cable ties to fix ribbons to the board to prevent re-loosening due to vibration.
2.2 Step 2: Power-On Switching Power Supply Test (Critical Step)
If reseating cables fails, test the Power Board output voltages. Reference voltage anomalies are the core cause of E.rEF.
Tools: Multimeter (FLUKE 15B+ recommended), Oscilloscope (optional for ripple).
Test Points & Normal Ranges (380V Input Example):
| Test Point | Normal Range | Consequence of Abnormality |
|---|---|---|
| +5V / GND | 4.8V – 5.2V | CPU & Sampling Circuit Reference Error |
| +15V / GND | 14V – 16V | Op-Amp & Comparison Circuit Failure |
| +24V / GND | 22V – 26V | Relay & Fan Failure |
| DC Bus (P+/N-) | 513V – 567V | Rectifier/Filter Capacitor Failure |
Operation:
- Power on (motor disconnected). Set multimeter to DC Voltage.
- Measure outputs. If 5V is abnormal (<4.5V or >5.5V), the 5V switching circuit has failed.
- Check: Filter capacitors (bulging/leaking?), Switching MOSFET (short circuit?), PWM Controller (e.g., UC3842).
- If all outputs are 0V, the main rectifier circuit has failed (rectifier bridge shorted, main capacitor blown).
2.3 Step 3: Signal Sampling Circuit Inspection
If power supply is normal, check the sampling circuits.
2.3.1 Current Sampling (Hall Sensor)
Principle: Hall sensor outputs voltage proportional to motor current (e.g., 10A = 1V).
Detection:
- Disconnect motor wires.
- Locate the Hall sensor on the drive board.
- Measure output voltage (OUT to GND):
- Static: 0V (Normal).
- Dynamic: 0-5V depending on load.
- Fault: 0V (Sensor dead) or 5V (Sampling resistor open). Replace the Hall sensor or the 0.1Ω/5W sampling resistor.
2.3.2 Voltage Sampling (DC Bus)
Principle: High voltage is divided by resistors (e.g., 100kΩ and 10kΩ) to a low voltage for the CPU.
Detection:
- Measure voltage across the lower divider resistor (R2).
- Fault: 0V (R1 open) or Abnormally High (R2 shorted). Replace the respective resistor.
2.4 Step 4: Comparison Circuit & Reference Source (Advanced)
If sampling is normal, check the comparison circuit (Op-Amps like LM358).
Tools: Oscilloscope.
Detection:
- Reference Source (TL431): Measure cathode voltage. Should be 2.5V ±1%. If not, replace TL431.
- Op-Amp (LM358):
- Input: IN+ (Sampling Signal), IN- (2.5V Reference).
- Output: High (5V) if Signal > Reference; Low (0V) if Signal < Reference.
- Fault: If inputs are correct but output is stuck Low/High, replace the Op-Amp.
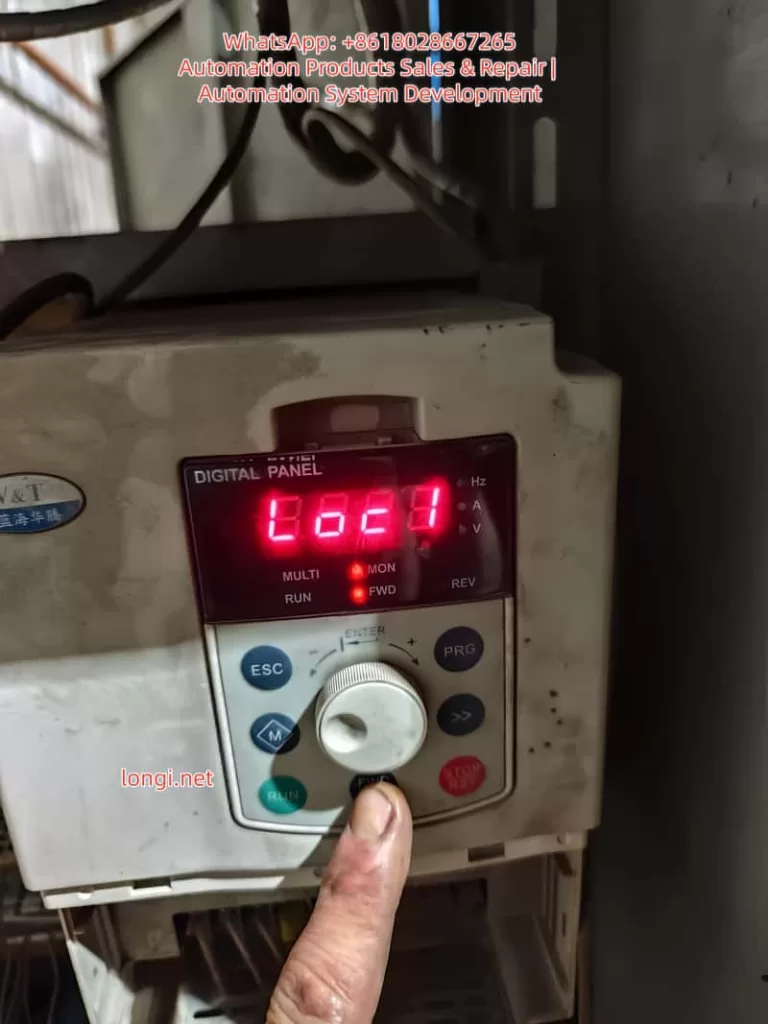
Chapter 3: LOC1 Keypad Lock: Causes and Unlocking
LOC1 indicates the Keypad Lock State (Parameter P2.00 = 1). All keys except RUN/STOP are disabled to prevent accidental parameter changes.
3.1 Trigger Scenarios
- Accidental Operation: Pressing the specific key combination.
- Parameter Setting: P2.00 was mistakenly set to 1.
- Panel Fault: Keypad short circuit.
3.2 Standard Unlocking Method (Per Manual)
According to Manual Section 4.6, the LOC1 Unlock Combination is:
Simultaneously press 「ESC」 + 「Jog Wheel Counter-Clockwise」 + 「◄ Key」
(Note: If no ◄ key, try PRG or M key)
Step-by-Step Operation:
- Power on (Display shows LOC1).
- Hold ESC (top left) with left thumb.
- Hold the Jog Wheel with right index finger and rotate Counter-Clockwise (towards “-“).
- Hold the ◄ Key (left direction key) with right middle finger. If unavailable, try PRG.
- Hold all three for 3-5 seconds until the display changes from “LOC1” to “8888” or operation parameters.
- Release. Verify keys are responsive.
3.3 Disabling the Lock (Modifying P2.00)
After unlocking, change P2.00 to 0 to prevent recurrence.
- Press PRG to enter the menu.
- Rotate to find P2.00 (Keypad Lock Setting).
- Press ENTER, change value from 1 to 0, and confirm.
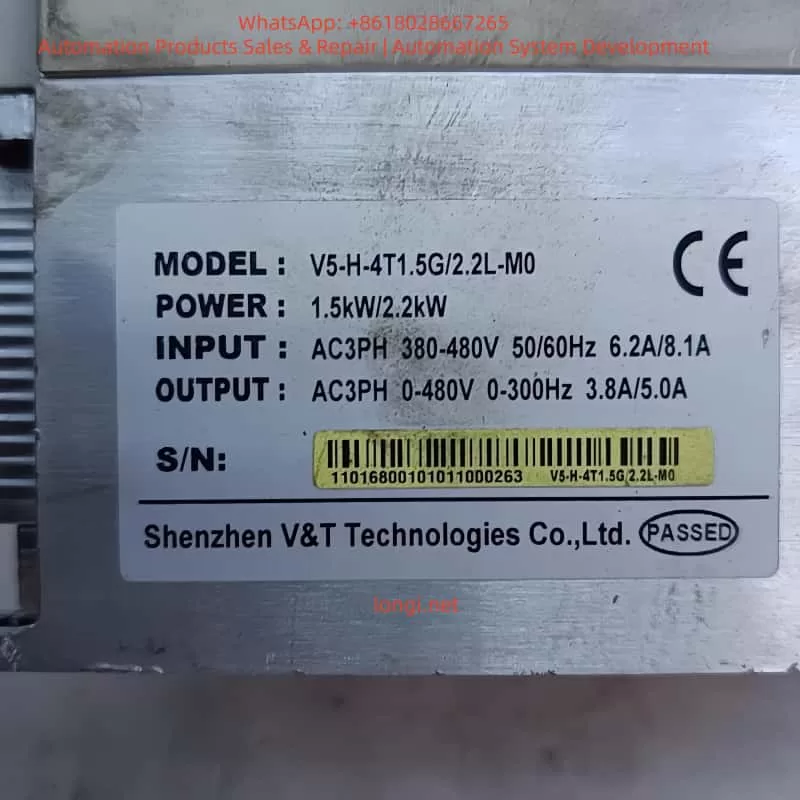
Chapter 4: Case Study: V5-H-4T1.5G Maintenance Process
4.1 Fault Phenomenon
A V5-H-4T1.5G inverter (1.5kW, 380V) driving a conveyor belt tripped with E.rEF. The panel showed LOC1, preventing menu access.
4.2 Troubleshooting Process
- Step 1: Reseated CN1 ribbon cable between Control and Power boards. Fault persisted.
- Step 2: Measured power supply. 5V was only 3.2V (Normal: 4.8-5.2V). 15V and 24V were normal.
- Step 3: Inspected Power Board. Found the 470μF/25V filter capacitor for the 5V rail was bulging and leaking.
- Step 4: Replaced the capacitor. Power-on test showed 5V = 5.1V. E.rEF cleared.
- Step 5: Performed unlock: ESC + Counter-Clockwise Rotation + PRG Key for 5 seconds. Display switched to “8888”.
- Step 6: Entered menu, changed P2.00 from 1 to 0. LOC1 disappeared.
4.3 Result
The inverter restarted successfully. Running current was 1.1A (Rated: 1.5A). No faults recurred in 3 months of follow-up.
Chapter 5: Preventive Maintenance
5.1 Environmental Maintenance
- Installation: Ensure good ventilation and dryness (0-40°C, <80% RH). Avoid direct sunlight.
- Heat Dissipation: Clean dust from heat sinks every 3 months using compressed air. Add cooling fans if ambient temp > 30°C.
5.2 Connection Checks
- Internal: Check ribbon cables (CN1, CN2) every 6 months. Secure with cable ties.
- External: Tighten power (L1/L2/L3) and motor (U/V/W) terminals regularly.
5.3 Parameter Management
- P2.00 Setting: Avoid setting P2.00=1 unless necessary.
- Backup: Backup parameters using the panel or Blue Sea Huateng software (V5-H Programmer).
5.4 Periodic Testing
- Power Supply: Test 5V/15V/24V outputs annually.
- Sampling Circuit: Test Hall sensors and resistors biennially.
Chapter 6: Frequently Asked Questions (Q&A)
Q1: Can E.rEF be cleared by resetting?
A: No. E.rEF is a hardware fault. You must repair the underlying issue (power supply, sampling, etc.) before it clears. Pressing STOP/RST will not work.
Q2: I can’t enter the menu due to LOC1. What should I do?
A: You must use the unlock key combination defined in the manual. If it fails, the keypad panel may be faulty and need replacement.
Q3: Can I repair the power board myself if 5V is abnormal?
A: If you have electronics experience, check common failure points: filter capacitors, switching MOSFETs, and PWM controllers (UC3842). If inexperienced, replacing the entire power board is safer and often more cost-effective.
Q4: How do I quickly diagnose a sampling circuit fault?
A: Use a multimeter to measure the sampling voltage:
- If voltage is 0V or full scale (5V), the sampling circuit (Hall sensor/resistor) is dead.
- If voltage is normal but E.rEF persists, the comparison circuit (Op-Amp/Reference) is faulty.
Conclusion
The E.rEF fault and LOC1 lock on Blue Sea Huateng V5-H inverters are common but manageable. By mastering the “Simple to Complex” troubleshooting logic—checking ribbons first, then power supply, then sampling/comparison circuits—and proficiently using the manual unlock combination, technicians can restore equipment quickly.
Key Takeaways:
- E.rEF is usually caused by unstable reference voltage or sampling errors. Prioritize checking the power board and internal connections.
- LOC1 is solved by the specific key combination. Always set P2.00 = 0 after unlocking to prevent recurrence.
- Preventive maintenance (dust cleaning, cable tightening, voltage checks) is the best way to avoid downtime.