
In the repair of precision magnetic field measurement instruments, the most difficult faults are often not complete power failure or total display loss, but rather those deceptive conditions in which the instrument appears partially functional while the core measurement chain has already failed. The Lake Shore 475 DSP Gaussmeter is a typical example of this category. The main unit may power up normally, the display may work, the keys may respond, and the probe serial number may even be readable, yet in actual DC measurement the instrument may show almost no meaningful response when a magnet is brought near the probe.
This article presents a full technical reconstruction of a real repair case involving a Lake Shore 475 DSP Gaussmeter. It covers the fault symptoms, probe interface logic, host-side Hall excitation chain, front-end signal chain, the role of the key devices, common misjudgments, the actual step-by-step troubleshooting logic, and the final repair result. The purpose is not to repeat general Hall probe theory, but to provide a practical and technically rigorous troubleshooting path that a third-party technician can actually use.
1. Fault Summary: The Instrument Recognizes the Probe, but Measurement Is Nearly Dead
The initial symptom was not total failure. That is exactly what made the fault difficult.
The unit showed the following behavior:
- The gaussmeter powered up normally.
- The display and keypad worked normally.
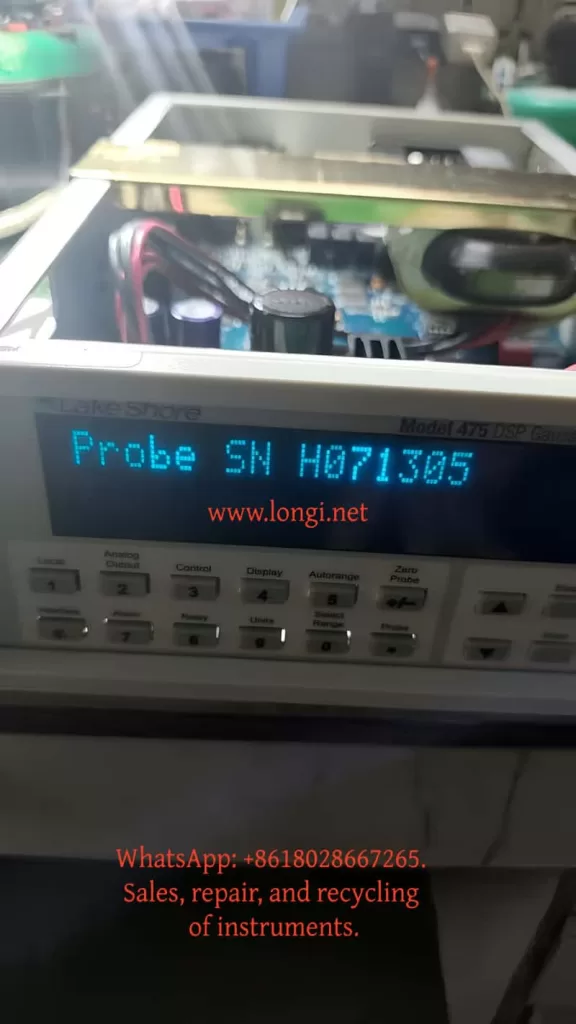
- The instrument could display the probe serial number when the Probe function was used.
- However, in DC mode, bringing a strong magnet close to the probe produced almost no meaningful response.
- The reading only showed tiny fluctuations near zero.
- Earlier testing suggested that in Peak mode, rapid motion of the magnet across the probe could occasionally produce a visible change, but in DC mode the response was effectively absent.
This combination is misleading. If one focuses only on the fact that the probe serial number can be read, it is easy to assume that the probe and host communication are fundamentally healthy. If one focuses only on the lack of DC response, it is easy to assume that the Hall probe itself is defective. In this case, neither assumption was sufficient.
The final repair result showed that the problem was not simply a bad probe and not merely an EEPROM recognition issue. The real fault was in the host-side Hall excitation servo chain, which allowed the probe to be recognized while preventing the proper Hall current excitation and measurement loop from being established.
2. Why This Fault Is Easy to Misdiagnose
This type of Lake Shore 475 fault encourages three common misjudgments.
2.1 Misdiagnosis as a Bad Probe
The most visible symptom is simple: “the magnet approaches the probe, but the reading barely changes.” Without another host unit for comparison, many technicians would immediately conclude that the probe is defective. In this case, however, the probe had already been tested on another Lake Shore 475 and was confirmed to be good. That forced the analysis back into the host unit.
2.2 Misdiagnosis as an EEPROM or Probe Identification Problem
The probe connector contains a memory device, and it is natural to suspect that a parameter-reading problem might prevent measurement. But the host could stably display the probe serial number. That means the probe identification path was largely intact. Identification and measurement are not the same subsystem.
2.3 Misdiagnosis as a Hall Voltage Amplifier Failure
Because the blue and yellow probe leads carry a very small Hall voltage, and because they do indeed go into low-noise front-end amplifiers such as LT1028-class devices, it is tempting to suspect that the Hall voltage amplification chain is dead. But if the Hall current excitation chain is not functioning, the Hall voltage chain can be perfectly healthy and still receive no meaningful signal. Excitation must be verified before the voltage amplification path can be judged.
3. Probe Interface Logic: Hall Current Pair and Hall Voltage Pair Must Be Distinguished
The first major turning point in troubleshooting was correctly identifying the physical meaning of the probe leads.
A Hall probe contains two critical electrical pairs:
- Hall control current terminals (Ic+ / Ic−)
- Hall voltage output terminals (VH+ / VH−)
Both pairs may show low resistance, so resistance alone cannot determine which pair is the excitation pair and which pair is the sensing pair. The distinction must be made by combining connector definitions, board tracing, and circuit behavior.
Through board-level tracing, pin mapping, and correlation with the probe documentation, the following relationships were established:
- Red wire / connector pin 8 = Ic+
- Green wire / connector pin 15 = Ic−
- Blue wire / connector pin 1 = VH+
- Yellow wire / connector pin 9 = VH−
This was a decisive clarification because it fixed the direction of the rest of the troubleshooting process:
- Red and green are the Hall current excitation path
- Blue and yellow are the Hall voltage sensing path
If one mistakenly searches for the 5 kHz excitation waveform on the blue/yellow pair, a great deal of time can be wasted in the wrong part of the instrument.
4. DC Mode Versus Peak Mode: The Core Diagnostic Reference
One of the most important properties of the Lake Shore 475 is that the Hall excitation method changes depending on operating mode.
Under normal conditions:
- In DC mode, the Hall probe should receive 100 mA, 5 kHz square-wave excitation
- In Peak mode, the Hall probe should receive 100 mA DC excitation
This means that if the same excitation-related node is observed in both modes and no essential difference is seen, then the host’s excitation switching or servo system is almost certainly malfunctioning.
In this case, regardless of how the mode was changed, the critical excitation nodes never showed the expected distinction between “5 kHz in DC mode” and “DC in Peak mode.” Instead, a wrong high DC platform or a low-frequency sawtooth-like fluctuation under AC coupling was repeatedly observed. That was one of the strongest signs that the host-side excitation servo chain was failing.
5. Why “Probe Recognized” Does Not Mean “Probe Measurement Chain Is Healthy”
Many technicians instinctively treat “Probe SN is readable” as proof that the whole probe path is working. This is incorrect.
The probe identification chain and the probe measurement chain are separate.
Probe Identification Depends On
- Memory device
- Data line
- Clock line
- Digital power and ground
Probe Measurement Depends On
- Proper Hall excitation current
- Valid Hall voltage generation
- Correct excitation servo loop
- Proper front-end amplification and post-processing
In this case, Probe SN could be read, which proved the identification path was alive. But the near-total absence of DC response proved the measurement chain was not functioning. These two subsystems must always be analyzed separately.
6. Board-Level Tracing: The Real Value Is Not Guessing Parts but Understanding Who Drives What
The next key step was not to blindly replace devices, but to map the functional relationships in the host-side excitation loop.
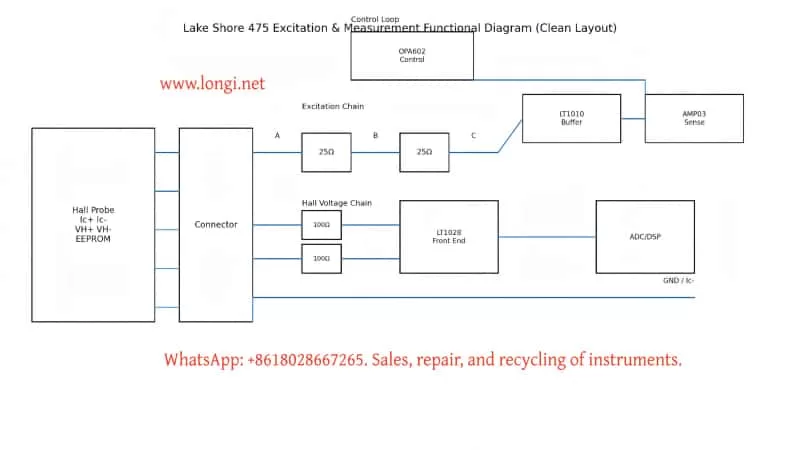
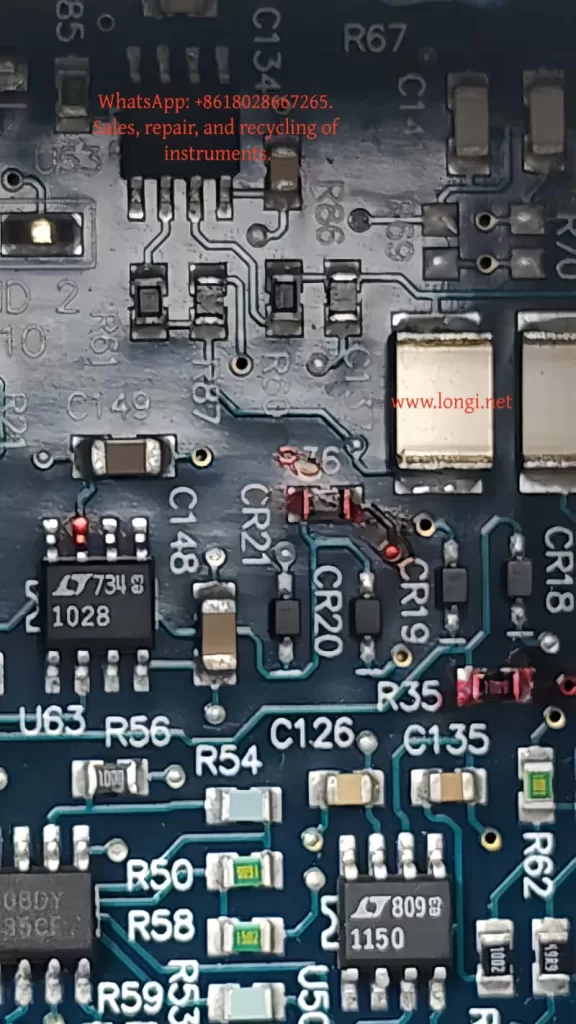
6.1 LT1028: Front-End Low-Noise Hall Voltage Amplification
The blue and yellow Hall voltage leads each passed through roughly 100-ohm resistors into LT1028-class amplifier inputs. That is a classic weak-signal front-end arrangement, not a 100 mA excitation driver. Therefore, the LT1028 side belongs to the Hall voltage measurement chain, not the primary excitation fault domain.
6.2 LT1010: Current Buffer / Output Driver
LT1010 is a high-speed, high-current buffer. It is well suited to serve as the stage that turns a control signal into actual excitation current. It is not just a “power filter.” It is a likely output actuator in the Hall excitation chain.
6.3 AMP03: Differential Detection / Sense / Feedback Core
AMP03 is not a simple op-amp. It is a precision unity-gain differential amplifier. Its pin 5 is SENSE, pin 6 is OUTPUT, and pin 1 is REFERENCE. This places it directly in the sensing and feedback portion of the excitation loop.
6.4 OPA602: Error Amplifier / Control Reference Generation
OPA602 pin 6 output was traced to AMP03 pin 1 REFERENCE, indicating that OPA602 participates in generating or modifying the control reference for the excitation servo loop. Later tracing showed that OPA602 inputs were tied through resistors and clamp diodes to Ic+ path nodes, which means it was not just an isolated external control source but part of the servo structure itself.
7. The A/B/C/D Node Method: Reducing a Complex Servo Chain to Measurable Potentials
To simplify the analysis, the Ic excitation path was abstracted into four nodes:
- Node A: Probe-side Ic+ output toward the red lead
- Node B: Midpoint between the left 25-ohm resistor group and the right 25-ohm resistor group
- Node C: Node after the right 25-ohm resistor group, connected to LT1010 pin 5 and AMP03 pin 5
- Node D: Ic− / AMP03 pin 2 / ground reference
With power off, the following were measured:
- A-B = 25 ohms
- B-C = 25 ohms
- A-C = 50 ohms
This proved that the resistor groups were intact and that A, B, and C were truly different nodes. This was essential, because only after confirming that these nodes are electrically distinct does voltage distribution analysis become meaningful.
8. Why “A, B, and C All at 13.6 V” Indicates Severe Abnormality
With power applied, the following were found:
- A = 13.6 V
- B = 13.6 V
- C = 13.6 V
- D = 0 V
This means the entire Ic+ bus—from probe excitation output through the driver node—was elevated to essentially the same high platform.
If the excitation chain were functioning normally, A, B, and C could not all be identical, because there are 25-ohm + 25-ohm resistive sections between them. The absence of any meaningful gradient means that the bus was being driven as a whole to an incorrect high level instead of forming the intended current drop.
This was a major diagnostic insight: the problem was not “which resistor has the wrong drop,” but “what is forcing the entire Ic+ bus high.”
9. Why OPA602 Could Not Be Blamed Too Early
A very natural suspicion was that the path from OPA602 pin 6 to AMP03 pin 1 was the source that elevated the whole bus. So a key isolation test was performed:
- The connection OPA602 pin 6 → AMP03 pin 1 was disconnected.
- Nodes A, B, and C still remained at approximately 13.3 V.
- However, the instrument displayed Invalid Probe.
This meant two things:
First
The OPA602 pin 6 to AMP03 pin 1 path was not the sole source driving the Ic+ bus high, because the high platform still existed after disconnection.
Second
That path was clearly involved in the instrument’s ability to validate or initialize the probe, because once it was disconnected the instrument no longer considered the probe valid.
Therefore, this path was important, but it was not the primary source of the bus-high condition.
10. The Decisive Test: Disconnecting LT1010 Pin 5 from Node C
The most decisive experiment was the following:
- Restore the OPA602 pin 6 to AMP03 pin 1 connection so that the probe is no longer invalid.
- Disconnect LT1010 pin 5 from node C.
- Re-measure A, B, and C.
The result was:
- A = 0 V
- B = 0 V
- C = 0 V
- The instrument again failed to establish normal probe status
This was close to decisive.
It proved:
The primary source that was elevating the Ic+ bus was on the LT1010 pin 5 side.
As soon as LT1010 pin 5 was isolated from node C:
- The previous high platform vanished
- A, B, and C all fell to zero
This was not a secondary effect. It directly demonstrated that the main drive source for the high bus platform was associated with LT1010 pin 5.
11. One More Critical Check: Measure LT1010 Pins with Pin 5 Already Isolated
To distinguish between “LT1010 is being driven high” and “LT1010 itself is faulty,” LT1010 pins were measured with pin 5 still disconnected from node C:
- Pin 1 = 5.8 V
- Pin 2 = +15 V
- Pin 3 = -15 V
- Pin 4 = 14 V
- Pin 5 = 13.3 V
This set of voltages was highly revealing.
If LT1010 were healthy as a current buffer/output stage, its output pin should not sit at 13.3 V while its input is only 5.8 V, especially when its output has already been disconnected from the external bus that was previously suspected of dragging it high.
This made the conclusion very strong:
Conclusion
LT1010 itself was highly abnormal, and its output stage was sitting at an erroneous high level.
12. Why OPA602 Was Also Replaced, and Why That Was Reasonable
Although LT1010 emerged as one of the clearest fault points, replacing OPA602 at the same time was still justified for several reasons.
12.1 OPA602 Was Part of the Excitation Servo Front End
Its input and output nodes were deeply involved in the same servo structure.
12.2 OPA602 Inputs Had Been Sitting at Abnormal High Voltage
Its pins 2, 3, and 6 had all been observed near 13.6 V for extended troubleshooting stages. Even if it was not the first failed device, it had clearly been operating at a wrong point in the loop.
12.3 In Tightly Coupled Analog Servo Systems, Replacing Strongly Coupled Core Devices Can Improve Repair Success
When parts are available and repeated disassembly is costly, replacing both the output buffer and the directly associated precision op-amp is often practical.
The final repair result confirmed this decision:
After LT1010 and OPA602 were replaced, the instrument showed clear response in DC mode.
13. Post-Replacement Result: DC Mode Regained Obvious Probe Response
After replacing LT1010 and OPA602, the instrument was tested again in DC mode with a magnet brought near the probe. This time, the reading showed an obvious and meaningful response.
This was a fundamental change compared to the original condition, in which the reading barely moved except for tiny noise-level fluctuations around zero.
That indicates:
- The Hall excitation current chain was re-established
- The Hall element began generating valid Hall voltage again
- The front-end signal chain began receiving meaningful input
- The main DC measurement chain of the host was effectively restored
From a fault-analysis perspective, this is strong confirmation that the main failure area really was the excitation servo section involving LT1010 and OPA602.
14. Why “Obvious Response Restored” Does Not Yet Mean “Fully Calibrated and Ready”
From a repair perspective, restoring clear DC response is a major success. But from a service or delivery perspective, it is not yet the final step. Several final checks are still necessary:
14.1 Zero Stability
Perform Zero Probe again in as low a field environment as possible and observe whether the zero point is now stable.
14.2 Polarity Reversal
Approach the probe with opposite magnet poles and confirm that the reading changes sign correctly.
14.3 Distance Tracking
Move the magnet slowly closer and farther away. The reading should change continuously rather than only responding to impact or rapid motion.
14.4 Peak Mode Verification
Since DC mode recovered, Peak mode should also be rechecked to verify whether peak capture behavior has been restored.
Only after these checks pass can the instrument be considered confidently serviceable.
15. Key Repair Lessons for Third-Party Technicians
Lesson 1: Identification Chain and Measurement Chain Must Be Separated
Being able to read Probe SN does not mean the measurement system is working.
Lesson 2: Distinguish the Ic Pair from the VH Pair Early
Red/green are the Hall current excitation pair; blue/yellow are the Hall voltage sensing pair.
Lesson 3: Use a Node-Potential Method for Complex Servo Loops
Reducing a complicated analog loop to a few nodes like A/B/C/D is more effective than guessing.
Lesson 4: Isolating Branches and Watching Whether the Platform Disappears Is Extremely Powerful
Disconnecting OPA602 → AMP03 pin 1 did not collapse the high platform, so it was not the sole source. Disconnecting LT1010 pin 5 → C did collapse it, which pointed directly at LT1010’s side.
Lesson 5: If an Output Node Stays High Even After Being Isolated from the External Load, the Device Itself Becomes Highly Suspect
This was the decisive clue for LT1010.
Lesson 6: In Coupled Analog Servo Systems, Do Not Judge One Device in Isolation
LT1010, OPA602, and AMP03 were all part of the same excitation control structure and had to be interpreted together.
16. Final Technical Conclusion
Based on the complete troubleshooting sequence, this Lake Shore 475 DSP Gaussmeter did not fail because of probe EEPROM recognition issues, and it did not fail because of probe connector contact problems. It also did not fail primarily because the Hall voltage amplification stage was dead.
The main fault was in the host-side Hall excitation servo loop. Within that loop, LT1010 developed an abnormal high output condition, and the OPA602-associated control section was also operating in an abnormal state, producing the following chain of effects:
- The Ic+ bus was forced to a high platform
- Excitation current became incorrect
- DC/Peak excitation switching no longer matched intended behavior
- The Hall element was not driven under correct operating conditions
- As a result, the probe could be identified but not measured correctly in DC mode
After replacing LT1010 and OPA602, the instrument recovered obvious DC magnetic response, confirming that the fault localization was correct.
17. Practical Advice for Future Similar Cases
If a Lake Shore 475 or a similar Hall-based gaussmeter shows the following symptoms:
- The host recognizes the probe
- Probe SN can be read
- DC mode has almost no response
- Peak mode may show occasional response
- No proper DC/Peak excitation distinction can be found in the excitation chain
- The Ic+ bus appears to sit at an abnormal high platform
then the correct procedure is not to start with the EEPROM and not to immediately condemn the probe. The better sequence is:
- Confirm whether the probe works on another host
- Separate the Hall current path from the Hall voltage path
- Use node-based testing on the Ic+ bus
- Check whether A/B/C are all being driven to the same high level
- Use branch isolation to determine which section creates the platform
- If a driver output remains abnormal even after being isolated from the bus, strongly suspect that device
- Then decide whether LT1010, OPA602, or another core device must be replaced
This method is valuable not only for this specific case, but for many precision instruments that combine probe identification, analog front ends, and tightly coupled feedback loops.
18. Closing Summary
This repair case demonstrates that a precision instrument may appear partially functional while its most important analog loop has already failed. In the Lake Shore 475, the ability to recognize the probe created a misleading sense that the probe path was intact. In reality, the measurement chain depends on the correct establishment of Hall excitation current, not merely digital recognition.
By distinguishing the Hall current pair from the Hall voltage pair, reducing the excitation path to measurable nodes, isolating control branches one by one, and checking device behavior both under connected and disconnected conditions, the fault was progressively narrowed from a large and confusing analog system down to the actual defective control stage.
The final result—recovery of obvious DC response after replacing LT1010 and OPA602—confirms that the excitation servo section was indeed the true fault core. For any technician facing a gaussmeter that “recognizes the probe but will not measure,” this case provides a clear technical reminder: recognition is not measurement, and analog servo faults must be analyzed by voltage distribution, topology, and isolation logic rather than by superficial symptoms alone.