Posted on

Inovance MD310 VFD Err14 Fault: Technical Analysis, Troubleshooting, and Repair Guide for Module Overheating

1. Introduction

In industrial automation systems, variable frequency drives, commonly called VFDs or inverters, play an important role in motor speed control, soft starting, energy saving, and process optimization. In small and medium power applications such as conveyors, fans, pumps, packaging machines, food processing equipment, textile machinery, and general OEM equipment, the Inovance MD310 series is widely used because of its compact structure, simple operation, and practical control functions.

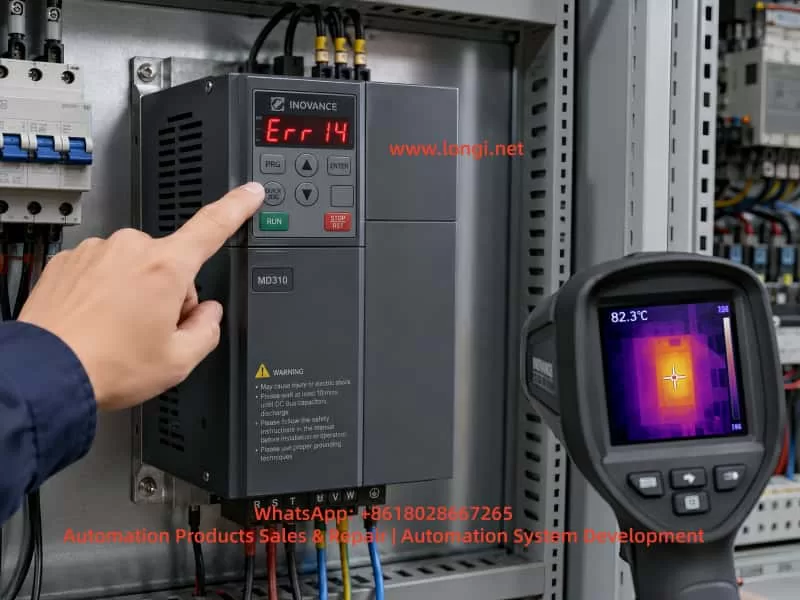
During long-term operation, VFD fault codes are one of the most important clues for diagnosing equipment problems. When an Inovance MD310 VFD displays Err14, it generally indicates module overheating. In practical maintenance work, this usually refers to overheating of the power module, IGBT module temperature protection, or an abnormal module temperature detection signal.

At first glance, Err14 may appear to be a simple high-temperature alarm. However, the actual cause can be more complex. In some cases, the power module is genuinely overheating because of poor ventilation, a failed cooling fan, blocked heatsink fins, high cabinet temperature, or excessive load current. In other cases, the VFD may display Err14 immediately after power-on, even before the motor runs. In this situation, the heatsink is still cold, so the fault is unlikely to be caused by real overheating. Instead, the likely cause may be a faulty temperature sensor, abnormal temperature detection circuit, damaged driver board, poor connector contact, or IGBT module temperature feedback failure.

Therefore, troubleshooting Err14 should not stop at the simple conclusion that “the VFD is too hot.” A correct diagnosis must combine the fault timing, load condition, ambient temperature, running current, ventilation system, parameter settings, and internal circuit condition. This article provides a systematic technical analysis of the Err14 fault on the Inovance MD310 VFD, including its meaning, common causes, field troubleshooting steps, repair logic, and preventive maintenance recommendations.

Inovance MD310 variable frequency drive displaying Err14 module overheating fault inside an electrical control cabinet, with a technician checking the keypad and using a thermal imaging camera.

2. Basic Meaning of Err14 on the MD310 VFD

On the Inovance MD310 series, Err14 normally means module overheating. The “module” mainly refers to the internal power inverter section, including the IGBT power module, freewheeling diodes, driver circuit, heatsink, and temperature detection components.

When a VFD operates, the input AC power is first rectified into DC bus voltage. The IGBT inverter section then converts the DC bus into a variable-frequency, variable-voltage three-phase AC output for the motor. During high-speed switching, IGBTs generate switching losses and conduction losses. These losses become heat. If the heatsink, cooling fan, and airflow path cannot remove this heat efficiently, the module temperature will rise. When the temperature reaches the protection threshold, the VFD will stop output and display a fault code to prevent further damage to the power devices.

However, Err14 does not always mean that the IGBT has failed, and it does not always mean that the heatsink is actually hot. In essence, the control system has detected an abnormal module temperature signal. This signal may come from real high temperature, or it may come from an abnormal detection circuit.

Therefore, during maintenance, Err14 should be divided into two major categories.

The first category is real overheating. The VFD runs for a period of time before the alarm appears. The heatsink is hot, the fan may be stopped or weak, the airflow path may be blocked, or the output current may be too high. In this case, the main focus should be cooling, ventilation, and load condition.

The second category is false overheating. The VFD reports Err14 immediately after power-on, before the motor starts. The heatsink is cold, and the machine has not produced any meaningful heat. In this case, the fault is more likely related to the temperature sensor, temperature sampling circuit, driver board, control board, connector, or internal module feedback signal.

This distinction is very important. Real overheating requires thermal and load correction. False overheating requires electrical diagnosis and board-level repair.

Technician servicing an Inovance MD310 VFD with Err14 fault, cleaning a dusty cooling fan and heatsink while inspecting internal components with a multimeter.

3. Main Components Related to Err14

To analyze Err14 correctly, it is necessary to understand which internal parts of the VFD are related to module temperature protection.

3.1 IGBT Power Module

The IGBT power module is the core component responsible for generating the three-phase output voltage. It withstands the DC bus voltage and switches rapidly under PWM control. During operation, the IGBT produces heat. The amount of heat depends on output current, carrier frequency, load characteristics, cooling performance, and switching condition.

If the motor is overloaded, mechanically jammed, frequently started and stopped, or if the acceleration and deceleration time is too short, the IGBT thermal stress will increase. A high carrier frequency also increases switching loss and can raise module temperature.

3.2 Heatsink

The power module is usually mounted on an aluminum heatsink. Heat is transferred from the module to the heatsink through thermal grease or a thermal interface material, and then removed by air. If the heatsink fins are blocked by dust, oil, cotton fibers, wood dust, or metal particles, heat dissipation becomes poor. Even if the fan is running, the thermal performance may still be insufficient.

3.3 Cooling Fan

Many compact VFDs rely on built-in cooling fans for forced-air cooling. A cooling fan may fail completely, rotate slowly, make abnormal noise, or become unstable after running for several minutes. Fan bearing wear is very common in old drives. A weak fan may still appear to be rotating, but the actual airflow may be insufficient. This is why checking fan speed and airflow is more important than simply checking whether the fan moves.

3.4 Temperature Detection Element

The VFD normally monitors power module temperature through a thermistor, temperature sensor, or internal temperature feedback pin of the module. The control board receives this signal and determines whether the module is overheated.

If the thermistor is open-circuit, short-circuit, drifting in resistance, or if the sampling circuit is damaged, the control board may mistakenly judge that the module temperature is too high. This can cause Err14 even when the module is cold.

3.5 Driver Board and Control Board

The temperature signal is often processed by the driver board or control board before being sent to the CPU. If the driver board power supply is abnormal, the sampling resistor has changed value, the connector is oxidized, the ribbon cable has poor contact, or the CPU input circuit is damaged, Err14 may be triggered incorrectly.

For repair engineers, if the heatsink is cold but the drive still reports Err14, the temperature detection path should be checked carefully.

4. Common Causes of Err14

4.1 Cooling Fan Failure or Low Fan Speed

This is one of the most common causes. During operation, the IGBT and rectifier section continuously generate heat. If the cooling fan does not work properly, the heatsink temperature will gradually rise and eventually trigger Err14.

The field inspection method is straightforward. Observe whether the fan rotates, listen for abnormal noise, and feel whether there is enough airflow from the outlet. It is important not to judge the fan only by whether it rotates. Some old fans rotate slowly, start with difficulty, or stop after running for a short time. These faults are easy to miss.

For old VFDs operating in dusty environments, replacing the fan directly is often more reliable than only cleaning it.

4.2 Blocked Airflow Path or Dusty Heatsink

Many VFDs are installed in environments with dust, oil mist, fibers, wood powder, or industrial particles. Over time, the heatsink fins become blocked. Even if the fan is working, air cannot pass through the heatsink effectively.

This type of problem usually has a clear pattern: the VFD works normally at first, then reports Err14 after running for some time. After cooling down, it can restart again. Once the heatsink and airflow path are cleaned thoroughly, the fault may disappear.

During maintenance, the cover should be removed after the DC bus is safely discharged. The heatsink fins, inlet, outlet, and internal air duct must be cleaned properly. Cleaning only the surface is not enough.

4.3 High Control Cabinet Temperature

Sometimes the VFD itself is normal, but the control cabinet temperature is too high. This is especially common in summer, high-temperature workshops, sealed cabinets, or cabinets containing several drives, contactors, power supplies, servo drives, and braking resistors.

The technician should measure the temperature inside the cabinet and check whether the cabinet has a proper air inlet, exhaust fan, filter, or air conditioner. Some cabinets only use internal circulating fans. This does not remove heat from the cabinet and therefore has limited effect. Real cooling requires cold air intake and hot air exhaust.

4.4 Insufficient Installation Clearance

A VFD needs enough space around it for heat dissipation. If several drives are installed too close to each other, or if wiring ducts and panels block the top outlet, hot air cannot escape smoothly.

Compact drives are often installed in tight spaces because they are small. However, poor installation clearance can directly cause overheating. This is especially common in retrofit projects where the cabinet space is limited.

4.5 Heavy Load or Motor Abnormality

Although Err14 is a module overheating fault, the root cause may be excessive output current. A jammed bearing, heavy mechanical load, dry gearbox, tight belt, blocked fan impeller, blocked pump, or high conveyor resistance can all increase motor current.

Higher current means higher IGBT loss and higher module temperature. In this case, repairing only the VFD is not enough. The motor and mechanical load must also be inspected.

A practical method is to check the VFD output current during operation and compare it with the motor rated current. A clamp meter can be used to verify whether the three-phase output current is balanced. If the drive runs normally without load but reports Err14 under load, the mechanical system should be inspected first.

4.6 Carrier Frequency Set Too High

A higher carrier frequency can reduce motor electromagnetic noise and improve current waveform quality, but it increases IGBT switching loss. Under heavy load or high ambient temperature, excessive carrier frequency may cause module overheating.

In this situation, the carrier frequency parameter should be reduced appropriately. After lowering the carrier frequency, the motor may produce more audible noise, which is normal. For fans, pumps, and general conveyor applications, an unnecessarily high carrier frequency is usually not required.

4.7 Acceleration or Deceleration Time Too Short

If the equipment starts, stops, reverses, or changes speed frequently, or if the acceleration time is set too short, the VFD may output high current for a short period. This increases IGBT thermal stress.

Large-inertia loads such as centrifugal fans, centrifuges, heavy conveyors, and winding systems are especially sensitive to short acceleration and deceleration settings. In these cases, Err14 may appear together with overcurrent, overload, overvoltage, or braking-related faults.

The acceleration and deceleration time should be adjusted according to the load inertia. If necessary, braking resistors or optimized stopping methods should be considered.

4.8 Temperature Detection Circuit Failure

If the VFD displays Err14 immediately after power-on and the heatsink is cold, real overheating is unlikely. The temperature detection circuit should then be investigated.

Common problems include open or shorted thermistor, abnormal thermistor resistance, damaged module temperature feedback pin, changed-value sampling resistor, poor connector contact, abnormal driver board circuit, or damaged control board input channel.

Board-level diagnosis usually requires measuring the temperature detection signal voltage or resistance and comparing it with a normal unit. Without a reference unit, the technician must analyze the thermistor characteristics carefully. The temperature protection circuit should not be simply shorted or bypassed for long-term operation, because it is an important protection function.

4.9 IGBT Module Aging or Damage

If the IGBT module itself has internal damage, poor thermal contact, or abnormal temperature feedback, Err14 may also appear. If the VFD also has output phase loss, unbalanced current, unusually fast temperature rise, or abnormal output waveform, the power module should be checked.

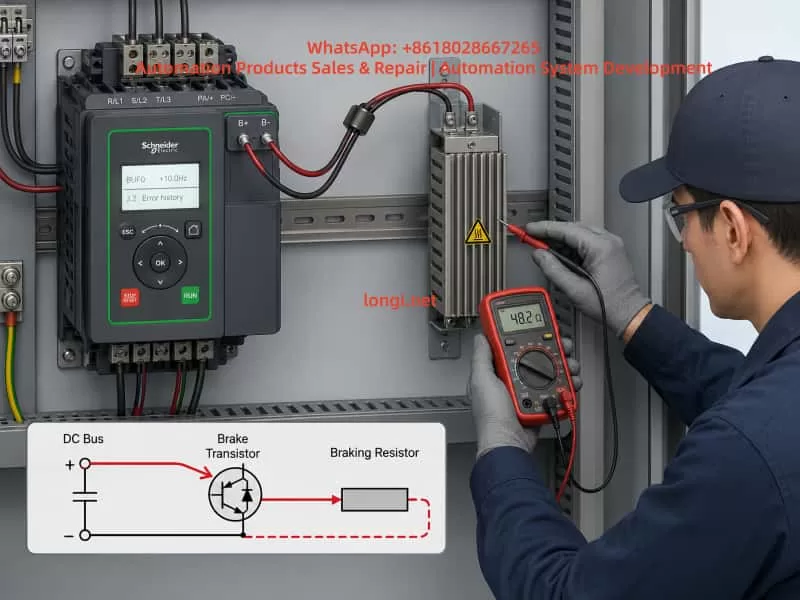
After power-off and safe discharge, a multimeter diode test can be used to check the diode characteristics between P, N, and U/V/W terminals. The readings should be relatively balanced among the three output phases. Any short circuit, open circuit, or obvious phase-to-phase inconsistency indicates that the power module may be defective.

5. Recommended Field Troubleshooting Procedure

For efficient field diagnosis, the troubleshooting process should follow a clear order: external first, internal later; cooling first, circuit later; operating condition first, board-level repair later.

Step 1: Confirm When the Fault Appears

The first question is: when does Err14 appear?

If Err14 appears immediately after power-on before running, suspect temperature detection or board failure.

If Err14 appears after several minutes or tens of minutes of operation, suspect cooling, ventilation, high load, or high ambient temperature.

If the fault appears only at high speed but not at low speed, check carrier frequency, output current, cooling condition, and motor load.

If the fault appears mainly in summer but not in winter, inspect cabinet cooling and ambient temperature.

If the fault started after changing the motor or mechanical system, check motor parameters, load matching, and running current.

Step 2: Check the Cooling Fan

Observe the fan operation, fan speed, and noise. Feel the airflow at the outlet. If the fan starts slowly, stops intermittently, has weak airflow, or makes abnormal noise, replace it. The fan is a low-cost part, but it has a major influence on VFD reliability.

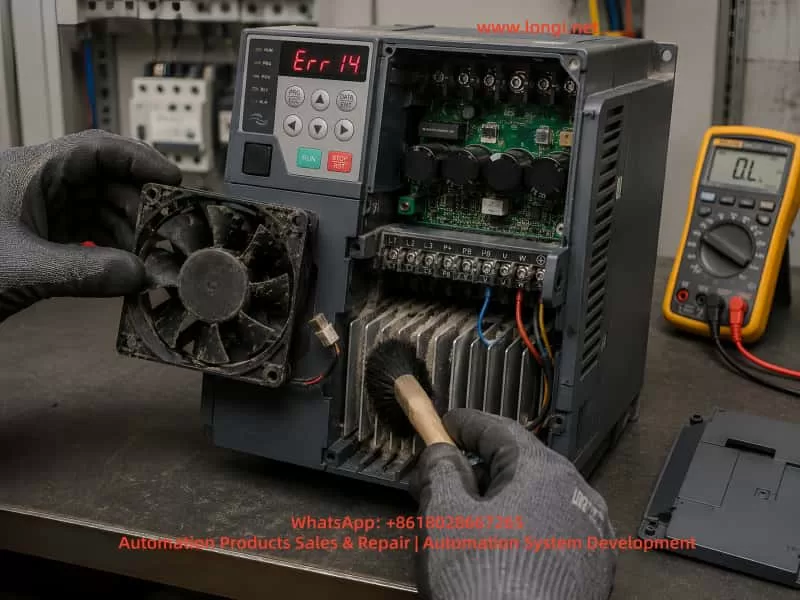
Step 3: Clean the Heatsink and Air Duct

After disconnecting power and confirming DC bus discharge, remove the cover and inspect the heatsink, inlet, outlet, and internal air path. Clean dust and oil contamination thoroughly. In harsh environments, surface cleaning is not enough; the heatsink fins must be cleared.

Step 4: Check the Installation Environment

Check whether the VFD has enough space above and below it, whether the cabinet is sealed, and whether hot air can escape. If several VFDs are installed close together, thermal accumulation must be considered. If the cabinet temperature is high, add ventilation, exhaust fans, or an industrial air conditioner.

Step 5: Check Running Current

Run the equipment under normal load and observe the VFD output current. Use a clamp meter to verify the current if necessary. If the current is close to or above the rated current for a long time, inspect the motor and mechanical load. For pumps and fans, check the pipeline, valve position, impeller, bearing, and mechanical resistance.

Step 6: Check Parameter Settings

Important parameters include motor rated voltage, rated current, rated frequency, rated speed, control mode, acceleration time, deceleration time, and carrier frequency. Incorrect motor parameters may cause high current. A high carrier frequency increases module heating. Too short acceleration and deceleration time increases thermal shock.

Step 7: Determine Whether It Is False Overheating

If the cooling system, environment, load, and parameters are all normal, and the VFD reports Err14 while cold, the issue should be treated as false overheating. The temperature detection circuit, connectors, ribbon cables, driver board, control board, and module feedback circuit should then be checked.

The technician should not permanently bypass the temperature protection circuit simply to make the drive run. Doing so can cause severe IGBT damage and higher repair cost.

6. Safety Precautions During Repair

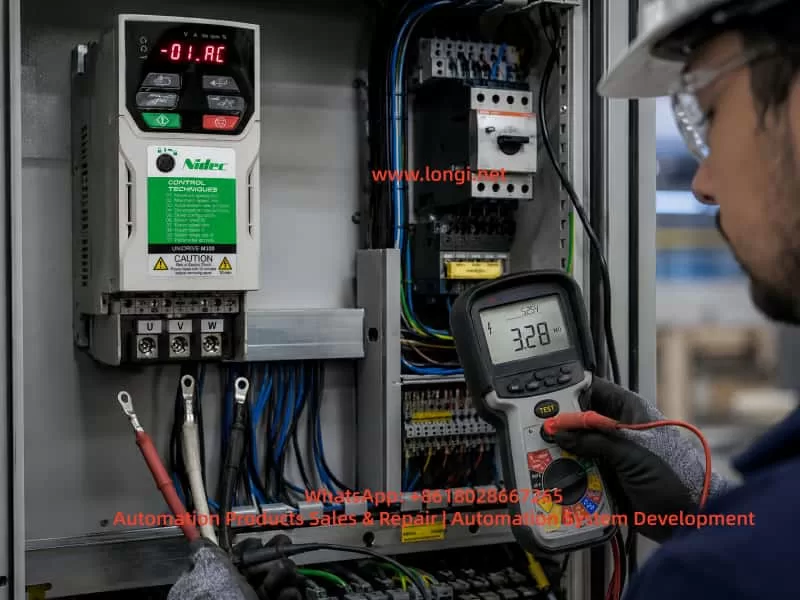
A VFD contains a high-voltage DC bus. Even after power is disconnected, the capacitors may still hold several hundred volts. Before opening the drive, wait long enough and measure the voltage between P and N terminals to confirm that it has dropped to a safe level. Do not assume that the drive is safe just because the keypad display is off.

When cleaning the inside of the VFD, prevent screws, wire ends, or metal particles from falling onto the PCB. When using compressed air, avoid excessive pressure because it may damage small components or push dust deeper into the drive. If cleaning solvent is used, it must be suitable for electronic equipment and must fully evaporate before power-on.

When testing the IGBT module, avoid live measurement at the U, V, and W output terminals during operation. The output waveform is high-frequency PWM, and ordinary multimeter readings may not be meaningful. Incorrect measurement may damage the instrument or create a safety hazard.

When replacing the cooling fan, confirm the voltage, size, airflow direction, connector type, and installation direction. If the fan is installed backwards, cooling performance will be reduced, and hot air may circulate inside the drive.

7. Relationship Between Err14 and Other Faults

Err14 may not always appear alone. It can occur together with overcurrent, overload, undervoltage, overvoltage, or braking-related faults. For example, if the mechanical load is jammed, the VFD may first experience high output current, then the power module heats rapidly, and finally Err14 appears. Poor cooling may also cause the power devices to operate at high temperature, resulting in unstable switching characteristics and additional faults.

Therefore, when a site reports that the drive sometimes shows Err14 and sometimes shows overcurrent, these should not be treated as completely separate problems. The technician should look for common causes such as excessive load, poor cooling, aging power module, abnormal driver waveform, motor insulation problem, or incorrect parameter settings.

8. Typical Case Analysis

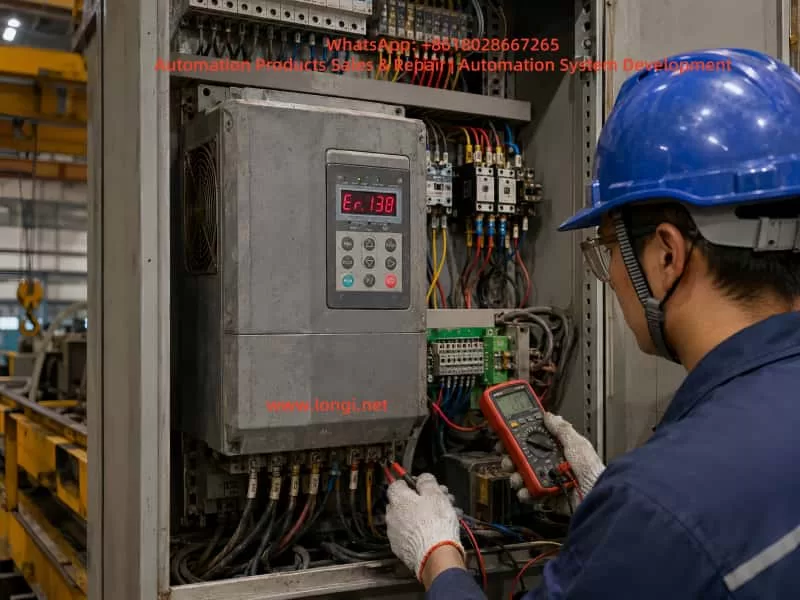
In one field case, an Inovance MD310T2.2B series VFD was used to drive a small motor. After running for a period of time, the drive stopped and displayed Err14. At first, the site suspected that the VFD was damaged. After inspection, however, the control cabinet was found to be dusty, the heatsink fins were blocked, and the built-in fan speed was weak. After cleaning the heatsink and replacing the fan, the drive resumed normal operation and the fault did not return.

In another case, the VFD displayed Err14 immediately after power-on. The motor had not started, and the heatsink was completely cold. Replacing the fan and cleaning the airflow path did not solve the issue. After board-level inspection, the temperature detection circuit was found to be abnormal, causing the control board to continuously receive an over-temperature signal. This case shows that Err14 is not always caused by real overheating. If the alarm appears while the drive is cold, the temperature feedback circuit should be checked first.

9. Preventive Maintenance Recommendations

To reduce the possibility of Err14 faults on MD310 VFDs, regular maintenance is necessary.

First, clean the control cabinet and VFD air duct regularly. In dusty environments, inspection every one to three months is recommended. In normal environments, inspection every six months may be sufficient.

Second, check the cooling fan regularly. The fan is a wear part. After long-term operation, bearing wear, low speed, and startup failure are normal aging symptoms. For equipment running continuously, preventive fan replacement is recommended.

Third, ensure proper cabinet ventilation. The cabinet should have a clear intake and exhaust path. Filters should be cleaned regularly. If the cabinet temperature remains high, an additional fan or industrial air conditioner should be installed.

Fourth, set carrier frequency and acceleration/deceleration time reasonably. Do not increase carrier frequency only to reduce motor noise, and do not set acceleration time too short only to achieve faster machine movement.

Fifth, pay attention to the motor and mechanical load. Many overheating faults are not caused by the VFD itself but by excessive output current due to mechanical problems. Electrical maintenance and mechanical inspection should be combined.

Sixth, do not repeatedly reset and restart the drive after Err14 appears. If real overheating has not been eliminated, repeated reset operation may eventually damage the IGBT module and increase repair cost.

10. Conclusion

When an Inovance MD310 VFD displays Err14, the core meaning is module overheating or abnormal module temperature detection. The correct repair approach is to first distinguish between real overheating and false overheating.

If Err14 appears after the drive has been running for some time, the most likely causes are fan failure, blocked airflow, high ambient temperature, excessive load current, improper installation clearance, high carrier frequency, or unreasonable acceleration and deceleration settings.

If Err14 appears immediately after power-on while the drive is still cold, the fault is more likely related to the temperature detection circuit, driver board, control board, connector, or power module temperature feedback signal.

The correct troubleshooting method is not simply resetting the fault or declaring the VFD damaged. Instead, the technician should analyze the fault timing, cooling system, load condition, parameter settings, and internal detection circuit step by step.

For field maintenance engineers, Err14 is a typical comprehensive VFD fault. It can be caused by environment and maintenance problems, but it can also be caused by circuit board or power module faults. Only by combining external inspection with internal electrical diagnosis can the fault be located accurately and unnecessary replacement avoided.

In daily use, good ventilation, regular air duct cleaning, timely fan replacement, reasonable parameter settings, and proper load inspection are the key measures to prevent Err14 on the Inovance MD310 series. For drives that report Err14 immediately after power-on, professional inspection should be carried out as soon as possible, with special attention to the temperature detection circuit and power module feedback signal.

Posted on

In-Depth Analysis of Schneider Variable Frequency Drive bUF / BUF Braking Circuit Faults: Principles, Troubleshooting, and Repair Strategy

1. Overview of the Fault

In Schneider Electric Altivar variable frequency drives, braking-related faults are commonly encountered in applications involving rapid deceleration, high-inertia loads, lifting mechanisms, centrifugal machines, conveyors, winding equipment, woodworking machinery, injection molding machines, and other systems with frequent start-stop cycles.

When the display shows a code such as bUF, BUF, BUF0, or a similar braking-circuit-related message, the fault should generally be treated as a braking circuit abnormality. In many cases, it indicates that the drive has detected an abnormal condition in the braking branch, especially a possible short circuit, excessively low resistance, damaged braking transistor, or braking unit drive failure.

This fault should not be interpreted simply as “the braking resistor is defective.” The braking system is made up of several interconnected sections, including the DC bus, braking IGBT, braking resistor, braking wiring, braking parameters, external braking unit, thermal protection, machine inertia, and deceleration settings. A failure in any one of these sections may trigger a braking-related fault.

In practical maintenance work, simply replacing the braking resistor without checking the internal braking transistor may not solve the real problem. Likewise, repeatedly resetting the drive without checking the external circuit may lead to more serious damage to the power module, rectifier bridge, DC bus capacitors, IGBT assembly, driver board, or control board.

Therefore, troubleshooting a bUF / BUF fault should follow a systematic sequence:

  1. Identify when the fault occurs.
  2. Isolate the external braking circuit.
  3. Test the braking resistor and wiring.
  4. Check the internal braking IGBT or braking module.
  5. Review the deceleration conditions and braking parameters.
  6. Confirm the repair through staged running tests.

Technician using a multimeter to test braking terminals inside a Schneider Electric Altivar variable frequency drive control cabinet displaying a BUF0 braking circuit fault.

2. Basic Operating Principle of the Braking System

2.1 Why overvoltage occurs during motor deceleration

During normal motor operation, the variable frequency drive converts incoming AC power into DC voltage through its rectifier section. The inverter stage then converts the DC bus voltage back into adjustable-frequency AC output for the motor.

During acceleration and normal running, electrical energy flows from the drive to the motor.

However, when the motor decelerates quickly, when a heavy load drives the motor, when a hoist lowers a load, when a winding machine releases material, or when a large fan is stopped rapidly, the motor can enter regenerative operation.

In regenerative operation, the motor no longer consumes electrical energy. Instead, it becomes a generator and returns mechanical energy back into the drive’s DC bus.

If this regenerated energy cannot be dissipated, the DC bus voltage rises rapidly. Once the voltage exceeds the drive’s protection threshold, the inverter will trip on a DC bus overvoltage fault.

2.2 Function of the braking resistor

A braking resistor is used to absorb regenerative energy and convert it into heat.

When the DC bus voltage rises above a preset threshold, the drive activates its internal braking IGBT. The braking IGBT switches on and connects the braking resistor to the DC bus.

The regenerative energy is then discharged through the braking resistor and converted into heat.

For this reason, a braking resistor is not an ordinary resistor used only for current limiting. It is a high-power energy absorption component that must be selected according to resistance value, power rating, duty cycle, thermal capacity, and machine operating conditions.

2.3 Main components of a braking circuit

A typical VFD braking system includes:

  • DC bus capacitors
  • DC bus voltage sensing circuit
  • Internal braking IGBT or braking transistor
  • Braking IGBT driver circuit
  • Braking resistor
  • Braking resistor cables
  • Braking terminals
  • External braking unit, if required
  • Thermal protection device
  • Deceleration parameters
  • Load inertia and regenerative energy conditions

A fault in any of these sections can cause braking-related alarms, DC overvoltage trips, resistor overheating, braking transistor damage, or bUF / BUF type faults.


Technical troubleshooting diagram for an Inovance CS700 hoist drive system showing the inverter, motor, brake, gearbox, encoder, lifting drum, load, power input, and Er.138 fault inspection path.

3. Meaning of bUF / BUF Type Faults

A bUF / BUF type fault generally indicates an abnormal condition in the braking circuit, with particular attention required for possible short circuit conditions, low-resistance conditions, damaged braking IGBT, or abnormal braking drive control.

This type of fault should not be confused with a braking resistor overload fault.

A braking resistor overload fault usually means that the drive’s thermal model has calculated excessive temperature rise in the braking resistor. This is often caused by frequent braking, short deceleration times, insufficient resistor power rating, excessive machine inertia, or incorrect braking parameters.

By contrast, a bUF / BUF fault usually points more directly to a hardware abnormality in the braking branch.

Possible causes include:

  • Shorted braking resistor
  • Braking resistor resistance too low
  • Incorrect braking resistor wiring
  • Damaged braking cable insulation
  • Braking cable shorted to ground
  • Braking terminals connected incorrectly
  • Failed internal braking IGBT
  • Shorted braking transistor
  • Braking driver circuit malfunction
  • Failed external braking unit
  • Incorrect connection between DC bus terminals and braking terminals
  • Moisture, conductive dust, metal particles, or oil contamination around terminals
  • Faulty DC bus voltage detection circuit
  • Control board misdetection

For this reason, a bUF / BUF fault should first be approached as a braking hardware and wiring issue rather than a simple parameter issue.


4. Why the Timing of the Fault Matters

One of the most important pieces of information during troubleshooting is the moment when the fault occurs.

The occurrence timing provides valuable direction for locating the root cause.

4.1 Fault appears immediately after power-on

If the drive trips on bUF / BUF immediately after power is applied, before the motor is started, the main suspected causes are:

  • Internal braking IGBT short circuit
  • Internal braking module failure
  • External braking resistor short circuit
  • Incorrect terminal wiring
  • Braking resistor resistance far below the allowed value
  • Braking cable shorted or damaged
  • Braking driver circuit stuck in the ON state
  • Power board damage
  • Moisture or conductive contamination inside the drive
  • Failure of the braking circuit detection circuit

This condition is usually not caused by deceleration settings because the motor has not yet been commanded to run or stop. The highest priority should be checking the braking resistor circuit and the internal braking transistor.

4.2 Fault appears immediately after motor start

If the drive powers up normally but trips shortly after receiving a run command, check the following:

  • Braking resistor connected to the wrong terminals
  • Motor output cable accidentally connected to braking terminals
  • DC bus terminals incorrectly wired to braking terminals
  • External braking unit installed incorrectly
  • Braking resistor resistance below the minimum allowed value
  • Internal braking IGBT leakage or partial short circuit
  • Power board damage caused by vibration, moisture, or aging
  • Wiring error after drive replacement or maintenance

This type of fault is common after equipment relocation, drive replacement, electrical cabinet rewiring, or installation of a new braking resistor.

4.3 Fault appears only during deceleration or stopping

If the fault occurs only while decelerating, stopping, lowering a load, reducing speed, or applying a quick stop command, focus on the braking circuit under actual load conditions.

Key inspection points include:

  • Braking resistor damaged or overheating
  • Braking resistor resistance incorrect
  • Braking resistor power rating insufficient
  • Loose braking terminals
  • Braking cable damaged by vibration
  • Braking cable touching the cabinet or ground
  • Internal braking IGBT failing under load
  • Intermittent short circuit in the braking branch
  • Deceleration time set too short
  • Load inertia too high
  • Braking frequency too high
  • External braking unit overheating
  • Poor ventilation around the drive or braking resistor

4.4 Fault appears intermittently

Intermittent bUF / BUF faults are often related to thermal, environmental, or mechanical problems.

Important possibilities include:

  • Braking resistor insulation drops after heating
  • Braking cable insulation becomes unstable at high temperature
  • Terminal screws become loose due to vibration
  • Internal resistor connections are cracked or poorly welded
  • Humidity or condensation in the cabinet
  • Conductive dust or metal particles around terminals
  • Cooling fan failure causing excessive internal temperature
  • Braking IGBT thermal instability
  • Solder cracks on the braking drive board
  • External braking unit intermittent failure

Intermittent faults should not be ignored. They are often an early sign of future power module damage.


5. Standard Field Troubleshooting Procedure

Step 1: Record the fault condition before resetting

Before pressing RESET or cycling power repeatedly, record the operating condition.

Important information includes:

  • Complete Schneider drive model number
  • Rated power and voltage class
  • Motor rated power
  • Fault code shown on display
  • Frequency at the moment of fault
  • Whether the drive was accelerating, running, decelerating, or stopped
  • Whether a braking resistor is installed
  • Whether an external braking unit is installed
  • Recent parameter changes
  • Recent motor replacement
  • Recent drive replacement
  • Recent cable replacement
  • Recent electrical cabinet work
  • Ambient temperature and cabinet ventilation condition

Repeated resets without recording the fault condition can hide useful diagnostic information and may worsen power circuit damage.


Step 2: Disconnect input power and wait for DC bus discharge

A VFD contains high-voltage DC bus capacitors.

Even after incoming AC power is switched off, dangerous DC voltage may remain inside the drive for several minutes.

The safe procedure is:

  1. Disconnect the upstream power supply.
  2. Wait until the keypad and display are fully off.
  3. Follow the discharge waiting time specified on the drive label or manual.
  4. Measure DC bus voltage and confirm it has fallen to a safe level.
  5. Only then remove wiring or perform measurements.

Never touch braking terminals, DC bus terminals, or internal power boards before confirming that the DC bus voltage has discharged.


Step 3: Inspect the braking resistor visually

Inspect the braking resistor for:

  • Burn marks
  • Discoloration
  • Cracked housing
  • Melted insulation
  • Loose terminals
  • Burned cable lugs
  • Strong burnt smell
  • Broken leads
  • Overheating marks on nearby wiring
  • Contact with the cabinet or grounded metal parts
  • Poor ventilation
  • Dust accumulation
  • Oil contamination
  • Moisture or condensation

If the braking resistor shows clear signs of overheating or physical damage, do not continue running the equipment before verifying resistor selection and braking circuit condition.


Step 4: Isolate the external braking resistor circuit

This is one of the most important diagnostic steps.

After disconnecting power and confirming the DC bus has discharged, remove the two braking resistor wires from the drive braking terminals. Label both wires clearly to prevent incorrect reconnection.

Then power the drive again and observe whether the bUF / BUF fault remains.

Result A: Fault disappears after braking resistor is disconnected

This strongly suggests that the fault is in the external braking circuit.

Possible causes include:

  • Braking resistor short circuit
  • Braking resistor resistance too low
  • Braking cable short circuit
  • Cable insulation damage
  • Wrong wiring
  • Ground fault
  • External braking unit failure
  • Moisture or conductive dust around braking terminals

Result B: Fault remains after braking resistor is disconnected

If the drive still displays bUF / BUF immediately after power-on with the braking resistor completely disconnected, the fault is more likely inside the drive.

The most likely internal causes are:

  • Braking IGBT short circuit
  • Braking transistor damage
  • Braking IGBT driver circuit failure
  • Braking power board failure
  • DC bus detection circuit failure
  • Control board fault
  • Internal contamination or damaged PCB traces

Step 5: Measure the braking resistor resistance

The braking resistor should be measured with at least one side disconnected from the drive.

Important measurement rules:

  • Do not measure the resistor while it is still fully connected to the drive.
  • Compare the measured value with the resistor nameplate value.
  • A resistance close to zero ohms is abnormal.
  • A resistance far below the specified value is dangerous.
  • Infinite resistance may indicate an open resistor.
  • Measure insulation resistance between the resistor terminals and ground.
  • Inspect for unstable readings caused by poor internal connections.

For example, if a braking resistor is rated at 50 ohms but measures only a few ohms or nearly zero ohms, it must not be connected to the VFD. Such a low resistance may cause excessive braking current and can damage the internal braking IGBT.


Step 6: Inspect braking cables and terminals

Braking cable problems are frequently overlooked.

Check for:

  • Crushed cable sections
  • Cable trapped by cabinet doors
  • Cable installed too close to hot components
  • Heat damage caused by braking resistor radiation
  • Hardened or cracked insulation
  • Cable touching cabinet metal
  • Loose crimped terminals
  • Oxidized terminal lugs
  • Loose screws
  • Conductive dust around terminals
  • Incorrect grounding of cable shields
  • Braking cable mixed with motor output cables
  • Wrong connection between braking terminals and DC bus terminals

For vibrating equipment such as hoists, presses, centrifuges, winding machines, conveyors, and woodworking equipment, terminal looseness and cable fatigue are especially common.


Step 7: Check the internal braking IGBT and driver circuit

If the external braking resistor and wiring are confirmed normal, but the bUF / BUF fault remains, the internal braking circuit must be inspected.

Common repair checks include:

  • Measuring the braking transistor using diode-test mode
  • Comparing readings with a known-good drive of the same model
  • Checking for near-zero resistance between braking terminals and DC bus terminals
  • Inspecting the braking IGBT for short circuit conditions
  • Inspecting the power board for burn marks
  • Checking gate resistors
  • Checking optocouplers
  • Checking driver ICs
  • Checking snubber capacitors and suppression components
  • Checking for damaged PCB tracks
  • Checking whether the braking IGBT gate is permanently driven ON

The internal topology differs between drive models. Therefore, measurements must be interpreted according to the specific Schneider Altivar model and power structure.

High-power drives, integrated IGBT modules, coated power boards, and high-voltage systems should be tested by qualified VFD repair personnel.


6. Problems Caused by Incorrect Braking Resistor Selection

Incorrect braking resistor selection is one of the main reasons braking faults repeat after repair.

6.1 Resistance value too low

When braking resistor resistance is too low, braking current becomes excessive whenever the braking IGBT turns on.

This may cause:

  • Excessive braking IGBT current
  • bUF / BUF braking circuit fault
  • Braking transistor overheating
  • Damage to the braking module
  • Excessive resistor heating
  • DC bus instability
  • Blown semiconductor devices
  • Damage to the power board

It is incorrect to assume that “lower resistance always means stronger braking.” The braking resistor value must never be lower than the minimum resistance specified for the VFD model.

6.2 Resistance value too high

If braking resistance is too high, insufficient current flows through the braking resistor.

This may result in:

  • DC bus overvoltage during deceleration
  • Overvoltage trips
  • Long stopping time
  • Failure to meet process stop requirements
  • Poor speed control during high-inertia deceleration
  • Safety risk in lifting or winding applications

6.3 Resistor power rating too low

Correct resistance value alone is not enough. The resistor power rating must also match the regenerative energy and braking duty cycle.

An undersized resistor may cause:

  • Excessive surface temperature
  • Thermal protection trip
  • Internal resistor wire oxidation
  • Cracking or deformation
  • Resistance drift
  • Insulation breakdown
  • Cable damage
  • Cabinet overheating
  • Secondary short circuit conditions

The resistor must be selected based on peak braking power, average braking power, deceleration frequency, machine inertia, and expected duty cycle.


7. Relationship Between Deceleration Time and Braking Faults

When a drive trips while stopping, many users immediately increase the deceleration time. This can help in some cases, but it is not a universal solution.

If the drive is tripping on DC bus overvoltage, increasing deceleration time can reduce regenerative power and lower the stress on the braking circuit.

However, if the drive has a bUF / BUF short-circuit-related fault, increasing deceleration time may not solve the root cause.

This is because the actual issue may be:

  • Shorted braking IGBT
  • Shorted braking resistor
  • Shorted braking cable
  • Incorrect braking terminal wiring
  • Failed external braking unit
  • Faulty braking driver circuit

A practical distinction is:

  • DC bus overvoltage during deceleration: Review deceleration time, braking resistor size, and regenerative energy.
  • Braking resistor overload: Review resistor power rating, braking duty cycle, and thermal parameters.
  • bUF / BUF type fault: Prioritize braking circuit hardware, wiring, and braking transistor diagnostics.

Different fault codes require different troubleshooting logic.


8. Common Causes of Internal Braking IGBT Failure

When the internal braking transistor or braking module fails, there is usually an underlying cause.

8.1 Braking resistor value too low

This is one of the most common causes. An excessively low resistance value creates excessive braking current and overloads the braking IGBT.

8.2 Short circuit in braking wiring

Cable damage, water ingress, wiring error, crushed insulation, and loose terminals can create near-short-circuit conditions in the braking branch.

8.3 Insufficient braking resistor capacity

An undersized braking resistor may overheat repeatedly. Over time, it can develop insulation failure, internal damage, or unstable resistance, eventually affecting the braking circuit.

8.4 Frequent rapid stopping

High-inertia equipment that repeatedly decelerates in a short time places heavy stress on the braking IGBT.

Typical examples include:

  • Hoists
  • Centrifuges
  • Large fans
  • Winding machines
  • Presses
  • Conveyors
  • Mixers
  • High-speed spindles

8.5 Poor cooling

Blocked airflow, damaged fans, high cabinet temperature, clogged heatsinks, or poor ventilation can significantly reduce braking IGBT lifetime.

8.6 High input voltage

When the input voltage is high, the normal DC bus voltage is already elevated. During deceleration, the bus voltage rises faster and the braking system must absorb more energy.

8.7 Surge voltage and electrical disturbances

Lightning, switching surges, welding machines, unstable generators, poor grounding, and high-power load switching can damage the braking driver circuit or power module.


9. Verification Procedure After Repair

After replacing a braking resistor, repairing a braking unit, or repairing the VFD power board, the drive should not be returned directly to full production.

A staged verification process is recommended.

9.1 Power-on test without load

Power on the drive with the braking circuit correctly connected and confirm that no bUF / BUF fault appears.

9.2 Low-frequency motor test

Run the motor at a low frequency and observe:

  • Output current
  • Motor sound
  • Motor vibration
  • DC bus behavior
  • Drive temperature
  • Fault history
  • Braking circuit response

9.3 Normal-frequency operation

Increase to normal operating frequency and verify that current, speed, and output stability are normal.

9.4 Light-load deceleration test

Use a relatively long deceleration time first. Confirm that the system stops smoothly and that no braking fault occurs.

9.5 Normal process deceleration test

Gradually restore normal deceleration settings. Monitor braking resistor temperature, DC bus behavior, fault history, and stopping performance.

9.6 Repeated braking test

For applications such as lifting systems, centrifuges, winding machines, presses, and high-inertia machinery, perform repeated brake cycles to confirm stable operation under thermal conditions.

A braking circuit that operates correctly when cold may still fail after repeated braking cycles if the resistor, wiring, or IGBT is thermally unstable.


10. Engineering Measures to Prevent bUF / BUF Braking Faults

Reliable braking system performance requires attention to system design, installation, parameter configuration, maintenance, and operating practice.

10.1 Design stage

  • Select braking resistor resistance according to the drive manufacturer’s minimum allowable value.
  • Select resistor power and thermal capacity according to load inertia and braking duty cycle.
  • Use an external braking unit or regenerative unit for frequent or high-energy braking applications.
  • Provide thermal protection for braking resistors.
  • Ensure sufficient ventilation space around the braking resistor.
  • Consider regenerative energy calculations for high-inertia systems.

10.2 Installation stage

  • Install braking resistors away from combustible materials.
  • Use high-temperature-rated cables.
  • Keep braking wiring separate from motor output cables where practical.
  • Tighten all braking terminals to the specified torque.
  • Keep wiring away from sharp edges and moving mechanical parts.
  • Prevent conductive dust accumulation.
  • Maintain cabinet sealing, ventilation, and moisture protection.

10.3 Parameter stage

  • Set deceleration time according to actual load inertia.
  • Configure braking-related parameters correctly.
  • Use suitable thermal protection settings.
  • Avoid unnecessary fast-stop commands.
  • Do not copy braking parameters blindly from another machine.
  • Review braking duty requirements after process changes.

10.4 Maintenance stage

  • Periodically inspect braking resistor temperature and appearance.
  • Measure braking resistor resistance during scheduled maintenance.
  • Tighten terminals regularly.
  • Inspect cable insulation.
  • Clean dust from the electrical cabinet.
  • Check cooling fans and heatsinks.
  • Review braking-related fault history.
  • Inspect for abnormal odor, discoloration, or heat damage.

10.5 Operating stage

  • Avoid repeated emergency stops under heavy load.
  • Avoid frequent rapid acceleration and deceleration unless the braking system is designed for it.
  • Do not install a lower-resistance braking resistor without confirming the drive’s limits.
  • Do not continue production after repeated braking faults.
  • Investigate intermittent faults before they become catastrophic power failures.

11. Conclusion

A Schneider VFD bUF / BUF type fault generally indicates an abnormal condition in the braking circuit. The most important suspected causes are braking resistor short circuit, braking resistor value too low, incorrect wiring, braking cable failure, damaged internal braking IGBT, braking driver circuit malfunction, or external braking unit failure.

The correct troubleshooting process is not simply resetting the drive or extending the deceleration time. A reliable diagnosis should follow this sequence:

  1. Determine whether the fault occurs during power-on, start-up, deceleration, or repeated operation.
  2. Disconnect power and confirm DC bus discharge.
  3. Inspect the braking resistor and braking wiring.
  4. Disconnect the external braking resistor to isolate the circuit.
  5. Measure resistor resistance and insulation condition.
  6. Inspect braking terminals and cables.
  7. If the fault remains with the external circuit disconnected, inspect the internal braking IGBT, driver circuit, and power board.
  8. After repair, verify the drive through staged no-load, light-load, full-load, and repeated braking tests.

Only by treating the braking resistor, braking transistor, DC bus, wiring, parameters, and machine inertia as one complete system can bUF / BUF braking faults be accurately diagnosed and permanently eliminated.

Posted on

Nidec Unidrive M300 OI.AC Fault: Causes, Diagnosis, and Corrective Actions

1. Introduction

The Nidec Control Techniques Unidrive M300 is widely used in industrial applications such as pumps, fans, conveyors, mixers, packaging machines, textile machinery, woodworking equipment, and general-purpose motor control systems. Its compact design, simple commissioning structure, and reliable motor-control capability make it suitable for a large number of standard automation applications.

During operation, the drive may display a fault such as:

OI.AC
Er.OI.AC

This fault indicates an instantaneous AC output over-current condition. It is not simply a normal motor overload alarm. Instead, the drive has detected that the output current has risen above the internal protection threshold within a very short period of time. To protect the IGBT power module, motor cable, and motor winding, the drive immediately blocks its output.

An OI.AC trip should therefore be treated as a protection event requiring systematic troubleshooting. Repeatedly resetting the drive and restarting the machine without identifying the root cause may lead to IGBT damage, motor winding failure, cable burning, or more serious control cabinet faults.

The correct diagnostic approach is to determine when the fault occurs, inspect the mechanical load, test the motor and cable insulation, verify motor parameters, examine output switching devices, and finally determine whether the fault is external or internal to the drive.


Technician inspecting a Nidec Control Techniques Unidrive M300 variable frequency drive displaying an OI.AC over-current fault inside an industrial control cabinet.

2. What Does OI.AC Mean?

The Unidrive M300 converts the fixed AC input supply into a variable-frequency, variable-voltage three-phase output for the motor.

Its energy path is generally:

AC Input Supply
      ↓
Rectifier Bridge
      ↓
DC Bus
      ↓
DC Bus Capacitors
      ↓
IGBT Inverter Stage
      ↓
U / V / W Output
      ↓
Motor and Mechanical Load

The drive continuously monitors its output current through internal current sensing circuits. If the current rises sharply above the allowed limit, the drive immediately disables the IGBT output stage.

This high-speed protection is different from a normal thermal overload trip.

A thermal overload condition occurs when the motor draws excessive current over a relatively long period and heats up gradually. By contrast, an OI.AC fault usually means that a very high current appeared suddenly.

Typical causes include:

  • Phase-to-phase short circuit in the motor cable
  • Motor winding short circuit
  • Motor insulation breakdown to earth
  • Mechanical jam or locked rotor
  • Excessively short acceleration time
  • Incorrect output contactor switching
  • Incorrect motor parameter settings
  • Improper motor connection
  • IGBT module damage
  • Current detection circuit failure

For this reason, OI.AC should not be treated as a minor parameter issue. It is a fast protection response against an abnormal output current condition.


Electrical technician testing disconnected U, V and W motor cables with an insulation resistance tester on a Nidec Unidrive M300 drive system showing an OI.AC fault.

3. Diagnose According to the Moment the Fault Occurs

The timing of the fault is one of the most important diagnostic clues.

When OI.AC OccursLikely Cause
Immediately after power-upInternal drive fault, IGBT failure, current sensing fault, drive power circuit issue
Immediately after start commandMotor cable short circuit, motor winding problem, jammed load, brake not released
During accelerationAcceleration time too short, excessive load inertia, heavy load, incorrect motor parameters
At low speedHigh torque demand, motor stall, vector control setting issue, mechanical resistance
At high speedCable insulation problem, loose terminal, vibration-related intermittent fault, load fluctuation
During decelerationOutput contactor switching, mechanical back-driving, braking-related issue
With motor cables removedInternal drive hardware fault is highly likely
Only with one particular motorMotor, cable, mechanical load, or connection issue

Before making parameter changes, the maintenance technician should record the actual operating conditions:

  • At what frequency did the trip occur?
  • Was the motor starting, accelerating, decelerating, or running steadily?
  • What was the displayed current before the trip?
  • Was the machine loaded or unloaded?
  • Was an output contactor operating?
  • Had the motor, cable, or drive recently been replaced?
  • Did the fault begin after moisture, overload, mechanical damage, or electrical maintenance?

These details often reduce troubleshooting time significantly.


4. Motor Cable Short Circuit and Ground Leakage

4.1 Phase-to-Phase Short Circuit

A short circuit between U, V, and W motor phases can cause an immediate OI.AC trip.

Common causes include:

  • Damaged motor cable insulation
  • Cable crushed by machinery
  • Loose copper strands touching adjacent terminals
  • Water inside the motor terminal box
  • Motor winding short circuit
  • Incorrect wiring after motor repair
  • Conductive dust inside the terminal box
  • Oil, coolant, or moisture contamination
  • Cable damage caused by vibration

The first inspection should be visual and mechanical. Check the motor terminals, cable glands, cable tray, junction boxes, and drive output terminals carefully.

A standard multimeter can help identify an obvious short circuit, but it cannot reliably assess insulation quality. A motor may appear normal under the low voltage of a multimeter but fail under the high dv/dt PWM output of a variable frequency drive.

Therefore, insulation testing is necessary.

4.2 Motor-to-Earth Insulation Failure

Motor insulation deterioration is one of the most common reasons for intermittent over-current or output-related faults.

Typical warning signs include:

  • The fault occurs more frequently in humid weather.
  • The motor runs normally when cold but trips after warming up.
  • The fault started after the machine was washed or exposed to water.
  • The cable is old, oily, or exposed to high temperature.
  • The motor has been unused for a long time.
  • The fault appears randomly rather than continuously.

Before insulation testing, disconnect the motor cable completely from the drive output terminals. Never apply a megger directly to a connected VFD output.

The following measurements should be performed:

U-V
V-W
U-W
U-Earth
V-Earth
W-Earth

For many low-voltage motors, a 500 V insulation resistance tester is commonly used. However, the test method and acceptance value should always follow the motor manufacturer’s requirements and local electrical standards.

If insulation resistance is low, the problem may be caused by moisture, cable damage, contaminated terminal boxes, winding degradation, or insulation breakdown inside the motor.

4.3 Long Motor Cables and PWM Reflection

The output of a VFD is not a pure sine wave. It consists of high-frequency PWM pulses. When the motor cable is long, cable capacitance, inductance, and reflected voltage waves can create additional electrical stress.

Possible consequences include:

  • Higher motor terminal voltage spikes
  • Increased leakage current
  • Motor insulation aging
  • Bearing current and bearing damage
  • Nuisance over-current trips
  • EMC interference
  • Encoder signal instability
  • Sensor communication problems

For long cable installations, an output reactor, dv/dt filter, or sine wave filter may be required depending on drive size, cable length, motor type, and application duty.

A motor that appears to run normally may still suffer accelerated insulation damage if the cable arrangement is not suitable for VFD operation.


5. Mechanical Jamming and Excessive Load

5.1 Mechanical Locking or High Resistance

When the drive receives a start command, the motor must develop torque to overcome the mechanical load. If the mechanical system is jammed, the motor cannot accelerate normally and the current rises quickly.

Common mechanical causes include:

  • Failed gearbox
  • Seized bearing
  • Blocked pump impeller
  • Fan blade rubbing against casing
  • Conveyor belt jam
  • Frozen or hardened material inside a mixer
  • Excessive belt tension
  • Lack of lubrication
  • Misaligned coupling
  • Closed mechanical brake
  • Foreign object interference

Mechanical faults often produce the following symptoms:

  • OI.AC immediately after start
  • Motor humming without accelerating
  • Current rising sharply
  • Motor shaft difficult to turn manually
  • Normal operation when the load is disconnected
  • Abnormal mechanical noise or vibration

For motors with holding brakes, always verify that the brake coil is energized correctly and that the brake is actually released before the motor starts.

5.2 Acceleration Time Too Short

A large-inertia load needs sufficient acceleration time.

Typical high-inertia applications include:

  • Large fans
  • Centrifuges
  • Heavy conveyors
  • Mixers
  • Winding machines
  • Crushers
  • Extruders
  • Pumps with high starting torque
  • Machines with gear reducers

If the acceleration time is set too short, the drive demands excessive torque from the motor. High torque demand means high current demand. If the current rises above the protection threshold, the drive trips on OI.AC.

A practical correction method is to increase the acceleration time gradually.

For example:

Original acceleration time: 3 seconds
First test value: 10 seconds
Second test value: 15 seconds
Further adjustment: 20–30 seconds if necessary

The correct value depends on the machine inertia, process requirements, motor size, and drive capacity.

The goal is not simply to make acceleration extremely slow. The objective is to reduce the current peak to a safe and stable value while maintaining acceptable production performance.


6. Incorrect Motor Parameters and Wiring Configuration

The motor parameters entered into the Unidrive M300 directly affect magnetic flux, torque production, current control, and protection behavior.

Important parameters include:

  • Motor rated voltage
  • Motor rated current
  • Motor rated frequency
  • Motor rated speed
  • Motor rated power
  • Motor power factor
  • Motor connection method
  • Control mode
  • Acceleration and deceleration time
  • Current limit setting

If these parameters do not match the motor nameplate, the drive may produce unstable torque, high current, poor low-speed performance, motor overheating, or over-current trips.

6.1 Incorrect Star/Delta Connection

A common issue involves dual-voltage motors.

For example, a motor nameplate may state:

220 V Delta / 380 V Star

If a 380 V output drive is connected to this motor in Delta configuration, each winding may receive excessive voltage. The motor can become over-fluxed, current can rise sharply, and the motor may overheat or trip on over-current.

Conversely, if a 220 V drive is connected to the motor while the motor is wired in Star configuration, the motor may produce insufficient torque. Under load, it may stall or draw excessive current.

Always verify both the drive output voltage class and the motor terminal connection.

6.2 Incorrect Rated Current Setting

If the motor rated current is set too low, the drive may limit current too early or generate protection trips during normal operation.

If the value is set too high, the motor thermal protection becomes ineffective and the motor may be exposed to excessive current for too long.

Increasing the current limit is not a proper solution for OI.AC unless the entire system has been carefully evaluated.

If the true cause is a cable short circuit, mechanical jam, motor insulation fault, or damaged IGBT, increasing the current limit can make the failure much more destructive.

6.3 Unsuitable Control Mode

Standard V/F control may be sufficient for simple fan and pump applications.

However, applications requiring high starting torque, low-speed torque, rapid response, or stable speed control may require correct vector control settings and proper motor tuning.

Examples include:

  • Extruders
  • Mixers
  • Crushers
  • Hoists
  • Heavy conveyors
  • Winding machines
  • Printing machines
  • Woodworking machines
  • Low-speed constant torque systems

Incorrect control settings may result in current oscillation, unstable torque, low-speed vibration, inability to accelerate, or OI.AC trips.

When appropriate, static or rotating motor autotuning should be performed after confirming that the motor data is correct and that the machine is safe for possible motor movement.


7. Output Contactor Switching and Its Risks

Some installations include an output contactor, isolation switch, bypass arrangement, or multi-motor switching circuit between the drive and the motor.

If these devices switch while the VFD is still producing output, OI.AC can occur.

The reason is that disconnecting or reconnecting the motor while the IGBT stage is actively switching creates a sudden voltage and current disturbance.

Risks include:

  • OI.AC trips
  • IGBT stress
  • Contactor contact damage
  • Electrical arcing
  • Severe electromagnetic interference
  • Motor torque shock
  • Premature drive failure

The proper switching sequence should be:

Stop the drive output
      ↓
Disable the drive
      ↓
Confirm motor current has reached zero
      ↓
Switch output contactor
      ↓
Confirm contactor position
      ↓
Enable the drive
      ↓
Restart the motor

Never switch U, V, and W directly while the drive is actively running.

In systems with bypass circuits, multiple motors, reversing circuits, star-delta circuits, or automatic transfer arrangements, PLC timing and electrical interlocking should be inspected carefully.


8. Identifying Internal Drive Faults

When the motor, cable, load, and wiring have been verified, the next step is to determine whether the drive itself has failed.

8.1 Test the Drive with Motor Cables Disconnected

A key diagnostic method is to disconnect the motor output cables completely.

Basic procedure:

Disconnect incoming power
      ↓
Wait for DC bus discharge
      ↓
Remove U, V, W motor cables
      ↓
Confirm no external load is connected
      ↓
Restore power
      ↓
Issue a start command
      ↓
Observe whether OI.AC still occurs

If OI.AC still occurs with U, V, and W disconnected, the fault is likely inside the drive.

Possible internal fault locations include:

  • IGBT power module
  • IGBT gate driver circuit
  • Gate driver optocoupler
  • Current sensor
  • Current feedback amplifier
  • Current sampling resistor
  • Drive power supply circuit
  • Control board
  • DC bus circuit
  • Internal wiring or connector issue

8.2 IGBT Failure

The IGBT module is the core power switching component inside the drive.

If an IGBT fails short circuit or develops leakage, the drive may show:

  • Immediate OI.AC after start command
  • Input fuse failure
  • Abnormal output waveform
  • Motor vibration or no rotation
  • One output phase abnormal
  • DC bus fault
  • Visible burn damage
  • Abnormal resistance readings between output terminals and DC bus

However, replacing only the IGBT module may not solve the problem permanently.

The following should also be inspected:

  • Gate driver circuitry
  • Gate resistors
  • Driver power supply
  • Snubber circuit
  • DC bus capacitors
  • Cooling fan operation
  • Heatsink condition
  • Current feedback circuit
  • External motor cable condition
  • Motor insulation condition

If an external short circuit caused the IGBT failure, installing a repaired drive without fixing the motor or cable may result in immediate repeat damage.

8.3 False Over-Current Caused by Current Detection Failure

In some cases, the actual motor current may not be excessive. The drive may trip because the current sensing circuit is faulty.

Potential causes include:

  • Hall current sensor failure
  • Faulty current feedback power supply
  • Drifted sampling resistor
  • Failed operational amplifier
  • Control board fault
  • Loose connector
  • Corrosion or moisture damage
  • Cracked solder joint
  • Excessive power supply ripple

Typical symptoms include:

  • OI.AC with no motor connected
  • Fault occurs randomly under normal load
  • Displayed current is clearly unreasonable
  • One phase current reading differs greatly from the others
  • Fault remains after mechanical and cable checks
  • Drive works temporarily after repair but fails again later

These faults usually require professional repair equipment such as an oscilloscope, isolated power supply, power module tester, and current waveform measurement tools.


9. Standard Troubleshooting Procedure

The following procedure is suitable for most Unidrive M300 and similar VFD over-current faults.

Step 1: Record the Fault Condition

Record:

  • When the fault occurs
  • Motor frequency at the time of trip
  • Displayed current before trip
  • Whether the motor is loaded
  • Whether the fault occurs during start, acceleration, steady running, or deceleration
  • Whether output contactors are used
  • Whether the machine has recently been repaired or modified
  • Whether water, dust, overload, vibration, or cable damage may be involved

Step 2: Stop Repeated Restart Attempts

Do not continue pressing reset and restarting the drive.

Disconnect the run command, switch off the incoming power, and allow sufficient time for the DC bus capacitors to discharge.

Step 3: Inspect the Mechanical Load

Check:

  • Can the motor shaft rotate manually?
  • Is the gearbox damaged?
  • Is the pump impeller blocked?
  • Is the fan rubbing?
  • Is the conveyor jammed?
  • Is the brake released?
  • Is the coupling aligned?
  • Are bearings seized?
  • Is the belt tension excessive?
  • Is there foreign material in the machine?

Step 4: Inspect the Motor and Cable

Disconnect the motor from the drive and check:

U-V
V-W
U-W
U-Earth
V-Earth
W-Earth

Also inspect:

  • Cable damage
  • Water ingress
  • Loose terminals
  • Exposed copper strands
  • Damaged cable gland
  • Terminal box contamination
  • Cable crushed by machinery
  • Cable routing near high-temperature areas
  • Grounding condition

Step 5: Verify Motor Nameplate Data and Drive Parameters

Check:

Motor rated power
Motor rated voltage
Motor rated current
Motor rated frequency
Motor rated speed
Motor power factor
Star or Delta connection
Drive output voltage class

The motor connection must match the drive output voltage.

Step 6: Increase Acceleration Time

Increase the acceleration time gradually and test again.

This is especially important for high-inertia systems and heavy-duty loads.

Step 7: Check Output Contactors and Logic Sequence

Confirm that:

  • The output contactor does not switch while the drive is running.
  • The drive is disabled before output disconnection.
  • The contactor closes before the drive is enabled.
  • PLC timing is correct.
  • Interlocks are reliable.
  • No reversing contactors are switching incorrectly.
  • No output switching device is vibrating or chattering.

Step 8: Test the Drive Without Motor Cables

If OI.AC remains after removing U, V, and W cables, the drive likely has an internal hardware fault.

At this point, inspection should focus on the IGBT module, driver board, current feedback circuit, and control board.


10. Common Incorrect Practices and Their Risks

10.1 Repeatedly Resetting the Fault

This does not eliminate the root cause.

Potential risks:

  • IGBT damage
  • Motor winding damage
  • Cable overheating
  • Larger electrical failure
  • Increased repair cost
  • Production downtime

10.2 Increasing Current Limit Blindly

This is dangerous because it may hide the protection instead of correcting the fault.

Potential risks:

  • Motor overheating
  • Cable heating
  • IGBT overload
  • More severe short circuit damage
  • Mechanical damage worsening

10.3 Replacing the Drive Without Testing the Motor and Cable

A replacement drive may fail immediately if the motor or cable is the real cause.

This can lead to the common situation where multiple drives are damaged one after another.

10.4 Megger Testing Through the Drive Output

Never connect an insulation tester directly to U, V, and W while the motor cable remains connected to the drive.

The test voltage can damage the IGBT power stage, gate drivers, EMC components, and internal electronics.

Always disconnect the motor cable from the drive first.

10.5 Switching the Motor Output While the Drive Is Running

Opening or closing an output contactor while the drive is producing output can create severe electrical stress.

Possible results include:

  • OI.AC trip
  • Contactor damage
  • Arc generation
  • Output stage damage
  • EMI problems
  • Unstable motor torque

11. Preventive Measures

11.1 Select the Drive with Adequate Margin

Drive selection should not rely only on motor kW rating.

Heavy-duty, high-inertia, high-starting-torque, or frequent-start applications may require a larger drive capacity or a heavy-duty rating.

A 7.5 kW fan and a 7.5 kW crusher do not impose the same stress on a drive.

11.2 Maintain Motor Cables Properly

Use suitable VFD-rated cables when required and ensure:

  • Correct cable clamping
  • Proper shielding and grounding
  • Secure terminal connections
  • Moisture protection
  • Oil resistance
  • Mechanical protection
  • Separation between power and control cables
  • Appropriate output filtering for long cables

11.3 Perform Regular Insulation Testing

Motors operating in humid, dusty, corrosive, hot, or outdoor environments should undergo periodic insulation testing.

Priority equipment includes:

  • Pumps
  • Cooling tower fans
  • Chemical mixers
  • Outdoor conveyors
  • Food processing machines
  • Textile equipment
  • Woodworking equipment
  • Machines restarted after long shutdown periods

11.4 Optimize Acceleration and Deceleration Profiles

Acceleration ramps should match the mechanical inertia and process requirements.

For large-inertia loads, S-curve acceleration may reduce mechanical shock and current peaks.

11.5 Avoid Output-Side Switching During Operation

Output contactors should operate only when the drive output is disabled.

Systems with bypass circuits or multiple motors require proper electrical and PLC interlocking.

11.6 Maintain Cooling and Cabinet Conditions

Heat, dust, and humidity accelerate failure of power electronics and current sensing components.

Maintenance should include:

  • Cooling fan inspection
  • Heatsink cleaning
  • Control cabinet temperature checks
  • Terminal tightening
  • DC bus capacitor inspection
  • Grounding inspection
  • Input voltage monitoring
  • Moisture control

12. Conclusion

An OI.AC fault on a Nidec Control Techniques Unidrive M300 indicates that the drive has detected an instantaneous output over-current condition.

It should not be considered a simple overload warning. It is a fast protective response that may be caused by motor cable faults, insulation breakdown, mechanical jamming, incorrect motor settings, output contactor switching, excessive acceleration demand, or internal drive hardware failure.

The most reliable troubleshooting principle is:

Identify the fault timing
      ↓
Stop repeated reset attempts
      ↓
Check the mechanical load
      ↓
Test the motor and cable insulation
      ↓
Check for output short circuits
      ↓
Verify motor parameters and wiring
      ↓
Increase acceleration time if necessary
      ↓
Inspect output contactor timing
      ↓
Test with U/V/W disconnected
      ↓
Determine whether internal drive repair is required

A structured diagnosis prevents unnecessary drive replacement, avoids repeated IGBT damage, reduces downtime, and improves long-term reliability of the motor control system.

Posted on

Understanding and Troubleshooting Er.138 Faults on Inovance CS700 Crane Inverters

1. Introduction: Do Not Treat Er.138 as a Simple “Fault Code 138”

When an Inovance CS700 crane-duty inverter displays “Er.138,” many maintenance technicians immediately search for “fault code 138” in the user manual. In many cases, they cannot find a direct explanation, which leads to assumptions that the alarm is caused by hidden firmware functions, application-card issues, software version incompatibility, or internal inverter damage.

However, the display logic of the CS700 series should not be interpreted as a simple three-digit numerical fault code. The fault indication normally contains two parts:

  • Er: Fault indication prefix
  • 1: Fault severity level
  • 38: Specific fault number

Therefore, Er.138 should first be understood as Level-1 Fault No. 38, rather than a single independent “Fault 138.”

This distinction is important. If Er.138 is mistakenly interpreted as an extended application fault code, troubleshooting may be directed toward communication cards, crane process cards, or firmware. In reality, Level-1 faults generally involve drive performance, output capability, motor control stability, brake coordination, or safety-related operating conditions.

For crane applications, this requires serious attention. A crane drive is not comparable to a fan, pump, or conveyor inverter. The lifting mechanism involves suspended loads, mechanical brakes, reduction gearboxes, ropes or chains, load inertia, acceleration torque, deceleration energy, encoder feedback, and anti-drop safety logic. A fault in any of these areas can result in abnormal current, poor speed tracking, torque instability, brake drag, or protection trips.

Therefore, Er.138 should never be handled by simply pressing RESET repeatedly. It should be investigated as a system-level lifting-drive fault.


Industrial technician troubleshooting an Inovance CS700 crane-duty inverter displaying Er.138 inside a factory control cabinet, using a digital multimeter to inspect wiring and terminals.

2. Fault Severity Levels in CS700 Crane Drives

The CS700 crane inverter uses different fault levels to determine how the drive reacts after an abnormal condition is detected.

A Level-1 fault is generally displayed in the format Er.1xx. When such a fault occurs, the inverter stops output, brake-control logic may become invalid, the fault output becomes active, and the machine enters a free-stop or protective stop condition.

For a lifting mechanism, this is critical because the motor, brake, gearbox, and load must work together to prevent uncontrolled motion or load drop.

Other fault levels may use different stopping methods:

Fault LevelTypical Action
Level 1Output shutdown or free-stop protection
Level 2Fast stop
Level 3Deceleration stop
Level 4Warning or limited operation
Level 5Status indication or non-critical prompt

The “1” in Er.138 indicates that this is a Level-1 protective event. It should not be treated as a minor warning.

Before resetting or restarting the equipment, the following safety principles should be followed:

  • Ensure that no suspended load is in an unsafe position.
  • Lower the load to a safe position whenever possible.
  • Do not force the brake open.
  • Do not bypass safety interlocks.
  • Do not reduce protection thresholds merely to keep the equipment running.
  • Record the operating condition when the fault occurred.

A successful reset does not prove that the root cause has been removed.


3. General Troubleshooting Strategy for Er.138

A correct diagnosis begins by identifying when the fault occurs.

The same code can be triggered by very different causes depending on whether it appears:

  1. Immediately after power-on
  2. At the moment of start command
  3. During lifting
  4. During lowering
  5. During deceleration
  6. During direction reversal
  7. Only under heavy load
  8. Only after the machine has warmed up

This operating context is often more valuable than the code itself.

For example:

  • A fault immediately after power-on may indicate control-board, current-detection, encoder-interface, or parameter-related issues.
  • A fault during start-up may indicate brake drag, incorrect motor parameters, output wiring problems, motor connection errors, or mechanical seizure.
  • A fault during lifting may indicate overload, insufficient torque, low input voltage, gearbox resistance, or brake release problems.
  • A fault during lowering or deceleration may indicate braking resistor, regenerative energy, brake timing, or mechanical-inertia issues.
  • A fault during direction reversal may indicate incorrect brake timing, excessive acceleration/deceleration settings, encoder direction errors, or speed-tracking instability.

The diagnostic method should always follow the actual operating sequence instead of relying on trial-and-error parameter changes.


Technical troubleshooting diagram for an Inovance CS700 hoist drive system showing the inverter, motor, brake, gearbox, encoder, lifting drum, load, power input, and Er.138 fault inspection path.

4. Inspect the Input Power and Main Circuit First

Crane control panels are often installed in dusty, humid, vibrating, or high-temperature environments. Loose terminals, oxidized contactors, worn cables, damaged cable glands, and poor grounding are common in such equipment.

Many faults that appear to be inverter failures are actually caused by unstable input power or defective external wiring.

4.1 Check Three-Phase Input Voltage

Measure the voltage at the inverter input terminals and confirm:

  • The three-phase voltage is within the permitted range.
  • The voltage imbalance is minimal.
  • Voltage does not drop sharply during lifting.
  • Main contactor contacts are not burned or unstable.
  • Incoming terminals are securely tightened.
  • Circuit breakers and fuses are in good condition.
  • Input cables are correctly sized.
  • Large loads such as welding machines, presses, furnaces, or compressors are not causing major voltage fluctuations.

A crane may operate normally at no load but trip during lifting because voltage drops significantly when current demand rises.

If the supply voltage becomes unstable, the inverter may be unable to maintain sufficient motor torque. This can lead to abnormal drive performance, poor speed response, current fluctuations, or protective faults.

4.2 Inspect Motor Cables and Output Terminals

After disconnecting power and waiting for the DC bus capacitors to discharge, inspect:

  • U, V, and W motor cable insulation.
  • Motor terminal-box connections.
  • Cable damage caused by vibration, movement, crushing, or friction.
  • Loose lugs and oxidized terminals.
  • Water ingress in cable joints.
  • Output contactors or overload relays.
  • Motor winding resistance balance.
  • Insulation resistance between motor windings and ground.

A loose terminal may appear normal during static inspection but fail under vibration or high current. This is especially common in hoist systems where cables move repeatedly during operation.

4.3 Avoid Switching the Motor with an Output Contactor During Inverter Operation

The inverter should not be started and stopped by repeatedly switching an output contactor.

Opening or closing a contactor between the inverter and motor while the inverter is producing output can cause:

  • Sudden current interruption
  • Output voltage spikes
  • IGBT stress
  • Current detection errors
  • Motor torque loss
  • Protective tripping
  • Damage to the inverter power stage

The normal start-stop command should be sent through the inverter control terminals, keypad, PLC, or communication interface. Output contactors should be used only for isolation, maintenance, or carefully designed safety interlocking functions.


5. Mechanical Brake Problems Are a Major Cause of Crane Drive Faults

For lifting systems, the electromagnetic brake is not merely an accessory. It is one of the most important safety components in the entire drive system.

The inverter must establish motor torque before the mechanical brake releases. During stopping, the inverter must control motor deceleration before the brake closes. If these actions are not properly coordinated, the system can experience overload, speed loss, brake drag, current peaks, or unstable motion.

5.1 What Happens When the Brake Does Not Fully Release?

If the inverter begins producing torque but the brake remains partially applied, the motor must overcome:

  • Brake friction
  • Mechanical transmission resistance
  • Static friction in the gearbox
  • Load gravity
  • Rope or drum resistance
  • Misalignment in couplings or shafts

This produces high current and poor speed buildup.

Typical symptoms include:

  • Motor humming without movement.
  • High current at low frequency.
  • Lift movement much slower than commanded.
  • Normal lowering but abnormal lifting.
  • Heavy-load lifting faults.
  • Brake coil energizes but brake does not fully open.
  • Abnormal rubbing noise near the brake.
  • Equipment works when cold but faults after heating.

5.2 Check the Brake Electrical Circuit

The following items should be inspected:

  • Brake coil rated voltage.
  • Actual brake coil voltage during operation.
  • Brake rectifier output voltage.
  • Brake contactor condition.
  • Intermediate relay condition.
  • Coil resistance.
  • Coil overheating.
  • Burned smell or discoloration.
  • Loose control wiring.
  • Faulty auxiliary contacts.
  • Timing between inverter torque output and brake release signal.

A damaged brake rectifier may produce insufficient DC voltage, causing the brake to release weakly. The brake may make a clicking sound but still fail to open fully.

5.3 Check the Brake Mechanical Assembly

Even if the electrical signal is correct, the brake mechanism may still be defective. Inspect:

  • Brake shoe wear.
  • Brake wheel wear or corrosion.
  • Brake gap setting.
  • Spring preload.
  • Brake lever movement.
  • Electromagnet plunger movement.
  • Pivot pins and shafts.
  • Brake wheel oil contamination.
  • Mechanical sticking.
  • Uneven brake-shoe contact.
  • Brake drag after release.

In dusty, humid, or outdoor crane environments, brake mechanisms often become corroded or contaminated. Parameter adjustment cannot solve a mechanically sticking brake.


6. Incorrect Motor Parameters Can Cause Vector-Control Instability

The CS700 crane inverter can operate in vector-control modes. Vector control provides strong low-speed torque and good speed regulation, making it suitable for hoisting applications.

However, vector control relies heavily on correct motor parameters.

If motor power, voltage, current, speed, frequency, pole number, or control mode is incorrect, the inverter cannot calculate the motor magnetic model accurately. This may result in poor torque output, unstable speed control, excessive current, or protection trips.

6.1 Verify All Motor Nameplate Data

The following parameters should be checked against the motor nameplate:

  • Rated power
  • Rated voltage
  • Rated current
  • Rated frequency
  • Rated speed
  • Number of poles
  • Connection method
  • Rated power factor
  • Motor efficiency
  • Cooling method
  • Encoder type, if installed

A common site problem occurs after motor replacement. The old motor parameters remain in the inverter, while the new motor has different current, speed, or pole number.

Another common error is incorrect star-delta connection. For example, a motor designed for 380 V delta connection may be connected in star, resulting in reduced torque and poor lifting performance.

6.2 Motor Auto-Tuning Must Be Performed Safely

Motor tuning should not be treated as a simple push-button operation.

Before tuning, confirm:

  • The load is in a safe position.
  • The brake logic is safe.
  • The motor can rotate safely if dynamic tuning is selected.
  • Motor wiring is correct.
  • Motor insulation is acceptable.
  • Nameplate parameters are already entered.
  • The selected tuning method is suitable for the mechanical condition.

If the motor is mechanically connected to a suspended load, static tuning may be safer than rotating tuning. Dynamic tuning under unsafe conditions can create unexpected movement and serious risk.

6.3 Do Not Blindly Increase Torque Boost

When lifting torque is insufficient, some technicians immediately increase torque boost.

A moderate torque-boost adjustment can help low-speed starting, but it is not a solution for brake drag, incorrect motor parameters, mechanical seizure, voltage drop, or overload.

Excessive torque boost can cause:

  • Motor overheating
  • Excessive current
  • Increased inverter stress
  • Reduced efficiency
  • Poor control stability

The correct sequence is:

  1. Verify motor parameters.
  2. Verify brake release.
  3. Inspect mechanical resistance.
  4. Check power supply stability.
  5. Confirm motor condition.
  6. Adjust torque-related parameters only after the above checks.

7. Encoder and Speed Feedback Problems Must Be Considered

Many crane systems use encoder feedback for closed-loop vector control, precise positioning, speed regulation, anti-sway functions, or anti-drop control.

If the encoder signal is unstable, reversed, noisy, or intermittent, the inverter may calculate incorrect motor speed and torque.

7.1 Typical Encoder Fault Symptoms

Encoder problems may appear as:

  • Normal operation when cold but faults after heating.
  • Normal low-speed operation but faults at high speed.
  • Random speed fluctuation.
  • Unstable hoist stopping position.
  • Motor current oscillation.
  • Faults only in one direction.
  • Abnormal creeping at zero speed.
  • Sudden speed feedback jumps.
  • Faults that occur after vibration or cable movement.

7.2 Encoder Inspection Checklist

Check the following:

  • Encoder supply voltage stability.
  • A/B/Z signal integrity.
  • Differential signal quality.
  • Encoder cable shield grounding.
  • Cable routing away from motor power cables.
  • Encoder coupling tightness.
  • Encoder shaft movement.
  • Connector condition.
  • Encoder resolution settings.
  • Encoder direction settings.
  • PG card condition.
  • Grounding and noise interference.

Encoder cables should use shielded twisted-pair cable whenever possible. They should be routed separately from motor cables. If crossing is necessary, cross at approximately 90 degrees rather than running parallel over a long distance.


8. Mechanical Resistance Must Not Be Underestimated

The lifting mechanism includes the motor, coupling, gearbox, drum, bearings, wire rope, pulley blocks, hooks, brakes, and limit devices.

Any abnormal resistance in these components increases motor torque demand.

8.1 Common Mechanical Causes

Typical mechanical causes include:

  • Gearbox lubrication failure
  • Damaged gears
  • Bearing seizure
  • Coupling misalignment
  • Drum deformation
  • Rope overlap or rope jamming
  • Pulley seizure
  • Brake drag
  • Motor bearing damage
  • Shaft misalignment
  • Limit switch interference
  • Gearbox output shaft binding
  • Structural deformation of the lifting mechanism

8.2 Use Motor Current as a Diagnostic Indicator

Motor current provides valuable information.

Under comparable conditions, observe:

  • Whether the three output currents are balanced.
  • Whether lifting current is much higher than lowering current.
  • Whether no-load current is already high.
  • Whether current spikes occur at brake release.
  • Whether current rises sharply at a certain mechanical position.
  • Whether current fluctuates with vibration.

If no-load current is abnormally high, suspect brake drag, mechanical resistance, bearing failure, or gearbox problems.

If lifting current is much higher than lowering current, inspect load condition, brake release, mechanical resistance, and gearbox efficiency.

If phase currents are clearly unbalanced, inspect motor windings, output cables, terminals, and contactors.


9. Acceleration and Deceleration Settings Must Match the Hoisting System

A crane cannot be configured using aggressive acceleration and deceleration values without considering load inertia, brake timing, motor torque capability, and regenerative energy.

9.1 Risks of Excessively Short Acceleration Time

If acceleration time is too short, the inverter must rapidly establish torque while overcoming brake release delay, static friction, suspended-load gravity, rope tension changes, and gearbox inertia.

This can result in:

  • Excessive current
  • Poor speed tracking
  • Torque saturation
  • Brake drag symptoms
  • Mechanical shock
  • Protective faults

A lifting mechanism should normally have a carefully designed low-speed starting stage and smooth acceleration profile.

9.2 Risks of Excessively Short Deceleration Time

During deceleration, a hoist may enter regenerative operation. Mechanical energy is returned to the inverter DC bus.

If the braking resistor, braking unit, or energy-dissipation capability is insufficient, the DC bus voltage may rise rapidly.

This can cause:

  • Overvoltage faults
  • Braking faults
  • Sudden deceleration instability
  • Mechanical shock
  • Brake timing problems
  • Load swing

Deceleration time should be set based on:

  • Load weight
  • Hoisting speed
  • Gear ratio
  • Drum diameter
  • Braking resistor power
  • Braking resistor resistance
  • Duty cycle
  • Frequency of lifting and lowering
  • Mechanical inertia
  • Required stopping distance

9.3 Avoid Sudden Multi-Speed Switching

If multi-speed control is used, large step changes should be avoided.

Use smooth acceleration and deceleration curves, including S-curves when appropriate. This reduces mechanical impact, current spikes, and load swing.


10. Check the Braking Resistor and Braking Unit

In crane applications, braking components are especially important during lowering, deceleration, and frequent reversing.

A braking resistor with incorrect resistance, insufficient power rating, poor wiring, overheating, or open circuit can cause abnormal drive behavior.

10.1 Inspect the Braking Resistor

Check:

  • Burn marks or discoloration.
  • Loose terminals.
  • Measured resistance value.
  • Correct power rating.
  • Proper ventilation.
  • Cooling fan operation, if installed.
  • Cable size and length.
  • Connection tightness.
  • Signs of overheating.
  • Installation away from flammable materials.

10.2 Do Not Reduce Resistance Arbitrarily

Some users install a lower-resistance braking resistor to obtain stronger braking.

This can be dangerous because lower resistance increases braking current. If the resistance is below the permitted range, the braking unit or inverter power stage may be overloaded and damaged.

The braking resistor value must match the inverter and braking-unit specifications.

10.3 Lowering Operation Often Reveals Braking Problems

When lowering a suspended load, gravity drives the motor. The motor can become a generator and return energy to the inverter DC bus.

Therefore, if faults occur mainly during lowering, rapid deceleration, emergency stop, or direction reversal, inspect:

  • Braking resistor
  • Braking unit
  • Deceleration time
  • Brake closing sequence
  • Mechanical inertia
  • DC bus voltage behavior

11. Recommended Field Troubleshooting Procedure

The following workflow can be used when a CS700 crane inverter displays Er.138.

Step 1: Confirm the Display Carefully

Verify that the display is truly Er.138 and not a similar-looking code caused by LED digit interpretation.

Take a clear photo and record:

  • Fault code
  • Load condition
  • Operating direction
  • Running speed
  • Whether the brake was open
  • Whether the fault occurred during start, run, stop, or reverse

Step 2: Record the Fault Condition

Document:

  • Lifting or lowering direction
  • No-load, light-load, or full-load condition
  • Cold machine or hot machine condition
  • Immediate or delayed trip
  • Frequency of occurrence
  • Recent maintenance history
  • Recent replacement of motor, brake, encoder, gearbox, or inverter
  • Whether reset is possible

Step 3: Inspect Main Power and Wiring

After isolating power and waiting for capacitor discharge:

  • Check incoming supply voltage.
  • Check U/V/W connections.
  • Check motor cable condition.
  • Check grounding.
  • Check motor insulation.
  • Check contactors and terminals.
  • Check for heat damage or loose connections.

Step 4: Verify Motor Parameters

Compare inverter settings with the motor nameplate. Back up existing inverter parameters before making changes. Enter correct motor data and perform a suitable motor tuning procedure.

Step 5: Inspect Brake Operation

Confirm brake release voltage, brake coil condition, rectifier output, contactor operation, brake gap, brake shoe condition, and actual mechanical opening movement.

Step 6: Inspect Mechanical Components

Check the gearbox, bearings, drum, rope, pulley, coupling, and brake wheel. If necessary, separate the motor from the mechanical load and test the motor alone.

Step 7: Check Encoder Feedback

For closed-loop systems, verify encoder voltage, wiring, shield grounding, signal integrity, coupling, direction, resolution, and PG interface condition.

Step 8: Inspect Braking Components and Motion Parameters

Check braking resistor value, resistor power, braking-unit condition, deceleration time, acceleration time, speed-change logic, and brake timing parameters.

Step 9: Perform Low-Risk Test Runs

After repairs or adjustments, begin with low-speed no-load testing. Increase speed and load gradually. Do not immediately perform full-load lifting before confirming that current, speed, brake action, and mechanical operation are stable.


12. Common Mistakes to Avoid

Mistake 1: Repeatedly Pressing RESET

Resetting only clears the current fault condition. It does not remove the underlying cause.

Mistake 2: Restoring Factory Settings Without Backup

A crane inverter contains critical parameters for motor data, brake timing, speed settings, limit logic, encoder configuration, and control terminals.

Restoring factory settings can create new hazards, including incorrect direction, unsafe brake timing, or loss of operational logic.

Mistake 3: Bypassing the Mechanical Brake

The brake is a safety device. Forcing it open or bypassing it may lead to uncontrolled load movement.

Mistake 4: Replacing the Inverter Without Checking the System

A new inverter may fail again if the true cause is brake drag, encoder failure, low input voltage, damaged motor cable, gearbox resistance, or incorrect motor settings.

Mistake 5: Solving Every Problem by Changing Parameters

Parameter changes should be based on measurements and system verification. Mechanical, electrical, and feedback faults cannot be reliably corrected through parameter adjustment alone.


13. Preventive Maintenance Recommendations

To reduce Er.138-type faults and other crane-drive failures, establish a preventive maintenance plan.

Monthly checks should include:

  • Cabinet cleaning
  • Cooling fan condition
  • Filter condition
  • Terminal tightening
  • Grounding inspection
  • Contactor condition
  • Brake movement observation

Quarterly checks should include:

  • Brake coil voltage
  • Brake rectifier condition
  • Brake shoe wear
  • Brake gap setting
  • Brake wheel condition
  • Motor cable inspection
  • Encoder connector inspection

Semi-annual checks should include:

  • Motor insulation resistance
  • Gearbox lubrication
  • Bearing condition
  • Braking resistor condition
  • Braking-unit connections
  • Parameter backup
  • Fault-history review

Annual checks should include:

  • Full inspection of brake timing
  • Motor parameter verification
  • Encoder feedback verification
  • Mechanical load test
  • Safety interlock verification
  • Wire rope and drum inspection
  • Gearbox efficiency evaluation

For high-duty crane systems, special attention should be given to brake wear, contactor life, braking resistor heat aging, fan life, encoder cable integrity, motor bearings, and gearbox lubrication.


14. Conclusion

When an Inovance CS700 crane inverter displays Er.138, it should not be treated as a simple “fault 138.” It should first be interpreted as a Level-1 drive fault, requiring careful evaluation of the entire hoisting system.

The investigation should include:

  • Input power quality
  • Output wiring
  • Motor condition
  • Motor parameters
  • Brake release and brake timing
  • Mechanical resistance
  • Encoder feedback
  • Braking resistor and braking unit
  • Acceleration and deceleration settings
  • Load condition and operating sequence

The objective is not merely to reset the inverter and resume operation. The real goal is to identify why the protection was triggered and verify that the lifting system can return to service safely.

For crane equipment, safe recovery is always more important than rapid recovery.

Posted on

ABB ACS550 Alarm 2023 “Emergency Stop”: Cause Analysis and Field Troubleshooting Guide

1. Overview of the Fault Symptom

The ABB ACS550 is a widely used general-purpose variable frequency drive in industrial automation. It is commonly installed on fans, pumps, conveyors, trimming machines, packaging machines, textile equipment, woodworking machinery, and many other types of automated production equipment. Because the ACS550 provides flexible digital inputs, analog control, run interlock logic, and protection functions, many machine builders integrate external emergency stop circuits, safety doors, thermal relays, PLC run-enable signals, and other safety-related conditions into the drive’s control logic.

A common field fault is that the ACS550 keypad displays:

ALARM 2023
Emergency Stop

This alarm means that the drive has detected an active emergency stop condition. In practical terms, the drive believes that the machine is not allowed to run, or that an external safety circuit is commanding the drive to stop.

It is important to understand that Alarm 2023 does not automatically mean the inverter power section is damaged. In most cases, it is related to the external control circuit, digital input status, safety relay, PLC interlock, 24 V control supply, or parameter configuration.

A frequent mistake in the field is to check only the red emergency stop button. If the button is not pressed, some technicians immediately assume that the drive is faulty. This is not a correct diagnostic approach. On many industrial machines, the emergency stop button is only one part of a larger safety chain. The emergency stop signal may pass through safety relays, intermediate relays, PLC inputs and outputs, terminal blocks, and finally reach one of the ACS550 digital inputs.

Therefore, when troubleshooting ACS550 Alarm 2023, the correct method is not simply to ask whether the emergency stop button is released. The correct method is to confirm whether the ACS550 actually receives the correct run-enable or emergency-stop-reset signal.

Close-up of an ABB ACS550 drive keypad displaying Alarm 2023 Emergency Stop on an industrial machine control panel.

2. What Alarm 2023 Really Means

Alarm 2023 on an ABB ACS550 indicates that the emergency stop function is active. This is generally a control logic alarm rather than a typical power-stage fault such as overcurrent, DC bus overvoltage, undervoltage, IGBT short circuit, or motor insulation failure.

From a maintenance perspective, the alarm can be understood in three layers.

First, the drive is not allowed to run under the current condition. Even if the START button is pressed, the ACS550 may not output normally.

Second, the drive has detected an external control input state that corresponds to emergency stop, safety stop, or run inhibit.

Third, the root cause is usually found in the control circuit, digital input wiring, parameter setting, or input hardware circuit.

This distinction is very important. If Alarm 2023 appears, replacing the inverter immediately is usually not the correct first step. The external safety chain and input logic must be checked before judging the drive itself as defective.

3. Common Emergency Stop Control Structures on ACS550 Systems

Different machine manufacturers may wire the ACS550 in different ways. However, in industrial equipment, the emergency stop signal usually follows one of the following structures.

3.1 Emergency Stop Button Directly Connected to a Drive Digital Input

In a simple control system, the emergency stop button may be wired directly to one of the ACS550 digital inputs. The button normally uses a normally closed contact. When the emergency stop button is released, the digital input receives the correct signal. When the button is pressed, the circuit opens and the drive stops or reports an emergency stop alarm.

This structure is simple, but it is usually found only on smaller machines or systems with lower safety requirements.

3.2 Emergency Stop Button Connected Through an Intermediate Relay

In many machines, the emergency stop button does not go directly into the drive. Instead, it controls an intermediate relay. The relay output contact then provides a signal to the ACS550 digital input.

In this structure, the emergency stop button may be mechanically normal, but the drive can still receive an emergency stop signal if the relay coil is not energized, the relay contact is oxidized, the relay base is loose, or the wiring between the relay and the drive is damaged.

Therefore, checking only the button is not enough. The relay output contact must also be checked.

3.3 Emergency Stop Circuit Connected Through a Safety Relay

On machines with safety doors, dual-channel emergency stops, safety light curtains, guard switches, or protective covers, the emergency stop circuit usually enters a safety relay or safety controller. Only when the safety relay is reset and all safety channels are valid will the relay output a safety-permit signal to the PLC or the drive.

In this structure, the emergency stop button may already be reset, but the safety relay may still be in a fault or unreset state. The safety relay may require manual reset, dual-channel consistency, correct power-up sequence, or a closed safety door before it enables its output contacts.

When this type of system reports ACS550 Alarm 2023, the safety relay status LEDs must be checked carefully. The technician should verify power, input channels, reset status, output status, and fault indication.

3.4 PLC-Based Emergency Stop and Run-Permit Logic

On more advanced automated equipment, the emergency stop, safety door, thermal relay, air pressure switch, limit switch, and other interlock signals may first enter a PLC. The PLC then processes the machine logic and sends a run-enable or drive-enable signal to the ACS550.

In this case, the ACS550 is only the final actuator in the control chain. Alarm 2023 may appear because the PLC is not providing the run-permit signal. The cause may be a missing sensor condition, PLC program interlock, damaged PLC output, failed intermediate relay, incorrect 24 V signal, or wiring problem.

This is why the alarm must be analyzed as a system-level control issue, not only as a drive issue.

Technician using a multimeter to troubleshoot the emergency stop circuit and safety relay wiring of an ABB ACS550 drive inside an electrical control cabinet.

4. Why Alarm 2023 Can Remain Even When the Emergency Stop Button Is Normal

In many real field cases, the operator confirms that the emergency stop button is not pressed, but the ACS550 still displays Alarm 2023. This can happen for several reasons.

4.1 The Button Is Normal, but the Wiring Is Open

The emergency stop button may mechanically reset correctly, but the cable from the button to the terminal block, relay, PLC, or drive may be broken or loose. Industrial machines are subject to vibration, oil contamination, dust, and repeated maintenance work. Terminal screws may loosen, connectors may oxidize, and cable cores may break inside the insulation.

The correct check is not only to test the button contact. The signal must be traced all the way to the ACS550 digital input terminal.

4.2 The Safety Relay or Emergency Stop Relay Has Not Reset

After the emergency stop button is released, the safety relay may still remain in a tripped state. Some safety relays require a separate reset signal. Some require both safety channels to recover simultaneously. Some will not reset if one safety door or guard switch is still open.

If the safety relay output is not enabled, the ACS550 will not receive the correct permit signal, and Alarm 2023 may remain.

4.3 The 24 V Control Supply Is Missing or Abnormal

ACS550 digital inputs require a valid control voltage and reference. Depending on the machine design, the digital input signal may come from the drive’s internal 24 V supply, an external 24 VDC power supply, a PLC output, or an intermediate relay.

If the 24 V control supply is missing, weak, unstable, or if the 0 V reference is disconnected, the digital input state may become invalid. The operator may see that buttons and switches look normal, but electrically the ACS550 is not receiving the proper input level.

4.4 The Digital Input Common Terminal Is Incorrectly Wired

Digital inputs require both the input signal and the correct common reference. If the DI common, DCOM, COM, 0 V, or 24 V wiring is incorrect, the drive may not recognize the input even though voltage appears to be present somewhere in the control cabinet.

This problem is common after drive replacement, control cabinet rewiring, terminal strip repair, or parameter restoration. A technician may reconnect the signal wire but forget the correct common reference.

4.5 Parameters Have Been Changed

If ACS550 parameters have been changed, a digital input may have been assigned to emergency stop, run enable, start enable, or external fault. If the selected digital input is not wired correctly, the drive may continuously detect an invalid condition.

This is especially common when a second-hand drive is installed, a replacement drive is used, factory reset has been performed, or multiple people have adjusted the drive parameters.

For example, if an unused DI terminal is accidentally assigned as an emergency stop input, the drive may remain in Alarm 2023 because that DI never receives the required signal.

4.6 The ACS550 Digital Input Circuit Is Damaged

If the external circuit, voltage, relay contacts, common terminal, and parameter configuration are all confirmed to be correct, but the ACS550 input status still does not change, the digital input circuit may be damaged.

Possible causes include incorrect high-voltage wiring into a low-voltage input, short circuit, surge voltage, moisture contamination, terminal corrosion, damaged optocoupler, or failure in the control board input circuit.

This diagnosis should only be made after the external control signal has been fully verified at the drive terminals.

5. Correct Field Troubleshooting Sequence

The most efficient way to troubleshoot ACS550 Alarm 2023 is to work from outside to inside, from simple checks to detailed electrical verification, and from signal status to parameter logic.

Step 1: Confirm All Emergency Stop and Safety Devices

Check all emergency stop buttons on the machine, not only the one near the main control panel. Some machines have multiple emergency stops at different locations, including remote stations, conveyor ends, control cabinet doors, and operator stations.

Also check safety doors, guard switches, limit switches, safety light curtains, protective covers, pull-wire emergency switches, and thermal overload contacts.

A single open safety device can keep the ACS550 in emergency stop status.

Step 2: Check the Safety Relay or Intermediate Relay

Open the control cabinet and check whether the emergency stop relay, safety relay, or intermediate relay is energized.

If the relay has LED indicators, check the power indicator, input channel indicators, reset status, output indicators, and fault indication.

If the relay is not energized, measure the coil voltage. If the coil has no voltage, the upstream safety circuit is not complete. If the coil has correct voltage but the relay does not operate, the relay itself may be faulty. If the relay operates but its output contact does not close, the contact may be damaged or oxidized.

Step 3: Measure the ACS550 Digital Input Terminal Voltage

This is one of the most important steps. Identify which ACS550 digital input is assigned to emergency stop, run enable, or start enable. Then use a multimeter to measure the voltage between that DI terminal and the correct common terminal.

When the emergency stop circuit is reset, the input should have the correct valid level according to the drive configuration. When the emergency stop is pressed, the input state should change.

If the external device operates but the voltage at the ACS550 terminal does not change, the fault is in the external wiring or relay circuit.

If the voltage at the ACS550 terminal changes correctly but the drive input status does not change, the problem may be in the drive input circuit, common wiring, or parameter configuration.

Step 4: Check the ACS550 I/O Status on the Keypad

The ACS550 keypad can be used to view digital input status. The technician should check the ON/OFF status of DI1, DI2, DI3, DI4, DI5, and DI6.

This step is essential because measuring voltage at the terminal and confirming that the drive internally recognizes the input are not the same thing. The drive must actually detect the input state change.

If the emergency stop circuit is reset and the corresponding DI does not change to the expected state, the drive is still not receiving or recognizing the correct signal.

Step 5: Verify Parameter Configuration

If the digital input voltage and keypad I/O status appear normal but the alarm remains, the relevant parameters must be checked.

The technician should review parameters related to control macro, external command source, digital input assignment, emergency stop, run enable, start enable, external fault, and input polarity.

Parameter checking must be done carefully. The original parameters should be recorded before any changes are made. If possible, compare the settings with the machine electrical drawing, commissioning record, or another identical machine.

Blindly disabling emergency stop or run-enable functions is not an acceptable repair method.

Step 6: Evaluate Possible Drive Control Board or Input Damage

Only after external wiring, control voltage, relay contacts, common terminal, and parameter configuration have been confirmed should the technician consider a faulty ACS550 control board or digital input circuit.

Further verification may include assigning the function to another spare DI input, testing the same signal on another input, comparing with an identical drive, or inspecting the control board input components.

Any temporary reassignment of a safety-related input must be done by qualified personnel and must not compromise machine safety.

6. Important Measurement Notes

6.1 Do Not Measure Only the Button

Testing the emergency stop button alone is not enough. The drive does not know whether the button itself is good. The drive only knows whether the correct signal reaches its digital input.

Therefore, the signal must be traced from the button to the relay, from the relay to the terminal block, from the terminal block to the PLC or drive, and finally to the ACS550 DI terminal.

6.2 Pay Attention to Normally Open and Normally Closed Logic

Emergency stop circuits usually use normally closed contacts. In normal condition, the circuit is closed. When the emergency stop is pressed, the circuit opens.

However, the drive parameter logic may define whether an input is active high or active low. If the wiring logic and parameter logic do not match, the drive may interpret a normal condition as an emergency stop condition.

This type of logic mismatch is common after parameter changes or drive replacement.

6.3 Confirm the Source of the 24 V Signal

Some machines use the ACS550 internal 24 V supply for digital inputs. Others use an external 24 VDC power supply or PLC output. Before testing or shorting any input, the technician must confirm where the 24 V signal comes from.

Incorrectly mixing an external 24 V supply with the drive’s internal 24 V supply may damage the drive control terminal or PLC output.

6.4 Do Not Bypass the Emergency Stop Circuit Permanently

Some technicians may temporarily short the emergency stop input to make the drive run. This may help identify the fault range, but it creates a serious safety risk.

Emergency stop circuits protect personnel and equipment. On machines with cutters, conveyors, winders, fans, presses, or moving mechanisms, bypassing emergency stop protection can cause injury or equipment damage.

If a temporary bypass is required for diagnosis, it must be performed only under controlled conditions, with the mechanical load isolated, personnel kept away from moving parts, and the original safety circuit restored immediately after testing.

7. Typical Field Case Analysis

A machine using an ABB ACS550 cannot start. The keypad displays Alarm 2023 Emergency Stop. The operator checks the emergency stop button on the control panel and confirms that it is not pressed. The button is rotated and reset several times, but the alarm remains.

At this point, it would be incorrect to conclude immediately that the inverter is damaged. The better approach is to inspect the complete safety chain.

After opening the control cabinet, the technician may find that the emergency stop button does not connect directly to the drive. Instead, it enters a safety relay first. The safety relay output goes to the PLC, and the PLC outputs a run-permit signal to one digital input of the ACS550.

This means that the ACS550 alarm does not necessarily indicate a defective emergency stop button. It indicates that the final run-permit signal has not reached or has not been recognized by the drive.

Possible findings include:

The safety relay has not reset.
The safety relay output contact is not closed.
The PLC has not received the safety relay feedback.
The PLC does not output the run-permit signal.
The intermediate relay contact between the PLC and ACS550 is oxidized.
The ACS550 DI terminal wire is loose.
The 24 V supply is normal, but the DCOM common wire is open.
A parameter has been changed, assigning emergency stop to an unwired DI terminal.

By analyzing the signal chain in this way, the technician can avoid unnecessary drive replacement and locate the real control-circuit fault more efficiently.

8. Difference Between Alarm 2023 and Other Start-Inhibit Alarms

On the ACS550, there are several alarms and conditions that may prevent the drive from starting. These include emergency stop, start enable missing, run enable missing, external fault, and other interlock-related conditions.

Although the symptom may be similar, the causes are different.

Emergency Stop indicates that the emergency stop or safety stop function is active.
Start Enable missing usually indicates that a start-permission input is not satisfied.
External Fault indicates that an external device is reporting a fault to the drive through a digital input.
Run Enable problems indicate that the drive’s run-permit condition is not met.

Therefore, troubleshooting must be based on the exact alarm code and message shown on the keypad. Not all “drive cannot start” cases should be treated as the same fault.

For Alarm 2023, the key point is that the drive believes the emergency stop state is active. If the physical button is not pressed, the next focus should be the safety relay, PLC logic, digital input status, 24 V supply, common terminal, and parameter assignment.

9. Recommended Diagnostic Logic for Technicians

When dealing with ACS550 Alarm 2023, technicians should follow a clear diagnostic logic.

First, do not immediately assume that the drive is damaged. Alarm 2023 is more likely related to external control signals than to the power section.

Second, do not rely only on the visual condition of the emergency stop button. A released button does not guarantee that the ACS550 has received the correct safety-permit signal.

Third, focus on the digital input assigned to emergency stop or run enable. Once this DI point is identified, the technician can determine whether the problem is outside the drive or inside the drive.

Fourth, combine voltage measurement with keypad I/O status. If voltage is missing at the terminal, the problem is external. If voltage is present but the drive input status does not change, the problem may be in the input circuit, common wiring, or parameter logic.

Fifth, check parameters carefully. Parameter errors can create a false emergency stop condition. However, safety-related functions should not be disabled casually.

Sixth, never use a permanent bypass as a repair solution. Emergency stop is part of the machine safety system and must be restored before normal operation.

10. Practical Field Checklist

The following checklist can be used during troubleshooting:

  1. Confirm that all emergency stop buttons are fully reset.
  2. Check safety doors, covers, guard switches, light curtains, and limit switches.
  3. Check whether the emergency stop relay or safety relay is energized.
  4. Confirm whether the safety relay requires manual reset.
  5. Measure the 24 V control supply.
  6. Check 0 V, DCOM, COM, and digital input common wiring.
  7. Measure the voltage at the relevant ACS550 DI terminal.
  8. Check whether the corresponding DI status changes on the keypad.
  9. Review parameters related to emergency stop, start enable, run enable, external fault, and control macro.
  10. Confirm whether the drive has been replaced, reset, or reprogrammed recently.
  11. Check whether the PLC is outputting the run-permit signal.
  12. Inspect intermediate relay contacts for oxidation or poor contact.
  13. Check terminal blocks, connectors, cable numbers, and wiring tightness.
  14. If all external signals are correct, evaluate possible ACS550 digital input or control board damage.

This checklist helps narrow the fault from the complete safety circuit to the exact drive input point.

11. Maintenance Conclusion

ABB ACS550 Alarm 2023 “Emergency Stop” means that the drive has detected an active emergency stop or safety stop condition. In most cases, the root cause is not a damaged inverter power stage, but an issue in the external emergency stop chain, safety relay, PLC interlock, 24 V control supply, digital input wiring, common terminal, parameter logic, or the drive’s digital input circuit.

When the emergency stop button appears normal, the emergency stop circuit should not be considered fully cleared. The key question is whether the correct reset or run-permit signal has actually reached the ACS550 digital input and whether the drive has recognized it through its I/O status.

If there is no correct voltage at the ACS550 DI terminal, the fault is usually in the external control circuit. If the terminal voltage is correct but the drive input status does not change, the cause may be incorrect common wiring, input circuit failure, or control board damage. If the input status is correct but the alarm remains, parameter logic and run interlock configuration should be checked carefully.

The correct troubleshooting strategy is to trace the signal step by step, verify the digital input status, confirm the parameter assignment, and only then judge whether the drive itself is faulty. Blindly replacing the drive or bypassing the emergency stop circuit may create unnecessary cost and serious safety risk.

A safe and reliable repair requires both electrical diagnosis and respect for the machine safety system. Only after the external safety chain, ACS550 input status, and parameter logic are fully verified can Alarm 2023 be resolved accurately and the equipment returned to stable operation.

Posted on

Analysis, Diagnosis, and Repair of Yaskawa SERVOPACK A.923 Fault

1. Overview of the Fault

During operation of Yaskawa SERVOPACK servo drives, operators may encounter the A.923 code displayed on the drive panel. This fault is commonly observed in the Sigma series, particularly when the device is running continuously, the control cabinet temperature is high, dust accumulation is significant, or the drive has been in service for an extended period.

The core meaning of A.923 is: the built-in cooling fan in the SERVOPACK has stopped or is operating abnormally. It is a fan-stop warning, not a motor, encoder, overcurrent, or main power circuit failure. Essentially, the servo drive has detected that the internal fan is not operating according to its specifications and is alerting the operator.

Although A.923 does not indicate an immediate catastrophic failure, it should not be ignored. The internal components of the servo drive—including rectifiers, DC bus capacitors, IGBT modules, braking units, power supplies, driver circuits, and control boards—generate heat during operation. If the fan stops, internal temperatures rise, potentially causing overheat alarms, sudden shutdowns, capacitor aging, IGBT module damage, and, in extreme cases, complete power section failure.

Thus, when A.923 occurs, the root cause should be investigated from multiple angles: fan condition, fan power supply, fan signal feedback, duct and cabinet environment, control board detection circuits, and overall cooling conditions.

Close-up view of a Yaskawa Σ-7 SERVOPACK inside an industrial electronics enclosure, showing a red A.923 error code on the display, surrounded by connectors, colorful wires, and a cooling fan, highlighting the internal components of the servo drive.

2. Technical Meaning of A.923

The primary function of the internal fan is to force airflow to dissipate heat from power devices. Medium- and high-power SERVOPACK drives cannot rely solely on natural convection, and the fan ensures effective heat removal from heatsinks, power modules, and the drive enclosure.

A.923 indicates the drive has detected abnormal fan operation. Scenarios include:

  1. Fan completely stopped: On power-up, the fan does not rotate or stops mid-operation.
  2. Fan speed too low: Bearing wear, dust, or blade resistance causes reduced rotation speed. The drive may detect this as abnormal.
  3. Intermittent fan stoppage: Loose connections, broken wiring, or internal fan sensor issues cause the fan to stop sporadically.
  4. Fan rotating but detection signal abnormal: Fan power is fine, but rotation feedback (e.g., FG signal) is missing or incorrect.
  5. Control board detection circuit failure: Even with a working fan, a damaged detection circuit may falsely trigger A.923.

3. Impact on Equipment Operation

A.923 primarily affects the drive’s cooling. Many operators assume that as long as the drive runs, the alarm can be ignored; this is risky.

IGBT modules and DC bus capacitors generate significant heat, especially during frequent acceleration/deceleration. Without fan cooling, heat accumulates, potentially triggering overheat alarms, power module failure, or DC bus capacitor degradation.

Extended operation under A.923 may shorten capacitor life, reduce ripple tolerance, and destabilize power supplies. In production lines, a drive shutdown can halt the entire process, damage materials, or cause mechanical jamming. Therefore, A.923 is a reliability warning that requires timely attention.

High-resolution macro shot of a Yaskawa Σ-7 SERVOPACK showing the A.923 alarm, with detailed view of the internal wiring, connectors, and a large cooling fan within a tidy industrial control cabinet.

4. Common Causes of A.923

4.1 Fan Failure

Bearings wear over time, lubrication declines, and blades experience resistance. Dusty, oily, or high-temperature environments accelerate deterioration.

4.2 Fan Obstruction

Dust, debris, wire ends, or foreign objects can block the fan blade or heatsink, increasing load or stopping rotation.

4.3 Loose Connectors or Wiring

Vibration or maintenance can loosen fan plugs or wires, causing intermittent operation.

4.4 Fan Power Supply Issue

Fans require DC12V or DC24V. Supply failure prevents operation.

4.5 Feedback Signal Abnormal

Fans with FG signals may rotate correctly but fail to provide feedback, causing the drive to detect a fault.

4.6 Control Board Detection Circuit Fault

Damaged board circuits may misinterpret signals or fail to detect fan rotation.

4.7 Poor Cabinet Cooling

Clogged filters, poor ventilation, insufficient spacing, or crowded drives can reduce cooling efficiency and indirectly trigger A.923.

5. On-Site Troubleshooting Procedure

  1. Confirm the alarm code: Ensure the display shows A.923.
  2. Observe fan operation: Safely power up and check if the fan rotates.
  3. Power off and discharge: Wait for DC bus voltage to drop.
  4. Inspect mechanical condition: Check blade smoothness, wear, and obstruction.
  5. Check fan power supply: Measure voltage per fan specifications.
  6. Replace with a compatible fan: Match voltage, feedback type, wiring, and airflow direction.
  7. Check detection signals: Ensure FG or other feedback lines function.
  8. Clear the alarm and test: Verify fan operation and drive temperature under load.

6. Repair Recommendations

For most maintenance personnel:

  • Clean dust and debris.
  • Check connectors and wiring.
  • Replace the fan with the correct specification.
  • If the alarm persists, inspect fan power supply and control board circuits.

Do not ignore A.923. Continuing operation increases the risk of overheat, shutdown, and component failure.

7. Common Misdiagnoses

  • Confusing A.923 with motor or encoder failure.
  • Assuming a visibly spinning fan is always normal.
  • Using a physically similar but electrically incompatible fan.
  • Only replacing the fan without cleaning the duct or enclosure.
  • Continuing operation without intervention.

8. Preventive Maintenance

  • Periodically clean filters and enclosures.
  • Inspect fan noise and speed.
  • Replace aged fans proactively.
  • Ensure sufficient cabinet ventilation and spacing.
  • Protect against moisture, oil, and conductive dust.

9. Customer Guidance

Inform customers:

A.923 indicates the internal cooling fan has stopped or has abnormal feedback. It is not a motor or encoder fault. Immediate action is recommended to inspect the fan, clean the duct, and replace the fan if necessary. Persistent alarms may indicate internal drive circuits need repair.

This approach clarifies the issue while avoiding unnecessary concern about motor or drive failure.

10. Conclusion

A.923 is a preventive warning about the cooling system in a Yaskawa SERVOPACK. Proper diagnosis includes verifying fan operation, power supply, feedback, and detection circuits. Most cases involve fan wear, obstruction, loose wiring, or power supply issues. Ignoring A.923 risks overheating, shutdown, and power module damage. Timely intervention ensures stable drive operation and long-term reliability.

Posted on

Delta C2000 Series Inverter VFDr Fault Analysis: Causes, Diagnosis, and Repair Logic for “Read VFD Info Error”

1. Overview of the Fault Symptom

During the maintenance and commissioning of Delta C2000 series inverters, technicians may occasionally encounter a fault message on the keypad display showing “VFDr / Read VFD Info Er”. At first glance, this fault does not resemble common inverter faults such as overcurrent, overvoltage, undervoltage, overload, phase loss, ground fault, or overheating. Instead, it points more toward an internal communication or data-reading problem.

Taking a Delta C2000 inverter model VFD040C43A-21 as an example, this unit belongs to the three-phase 380–480V input class, with an output power of approximately 4kW / 5HP. After power-up, the keypad lights up normally, but the display shows:

Fault
VFDr
Read VFD Info Er

From the literal meaning, VFDr can be understood as an abnormal condition during the keypad’s reading of VFD information. The English message “Read VFD Info Er” means “Read VFD Info Error”, indicating that the keypad has failed to read the inverter’s internal information correctly.

The key point of this fault is that the keypad, control board, memory, communication interface, or low-voltage control power supply may have a data exchange problem. As a result, the keypad cannot correctly read the inverter model, parameter information, status data, or internal identification information.

Therefore, the VFDr fault should not be simply understood as a damaged power module, nor should it be directly classified as a motor-side fault. It is more accurately described as an information-reading failure between the human-machine interface and the inverter control system. During repair, troubleshooting should focus first on the keypad, keypad connector, control board communication circuit, low-voltage power supply, memory devices, and the general condition of the control board.

Delta C2000 series inverter showing VFDr fault and “Read VFD Info Er” message on the keypad display during workshop diagnosis.

2. Essential Meaning of the VFDr Fault

The keypad of an inverter is not merely a simple display screen. It usually performs several functions:

It displays operating frequency, current, voltage, fault codes, and status information. It allows parameter reading and modification. It executes commands such as start, stop, forward/reverse operation, and reset. It exchanges data with the main control board through a communication interface. During power-up, it reads the inverter model, capacity, firmware version, parameter area, status flags, and other internal information.

When the keypad displays “Read VFD Info Er”, it means that the keypad has failed while reading internal information from the inverter. This failure may occur at several levels.

The keypad itself may not be working properly. The connection between the keypad and the inverter control board may be poor. The control board may not be responding correctly to the keypad’s request. The internal memory data on the control board may be abnormal, causing the keypad to read invalid information. The low-voltage control power supply may be unstable, causing the MCU, memory, or communication IC to operate abnormally. The control board may be affected by moisture, oxidation, contamination, cold solder joints, or connector damage, resulting in communication failure.

From a repair perspective, VFDr is a communication and data-reading fault, not a typical power output fault. This distinction is very important. If the fault is incorrectly judged as an IGBT, rectifier bridge, DC bus capacitor, or driver board failure, the repair direction will be wrong and a great deal of time may be wasted.

3. Basic Structure of the Delta C2000 Inverter

To analyze the VFDr fault accurately, it is necessary to understand the basic electrical structure of the C2000 series inverter. In general, an inverter consists of the following sections.

3.1 Main Power Circuit

The main power circuit includes the input rectifier, DC bus, pre-charge circuit, braking unit, inverter IGBT module, current detection circuit, and output terminals. Its function is to rectify three-phase AC power into DC power, then use the IGBT inverter section to output three-phase AC power with adjustable frequency and voltage.

Common main circuit faults include input phase loss, DC bus overvoltage, DC bus undervoltage, IGBT short circuit, output ground fault, output phase loss, and braking unit faults. These faults usually appear as protection-related codes such as OC, OV, LV, GF, OH, or OL.

VFDr does not usually point first to a main power circuit fault. Even if the power board is damaged, it may not directly cause VFDr. Conversely, even if the power section is normal, the inverter may still display VFDr due to abnormal communication, memory failure, or control board problems.

3.2 Control Power Supply

The control power supply usually generates several low-voltage rails through a switching power supply circuit, such as 24V, 15V, 5V, and 3.3V. The exact voltage configuration may vary by model, but the general functions are as follows.

The 24V supply is often used for relays, external terminals, fan control, or interface circuits. The 15V supply may be used for analog circuits, driver front-end circuits, or operational amplifiers. The 5V supply is commonly used for communication ICs, digital logic, and some interface circuits. The 3.3V supply is often used for the main MCU, DSP, Flash, EEPROM, or logic chips.

If the 5V or 3.3V supply is unstable, communication between the keypad and the control board may fail. Slight ripple, a low voltage level, or abnormal power-on reset timing may all cause data-reading errors. During repair, it is not enough to check only whether voltage is present. The technician should also confirm whether the voltage is stable, whether ripple is excessive, and whether the power-up sequence is normal.

3.3 Main Control Board

The main control board is the brain of the inverter. It handles parameter processing, operation logic, fault protection, PWM output, communication management, and keypad interaction. It usually contains an MCU or DSP, memory devices, communication ICs, crystal oscillator, reset circuit, analog sampling circuits, and digital input/output circuits.

The VFDr fault is closely related to the control board. If the control board cannot return correct device information to the keypad, the keypad will report a reading error. Control board abnormalities may be caused by several factors:

The MCU fails to start correctly. The crystal oscillator does not oscillate or has an abnormal frequency. The reset circuit is abnormal. Flash or EEPROM data is damaged. The communication IC is faulty. Interface protection components are shorted. The low-voltage power supply is abnormal. The board is affected by moisture or corrosion. The program area or parameter area is corrupted.

3.4 Keypad and Interface Section

The keypad is connected to the inverter body through pins, a ribbon cable, an RJ45 connector, or a similar interface. The keypad usually contains its own MCU, key scanning circuit, display driver, communication interface, and sometimes memory-related devices. It is not a passive display; it is a small communication terminal.

If the keypad connector is oxidized, has poor contact, bent pins, a broken ribbon cable, or a loose socket, VFDr may occur. The same fault may also occur if the keypad’s internal communication IC is damaged. This is especially common in second-hand units, equipment stored for a long time, devices exposed to moisture, or machines used in dusty industrial environments.

Technician testing a Delta C2000 inverter control board with a multimeter while diagnosing the VFDr keypad communication fault.

4. Difference Between VFDr and Common Operating Faults

When technicians see an inverter fault, they may immediately think of the motor, load, IGBT, or power module. However, the logic for diagnosing VFDr is different.

4.1 Common Operating Faults Are Usually Related to Load or Power Circuit Conditions

For example, an overcurrent fault normally requires checking motor insulation, output short circuit, acceleration time, mechanical load jam, IGBT condition, and current detection circuits. An overvoltage fault requires checking input voltage, deceleration time, braking resistor, and braking unit. An overheating fault requires checking the fan, heat sink, temperature sensor, and ambient temperature.

These faults usually occur during start-up, acceleration, operation, deceleration, or load changes.

4.2 VFDr Usually Occurs During Power-Up or Information Reading

VFDr often appears immediately after the inverter is powered on, or when the keypad attempts to enter a menu or read internal information. It is not directly related to whether the motor is connected or whether the load is running. Even if no motor is connected, the inverter may still display VFDr.

This indicates that the fault is closer to the control layer rather than the output power layer.

4.3 VFDr Is Not Simply a Parameter Error

Some technicians may see “Read VFD Info Error” and assume that the parameters are incorrect, then try to restore factory settings. In reality, when the keypad cannot correctly read inverter information, forced initialization may not be effective. The problem may not be parameter setting error; the real issue may be that the keypad cannot establish reliable communication with the control board, or the control board cannot correctly read its own internal information.

If the control board memory is damaged, the communication link is abnormal, or the low-voltage power supply is unstable, restoring parameters will not solve the root cause.

5. Possible Causes of the VFDr Fault

5.1 Poor Keypad Contact

This is one of the most common and easiest causes to eliminate. Industrial environments are complex. After long-term operation, the keypad interface may become oxidized, loose, deformed, or contaminated with dust. After transportation, disassembly, or maintenance, the keypad may also be improperly seated.

The correct method is to power off the inverter, remove the keypad, and inspect the connector and pins for oxidation, blackening, bending, breakage, or looseness. The connector may be cleaned using electronic contact cleaner, then dried thoroughly before reinstallation. If available, a known-good keypad from the same series should be used for cross-testing.

If replacing the keypad clears the fault, the original keypad or its connector is likely defective. If the VFDr fault remains after replacing the keypad, the problem is more likely inside the inverter control board.

5.2 Keypad Failure

The keypad itself contains electronic circuits. After long-term use, it may develop MCU failure, communication IC failure, display driver fault, or Flash data abnormality. If the keypad has been affected by electrostatic discharge, hot plugging, external communication interference, or moisture, internal damage may occur.

A faulty keypad may show garbled characters, no key response, failure to enter menus, read failure, fixed fault display, or communication interruption. The best diagnostic method is still cross-testing: install the suspected keypad on a known-good inverter, or install a known-good keypad on the faulty inverter. Cross-testing is more direct than only measuring voltage.

5.3 Abnormal Keypad Communication Line

The keypad usually exchanges data with the control board through serial communication. The communication path may contain transceiver ICs, protection diodes, TVS diodes, resistors, capacitors, isolation devices, and other components. If any of these components becomes shorted, open, or degraded, communication may fail.

Common problems include damaged communication ICs, shorted TVS diodes, open or drifted resistors near the interface, cold solder joints, corroded traces, broken ribbon cables, PCB trace damage, and leakage in ESD protection devices.

During repair, a multimeter can be used to check whether the resistance from each connector pin to ground is abnormal. If an oscilloscope is available, the communication line should be checked for data waveforms. Under normal conditions, there should be data exchange between the keypad and the control board after power-up. If the signal remains permanently high, permanently low, or severely distorted, the communication link is abnormal.

5.4 Abnormal Low-Voltage Control Power Supply

In VFDr faults, low-voltage power supply problems are often overlooked. Many technicians focus only on the DC bus voltage and power module, but do not carefully measure the control power supply. In fact, an unstable control power supply can create many symptoms that look like communication faults.

The following points should be checked:

Whether 5V is stable. Whether 3.3V is stable. Whether there is a voltage drop during power-up. Whether ripple is excessive. Whether electrolytic capacitors have aged. Whether the DC-DC converter or linear regulator is overheating. Whether the reset circuit is releasing normally. Whether the low-voltage power rail has a short circuit or leakage load.

If the 5V rail is low, for example around 4.5V, the communication IC may still operate marginally, but the data error rate will increase significantly. If the 3.3V rail has ripple or momentary dropouts, the main MCU may repeatedly reset, causing the keypad to fail when reading inverter information.

5.5 Main MCU or DSP Not Starting Correctly

If the main control chip does not start correctly, the keypad cannot read valid inverter information. Causes may include abnormal crystal oscillator operation, reset circuit failure, power supply fault, program memory corruption, or failure of the chip itself.

The technician can measure whether the crystal oscillator has a proper oscillation signal, whether the reset pin level is normal, and whether the main control supply voltage is correct. If the main control chip has abnormal heating, abnormal supply current, or no response on all communication lines, damage to the MCU or program area should be considered.

This type of fault is more difficult to repair. It normally requires an oscilloscope, logic analyzer, thermal camera, adjustable power supply, and comparison with a known-good board of the same model.

5.6 Flash, EEPROM, or Parameter Memory Abnormality

Another important diagnostic direction for “Read VFD Info Error” is the memory section. The inverter stores model information, capacity information, parameter data, firmware version, calibration data, and other internal information. If the memory chip is damaged, or if internal data is lost, corrupted, or fails checksum verification, the control board may be unable to provide correct VFD information to the keypad.

Common causes of memory faults include long-term storage, power failure during writing, surge or electrostatic damage, chip aging, incorrect maintenance operation, moisture-induced leakage around chip pins, and failed firmware or parameter copying.

If the memory area is abnormal, the inverter may not only display VFDr, but may also show incorrect model identification, incorrect capacity identification, failure to save parameters, failure to restore factory settings, or repeated alarms after power-up.

5.7 Moisture, Contamination, or Corrosion on the Control Board

Industrial inverters are often installed in environments containing dust, oil mist, water vapor, or metal particles. Once the control board is affected by moisture or contamination, slight leakage may occur. Digital communication circuits are sensitive to leakage and impedance changes. Even minor contamination may affect data transmission.

The control board should be checked carefully for green copper corrosion near connectors, blackened chip pins, water stains, oil residue, dust accumulation, oxidized ribbon cable sockets, moldy or cracked solder joints, leaking capacitors, and cracked protective coating.

For slight contamination, the board can be cleaned with anhydrous alcohol or dedicated electronic cleaner and then dried thoroughly. For severe corrosion, trace repair, component replacement, or control board replacement may be required.

5.8 External Communication or Expansion Module Interference

Some Delta C2000 inverters are connected to external communication modules, expansion cards, PLCs, HMIs, or fieldbus systems. If an expansion module is abnormal, it may affect internal communication or power-up identification. Although VFDr is more closely related to keypad information reading, external communication interference should also be ruled out in complex systems.

During troubleshooting, all unnecessary external wiring should be disconnected first, leaving only the required input power and keypad. This puts the inverter into a minimum system condition. If the fault disappears after external communication is disconnected, the communication module, parameter settings, shielding, grounding, termination resistor, or external device status should be checked.

6. Systematic Diagnostic Procedure

The VFDr fault should be diagnosed according to the principle of from outside to inside, from simple to complex, from interface to control board. The following procedure is recommended.

6.1 Confirm the Exact Fault Display

First confirm that the display really shows:

VFDr
Read VFD Info Er

Do not rely only on verbal descriptions. A difference of one letter in a fault code may lead to a completely different repair direction. Take photos of the fault display, nameplate, voltage class, operating environment, and wiring condition.

6.2 Power Off, Discharge, and Power On Again

An inverter contains large DC bus capacitors. Even after power is removed, dangerous voltage may remain inside. Before removing the keypad or inspecting internal circuits, power must be disconnected and the DC bus voltage must fall to a safe level. It is recommended to wait more than 10 minutes and measure the voltage between P and N, or DC+ and DC-, to confirm that the bus is discharged.

After repowering the inverter, observe whether the fault remains. If it disappears intermittently, poor contact, unstable power-up, or moisture may be suspected. If it appears every time, the fault is stable and easier to locate.

6.3 Inspect the Keypad and Connector

Remove the keypad and inspect the interface. Clean the connector and pins, then reinstall the keypad. Confirm that it is fully inserted, locked in place, and not loose.

If a known-good keypad from the same series is available, cross-testing should be performed. The test result is highly valuable:

If a known-good keypad works normally on the faulty inverter, the original keypad is likely defective. If a known-good keypad still shows VFDr on the faulty inverter, the fault is likely inside the inverter control board. If the suspected keypad also shows the same fault on a normal inverter, the keypad itself is very likely defective. If the suspected keypad works normally on another inverter, the control board or interface of the faulty inverter should be checked.

6.4 Test the Inverter in Minimum System Condition

Disconnect the motor cable, external control terminals, communication cables, and expansion cards. Keep only the necessary input power and keypad. This eliminates external wiring, communication interference, and terminal short-circuit factors.

If VFDr remains under minimum system conditions, the fault is basically internal to the inverter. If the inverter returns to normal, reconnect external wiring step by step to identify the circuit that triggers the fault.

6.5 Check the Control Power Supply

After opening the cover, measure the key power supply points on the control board. The focus should be on 5V, 3.3V, 24V, and other low-voltage rails. During measurement, do not only check static voltage. Observe whether there is a voltage drop during power-up or when the fault appears.

If an oscilloscope is available, check the power supply ripple. Excessive ripple on digital power rails may cause communication errors and MCU malfunction. For older units, electrolytic capacitors, regulator ICs, DC-DC modules, and switching power supply feedback circuits should be inspected carefully.

6.6 Check Communication Waveforms

In a well-equipped repair environment, an oscilloscope can be used to observe the keypad communication lines. Under normal conditions, there should be data requests and responses between the keypad and the control board after power-up. If only the keypad sends data and there is no response from the control board, the main controller may not have started or the receiving channel may be abnormal. If the control board responds but the waveform amplitude is abnormal or severely distorted, the communication IC, protection devices, or line impedance may be faulty.

If a TVS diode on the communication line is shorted, the waveform may be pulled low or the resistance may be abnormally small. After removing or replacing the abnormal protection component, communication may recover.

6.7 Check Main Controller Start-Up Conditions

If there is no communication response, further check the start-up conditions of the main control chip, including power supply, reset, crystal oscillator, and program memory. If the main controller does not start, the keypad cannot read any valid information.

This step requires stronger electronic repair skills. If no circuit diagram is available, comparison with a known-good board of the same model is useful for judging voltage, waveform, and resistance differences.

6.8 Check Memory and Parameter Area

If the main controller starts and communication waveforms exist, but the information still cannot be read correctly, memory or parameter area abnormality should be suspected. Check the power supply, chip select, clock, and data line waveforms of EEPROM, Flash, FRAM, or other memory devices. Oxidized pins, cold solder joints, or abnormal chip power supply may also cause read failure.

Memory-related faults should not be handled blindly. Some inverter memory devices contain capacity identification, calibration data, and factory information. Replacing the chip with a blank one may cause the inverter to lose capacity identification or fail to operate. Whenever possible, the original data should be preserved. If necessary, data comparison should be performed using the same model and same capacity inverter.

7. Precautions During Repair

7.1 Do Not Hot-Plug the Keypad

Although some inverter keypads support remote mounting or removal, hot-plugging is not recommended during repair. Hot-plugging may generate surge voltage or electrostatic discharge, damaging the keypad communication IC or the main control interface. The correct procedure is to power off the inverter, wait for discharge, confirm safety, and then remove or install the keypad.

7.2 Do Not Immediately Restore Factory Parameters

VFDr is an information-reading error, not a normal parameter setting error. Before communication is restored, factory initialization often cannot be executed correctly. Even if it can be executed, it may erase original parameters and make later commissioning more difficult. In production-line applications, original parameters may include motor nameplate data, control mode, communication address, analog scaling, and protection logic. Random initialization may create additional problems.

7.3 Do Not Immediately Judge the Power Module as Faulty

VFDr does not directly correspond to power module failure. A damaged power module may coexist with other problems, but when VFDr appears alone, the control communication system should be checked first. Blindly removing and testing IGBTs will not solve the reading error and may increase the risk of secondary damage.

7.4 Pay Attention to High-Voltage Safety

The Delta C2000 is an industrial inverter, and the internal DC bus voltage is very high. In a 380V-class inverter, the rectified DC bus voltage can reach approximately 500–700VDC. Even after power is removed, the bus capacitors may still hold dangerous voltage. Before repair, the bus voltage must be measured and confirmed safe. A dark keypad display does not mean the inverter is safe.

7.5 Observe ESD Protection

The keypad, control board, communication ICs, Flash, and EEPROM are all sensitive electronic components. During repair, electrostatic discharge should be avoided. This is especially important when removing and installing the keypad or control board in a dry environment.

8. Typical Diagnostic Logic

When a Delta C2000 inverter displays VFDr after power-up, the following logic can be used.

If the keypad is completely dark, check the control power supply and keypad power first.
If the keypad lights up but displays VFDr, check keypad communication and control board response first.
If replacing the keypad solves the problem, the original keypad or its interface is faulty.
If replacing the keypad does not solve the problem, focus on the control board.
If cleaning the connector solves the problem, poor contact or contamination leakage is confirmed.
If the low-voltage power supply is low, repair the power supply before judging communication.
If the communication line has abnormal resistance to ground, check TVS devices, communication ICs, and nearby interface components.
If the main controller has no crystal oscillation, no reset release, and no communication waveform, check MCU start-up conditions.
If the main controller communicates but information reading still fails, check the memory and parameter area.
If the equipment has been stored for a long time or exposed to moisture, connector oxidation, board contamination, power supply aging, and memory abnormality should be considered high-probability causes.

This diagnostic order helps avoid blind component replacement and improves repair efficiency.

9. Relationship Between VFDr and Long-Term Storage

Inverters that have been stored for a long time are more likely to show VFDr-type faults. There are several reasons.

First, long-term power-off storage can degrade electrolytic capacitors, causing increased ripple in the control power supply during start-up. Second, humid environments can oxidize connectors and cause leakage on the PCB surface. Third, dust and oil contamination accumulated over time can reduce insulation resistance and affect high-impedance communication circuits. Fourth, memory devices or parameter areas in older equipment may develop data abnormalities. Fifth, transportation may loosen the keypad connector, ribbon cable, or socket.

Therefore, for inverters that have been stored for years, it is recommended to perform visual inspection, insulation checking, low-voltage power supply checking, and connector cleaning before power-up. For larger units, capacitor reforming and main circuit safety tests should also be considered to prevent secondary damage caused by direct power-up.

10. Post-Repair Testing

After the VFDr fault is cleared, the repair should not end simply because the keypad no longer reports an error. A full system test should be performed to confirm that both the control system and the power system are operating normally.

Recommended test items include:

Power on the inverter multiple times and confirm that VFDr does not reappear. Enter the parameter menu and confirm that parameters can be read, modified, and saved. Check whether the inverter model, capacity, voltage class, and version information are displayed correctly. Confirm that all keypad buttons work normally. Check whether external terminal inputs and outputs are normal. Check analog input and output functions. Perform no-load operation and observe whether output frequency and voltage are stable. Run the motor at low frequency and observe whether the output current is balanced. Perform acceleration and deceleration tests and confirm that no abnormal alarms occur. Power off and then power on again to confirm that parameter saving is normal.

If the repair involves the memory, control board, or control power supply, parameter retention and repeated power-cycle stability must be tested carefully. Some memory or power supply problems may not appear immediately and may only be exposed after repeated hot and cold tests.

11. Conclusion

When a Delta C2000 series inverter displays VFDr / Read VFD Info Er, the essential fault is that the keypad has failed to read internal information from the inverter. This is different from common main circuit faults such as overcurrent, overvoltage, overload, or short circuit. The repair focus should be placed on the keypad, keypad connector, control board communication circuit, low-voltage control power supply, MCU start-up conditions, and memory data integrity.

In actual repair work, the recommended troubleshooting method is to proceed from outside to inside: first inspect the keypad and connector, then perform cross-testing, check the control power supply and communication waveform, and finally move deeper into the control board, memory, and program data level. For equipment that has been stored for a long time, exposed to moisture, transported, or purchased second-hand, connector oxidation, control board contamination, power supply aging, and parameter storage abnormality are all high-probability causes.

The key to diagnosing VFDr is not to blindly replace power components, but to understand the nature of the fault as an information-reading error. Once the data link between the keypad and the control system is clearly understood, the fault range can be narrowed efficiently by checking power supply, interface, communication, main controller, and memory in sequence.

For technicians, VFDr is a representative control-layer fault. It shows that modern inverters are not just power converters; they are complex systems integrating power electronics, embedded control, digital communication, parameter storage, and human-machine interaction. To repair such equipment accurately, one must understand not only the main power circuit, but also the control board; not only how to test IGBTs, but also how to analyze communication circuits and low-voltage power supplies. Only with this complete diagnostic approach can the real fault be identified and ineffective repair work avoided.

Posted on

Troubleshooting Yaskawa SGDM Servo Drive A.F5 Alarm: Motor Disconnection, Output Circuit Abnormality, and Internal Drive Fault Analysis

1. Overview of the Fault Symptom

Yaskawa SERVOPACK servo drives are widely used in industrial automation equipment. Older Yaskawa series such as SGDM, SGDH, and SGDV are commonly found in CNC machines, printing machines, packaging equipment, semiconductor machinery, handling systems, robotics-related mechanisms, dedicated production lines, and high-precision positioning systems. Because these machines often operate for many years in demanding industrial environments, servo systems may develop alarms, failure to enable, unstable operation, unexpected stopping, or complete axis failure.

One common fault on the Yaskawa SGDM series is the A.F5 alarm. In many field cases, technicians may see “A.F5” on the display and simply interpret it as “AF5.” Some may immediately assume that the servo drive itself is defective. However, this alarm does not always mean that the SERVOPACK is damaged. In many cases, it points to an abnormal motor power circuit, especially a disconnection or poor contact in the U, V, W motor power lines between the servo drive and the servo motor. It may also be caused by an open motor winding, loose terminal, faulty connector, damaged cable, or an internal output detection or current detection fault inside the servo drive.

From a repair and troubleshooting perspective, the A.F5 alarm should be handled according to the principle of checking the external motor circuit first and the internal drive circuit second. It is not correct to dismantle the drive immediately after seeing A.F5, nor is it correct to only check parameters or control signals. The first priority should be to inspect the motor power cable, motor winding, intermediate terminals, connectors, contactors, drag-chain cables, and the U/V/W output path. Only after the external circuit has been confirmed normal should the internal power output stage and detection circuit of the SERVOPACK be considered.

Yaskawa SGDM SERVOPACK 200V servo drive displaying A.F5 alarm inside an industrial electrical cabinet.

2. Basic Meaning of the A.F5 Alarm

On the Yaskawa SGDM servo drive, A.F5 generally indicates a Servomotor Disconnection Alarm.

It can be understood as:

Servo motor power line disconnection alarm, servo motor connection abnormality alarm, or output circuit abnormality alarm.

The core meaning is that when the drive attempts to control the servo motor, it detects that the motor power circuit is not forming a normal current path, or that the output-side condition does not match the expected state of a normally connected motor. As a result, the drive determines that the motor may not be connected correctly, the power cable may be open, one output phase may be missing, or the internal detection circuit may be abnormal.

It is important to note that A.F5 is not primarily an encoder alarm and is not a general parameter error. A complete servo system includes several parts:

  1. Servo drive main power circuit;
  2. Servo drive control board;
  3. Servo motor;
  4. Motor power cable;
  5. Encoder feedback cable;
  6. Control signal wiring;
  7. Servo ON, limit, emergency stop, and safety circuits;
  8. Mechanical load.

The A.F5 alarm mainly concerns the power output relationship between the servo drive and the servo motor. The key inspection targets are the U, V, and W motor phases and the related output detection circuit.

3. Common Timing of the A.F5 Alarm

Before judging the fault location, it is necessary to confirm when the A.F5 alarm appears. Different alarm timing often indicates different fault directions.

3.1 A.F5 Appears Immediately After Control Power Is Turned On

If the servo drive displays A.F5 immediately after the control power is applied, before the Servo ON signal is given, the fault is more likely related to the internal detection circuit of the drive.

Possible causes include:

  • Abnormal internal output detection circuit;
  • Abnormal current detection circuit;
  • Faulty connection between the power board and control board;
  • Aging electronic components inside the drive;
  • Abnormal main circuit detection signal;
  • Previous output short circuit, explosion, water ingress, moisture damage, or severe overload.

External motor wiring problems cannot be completely ruled out, especially if the motor cable is severely shorted or connected incorrectly. However, if the alarm appears before servo enable, the SERVOPACK itself deserves more attention.

3.2 Power-On Is Normal, but A.F5 Appears After Servo ON

If there is no alarm after power-on, but A.F5 appears when the servo is enabled, when the machine is started, or when the axis is about to run, the external motor power circuit is more suspicious.

This is a very common field situation. Typical causes include:

  • One phase of U/V/W motor cable is open;
  • Motor power connector is loose;
  • Motor terminal box wiring is loose;
  • Intermediate terminal block has poor contact;
  • Internal conductor of a drag-chain cable is broken;
  • Output-side contactor contact is burnt or unreliable;
  • Servo motor winding is open;
  • Incorrect wiring after repair, relocation, or modification;
  • Loose screws on the drive output terminals.

In this case, the correct inspection direction is from the drive output terminals to the motor end, section by section.

3.3 A.F5 Appears Occasionally During Operation

If the equipment can run but occasionally stops with A.F5 after a period of operation, the fault is often intermittent.

Common causes include:

  • Drag-chain cable conductor is half-broken due to repeated bending;
  • Motor connector loses contact under vibration;
  • Terminal block oxidation or looseness;
  • Motor cable insulation or conductor damage;
  • Motor winding internal break changes with temperature;
  • Internal solder joint or connector problem inside the drive;
  • Poor thermal stability of the current detection circuit.

Intermittent faults are more difficult to locate than fixed faults. Static measurement may appear normal, but the problem may occur only during movement, vibration, or heating. In such cases, cable bending tests, hot-state testing, operation monitoring, and substitution testing are necessary.

Technician using a multimeter to troubleshoot a Yaskawa SGDM servo drive with A.F5 servomotor disconnection alarm.

4. Difference Between A.F5 Alarm and Encoder Fault

In field maintenance, some technicians tend to classify all servo alarms as “encoder problems.” This is inaccurate. In a Yaskawa servo system, encoder-related alarms usually involve encoder communication, feedback abnormality, encoder disconnection, encoder data error, or battery alarm. The core of A.F5 is not the feedback signal but the motor power output circuit.

The difference can be summarized as follows:

ItemA.F5 AlarmEncoder-Related Alarm
Main targetMotor power cable U/V/WEncoder feedback cable
Circuit involvedMain power output, current detection, motor windingEncoder power, communication, feedback signal
Typical symptomAlarm after Servo ON, motor does not runFeedback abnormality, homing error, encoder communication alarm
Main inspection pointU/V/W cable, motor winding, output terminalsEncoder connector, battery, feedback cable, encoder
Must the motor be faulty?NoNo
Must the drive be faulty?NoNo

Therefore, when A.F5 occurs, the inspection should not focus only on the encoder cable, nor should the encoder be replaced blindly. The correct focus should be the motor three-phase power cable and the drive output circuit.

5. Main Causes of the A.F5 Alarm

5.1 Servo Motor Power Cable Disconnection

This is the most direct and common cause. The servo motor power cable normally includes U, V, W phases and PE ground. The drive outputs three-phase PWM voltage through U, V, and W to control the servo motor. If any phase is disconnected, the drive cannot establish normal output current and may trigger A.F5.

The disconnection may occur at:

  • Drive output terminals;
  • Cabinet terminal block;
  • Aviation connector;
  • Servo motor connector;
  • Drag-chain cable;
  • Cable bending point;
  • Motor terminal box;
  • Rewired location after repair, relocation, or modification.

This is especially common in machines with moving axes, robotic arms, gantry systems, and drag-chain applications. The cable may look intact externally, but the copper conductor inside may already be half-broken or completely open.

5.2 Loose Terminal or Poor Contact

Loose terminals are common in industrial equipment. Servo drive U/V/W outputs carry fast-changing current. If the terminal is not tight, heating, oxidation, arcing, increased contact resistance, or intermittent disconnection may occur.

Typical signs include:

  • Blackened terminal;
  • Discolored cable lug;
  • Loose terminal screw;
  • Yellowed or deformed insulation sleeve;
  • Burnt smell near the terminal;
  • Alarm becomes more frequent during vibration.

Machines with strong vibration, such as punching feeders, packaging machines, printing machines, woodworking machines, and CNC machine tools, are more likely to develop loose terminals.

5.3 Open Servo Motor Winding

If the motor winding is internally open, the drive will also fail to detect a normal motor load. After power-off, the three-phase motor winding resistance can be measured to make a preliminary judgment.

Measurements should be taken between:

  • U-V;
  • V-W;
  • W-U.

The three resistance values should be close to each other. If one pair shows infinite resistance, the winding or internal lead wire may be open. If the three values are obviously unbalanced, the motor may also have an internal fault.

For large servo motors, the winding resistance can be very low, and ordinary multimeters may not give highly accurate readings. Therefore, the relative balance of the three readings is usually more important than the absolute value.

5.4 Intermediate Contactor or Terminal Block Fault

Some machines use an intermediate contactor, terminal block, plug connector, or safety disconnect device between the servo drive and the motor. In general, it is not recommended to casually install a contactor on the U/V/W output side of a servo drive, because the servo output is a high-frequency PWM waveform and improper switching may cause impact or detection errors.

If the original machine design does include an output-side contactor, the following points should be checked carefully:

  • Whether the contactor contacts are burnt;
  • Whether all three phases close reliably and simultaneously;
  • Whether the contactor coil is energized properly;
  • Whether terminal blocks are loose;
  • Whether one phase has high contact resistance;
  • Whether a safety circuit is incorrectly interrupting the output side.

A contactor may appear conductive during static measurement, but under load its voltage drop may increase, causing the drive to report A.F5.

5.5 Servo Motor Model Mismatch or Incorrect Wiring

Yaskawa servo drives require correct motor matching. If the motor, drive, or cable has been replaced, there may be motor mismatch, wrong phase sequence, or incorrect connector pin definition.

Common wiring mistakes include:

  • Connecting a motor from a different series to an incompatible drive;
  • Incorrect U/V/W phase sequence;
  • Motor power cable connected to wrong terminals;
  • Input power and motor output mistakenly reversed;
  • Motor cable connected to braking resistor terminals;
  • Incorrect pin assignment when using a non-original cable.

Reversing the input power and motor output is especially dangerous and may directly damage the power module. During repair, L1/L2/L3 input terminals and U/V/W output terminals must be clearly distinguished. Wire color alone should not be used as the only basis.

5.6 Internal Power Module Fault

If the external motor, cable, connector, and terminal block are confirmed normal but A.F5 remains, an internal drive fault must be considered.

The SGDM series is an older Yaskawa servo drive family. Many units have been operating for more than ten or even twenty years. Aging components, damaged power modules, cracked solder joints, and current detection drift are all possible.

Common internal problems include:

  • Damaged IGBT module;
  • One output phase open internally;
  • Aging gate driver optocoupler;
  • Abnormal gate drive circuit;
  • Current detection circuit fault;
  • Hall current sensor or shunt resistor fault;
  • Poor connection between power board and control board;
  • DC bus voltage detection abnormality;
  • Output detection comparator circuit fault.

If the drive previously experienced output short circuit, motor cable short circuit, water ingress, heavy dust contamination, capacitor failure, or power module explosion, the probability of internal damage is higher.

5.7 Control Board or Detection Circuit Fault

The A.F5 alarm depends on the internal detection logic of the drive. If the detection circuit itself is faulty, the drive may falsely report motor disconnection even when the external motor cable is normal.

Examples include:

  • Current sampling signal not reaching the control board;
  • Damaged operational amplifier;
  • Abnormal isolated feedback signal;
  • Comparator output error;
  • Changed value of analog sampling resistor;
  • Damaged control board input channel;
  • Poor contact in board-to-board ribbon cable or connector.

This type of fault usually requires professional bench repair, circuit measurement, signal tracing, substitution testing, and oscilloscope analysis.

6. Correct Field Troubleshooting Procedure

Step 1: Record the Alarm Condition

Before troubleshooting, record the following information:

  1. Servo drive model;
  2. Servo motor model;
  3. Alarm code;
  4. Whether the alarm appears at power-on or after Servo ON;
  5. Whether the alarm occurs intermittently during operation;
  6. Whether the motor, cable, or drive was repaired or replaced before;
  7. Whether the machine was relocated, rewired, flooded, shorted, or overloaded;
  8. Whether abnormal noise, smell, breaker trip, or mechanical jamming occurred before the alarm.

These details help narrow down the fault quickly.

Step 2: Power Off and Confirm DC Bus Discharge

There is a high-voltage DC bus inside the servo drive. Even after power is turned off, the capacitors may retain dangerous voltage. Before checking U/V/W terminals or opening the drive, the main power must be disconnected and the DC bus voltage must be confirmed safe.

Safety requirements include:

  • Turn off the machine main power;
  • Wait until the CHARGE indicator goes out;
  • Use a multimeter to confirm that the DC bus voltage has dropped to a safe level;
  • Do not touch main circuit terminals directly;
  • Do not plug or unplug motor or encoder cables while powered;
  • Do not disconnect U/V/W wiring while the drive is enabled.

The servo output side carries high-frequency PWM voltage. Live operation can cause electric shock, short circuit, or secondary damage.

Step 3: Inspect the U/V/W Output Terminals

Check the motor output terminals at the bottom of the drive:

  • U;
  • V;
  • W;
  • PE ground.

Inspection items include:

  • Whether terminal screws are loose;
  • Whether cable lugs are tightly pressed;
  • Whether terminals are burnt or blackened;
  • Whether cables are detached;
  • Whether wiring is incorrect;
  • Whether wire numbers match the drawing;
  • Whether copper strands are exposed and causing short circuit;
  • Whether oil, dust, or metal chips are present.

If loose terminals are found, re-crimp the cable lug, clean oxidation, and tighten the terminal. If cable lugs or terminal blocks are already burnt, they should be replaced rather than simply tightened.

Step 4: Measure Motor Winding Resistance

Disconnect the U/V/W motor cable from the drive and measure the motor-side three-phase winding resistance.

MeasurementJudgment
U-VShould show low resistance
V-WShould show low resistance
W-UShould show low resistance
Comparison of three valuesShould be basically balanced
One pair reads infinitePossible winding open circuit or cable break
One pair obviously higherPossible poor contact or winding abnormality

If the measurement is taken at the drive end, the result includes both the cable and motor. If abnormal, continue measuring at the motor connector or motor terminal box to distinguish cable fault from motor fault.

Step 5: Measure Insulation to Ground

Although A.F5 mainly indicates a disconnection alarm, insulation should also be checked. Damaged cable insulation or motor winding leakage may cause other alarms or indirectly affect the drive detection.

Use a megohmmeter to measure:

  • U to PE;
  • V to PE;
  • W to PE;
  • Motor winding to motor housing.

For a servo motor and cable, insulation should be high. If insulation is low, the motor, cable, or connector may be damp, damaged, contaminated, or aged.

Important: the servo drive must be disconnected before using a megohmmeter. Never apply megger voltage directly to the drive electronics, as this may damage the drive.

Step 6: Inspect Motor Connector and Intermediate Connectors

Servo systems often use aviation plugs or special connectors. Connector faults are common, especially in environments with oil mist, coolant, dust, and vibration.

Check for:

  • Bent pins;
  • Pins pushed backward;
  • Connector not locked;
  • Oil or water inside the connector;
  • Oxidized or blackened pins;
  • Poor shield termination;
  • Cable strain at connector tail;
  • Loose crimping inside the plug.

If oil or water has entered the connector, simply blowing it dry may not be reliable. The connector should be cleaned, dried, re-crimped, or replaced if necessary.

Step 7: Inspect Drag-Chain Cable

For moving axes, the drag-chain cable is a key suspect. Drag-chain cable damage can be hidden, and static measurement may not reveal it.

Practical checking methods include:

  1. Measure continuity while bending the cable;
  2. Move the machine to different positions and measure again;
  3. Check whether the alarm only occurs at a certain axis position;
  4. Temporarily bypass the drag-chain cable with another motor cable;
  5. Check whether the bending radius is too small;
  6. Inspect for clamping, pulling, or mechanical damage.

If A.F5 disappears after bypassing the original cable, the original cable or intermediate connector is very likely faulty.

Step 8: Use Substitution Testing to Identify Motor or Drive Fault

If there is another same-model axis or spare equipment on site, substitution testing can be used, but it must be done carefully.

Possible methods include:

  • Connect a known-good motor to the suspected drive;
  • Connect the suspected motor to a known-good drive;
  • Swap motor power cables;
  • Swap encoder cables;
  • Swap drives.

Before substitution, confirm that voltage, power rating, motor model, encoder type, and parameters are compatible. Randomly connecting different motor and drive models may cause damage.

Typical conclusions are:

  • If the fault follows the motor, the motor or motor cable is faulty;
  • If the fault follows the drive, the drive is faulty;
  • If the fault follows the cable, the cable or connector is faulty;
  • If the fault disappears after reconnection, there may have been poor contact.

7. Internal Repair Logic of the Servo Drive

When the external motor cable, motor winding, connector, and terminal block are all confirmed normal but A.F5 remains, the drive should be inspected internally.

7.1 Check the Power Module

The SGDM servo drive uses an internal power module or IGBT output structure. During repair, check:

  • Whether the P-N DC bus is shorted;
  • Whether U/V/W to P or N show abnormal short circuit;
  • Whether the IGBT bridge diode characteristics are normal;
  • Whether one output phase is open;
  • Whether the module has cracks, burns, or explosion marks;
  • Whether the module base shows overheating discoloration.

If the IGBT module is damaged, replacing a fuse or simply resetting the alarm is not enough. The gate drive circuit, motor cable, and load must also be checked, otherwise the new module may fail again.

7.2 Check the Gate Drive Circuit

The IGBT gate drive circuit controls the switching of the power module. If the drive signal is abnormal, output current cannot be established correctly, and the system may judge the motor as disconnected or output abnormal.

Inspection points include:

  • Whether gate drive power supply is normal;
  • Whether upper and lower bridge gate signals are normal;
  • Whether driver optocouplers are damaged;
  • Whether gate resistors are open or changed in value;
  • Whether protection diodes are shorted;
  • Whether the driver board is burnt;
  • Whether board-to-board connectors are reliable.

This area usually requires an oscilloscope and isolated measurement conditions. It is not recommended for untrained field personnel to test blindly.

7.3 Check the Current Detection Circuit

The servo drive often depends on output current feedback to judge motor connection status. If the current detection circuit fails, the control board may interpret the output as abnormal even if the power module is working.

Common detection components include:

  • Current transformer;
  • Hall current sensor;
  • Shunt resistor;
  • Operational amplifier;
  • Comparator;
  • A/D input channel;
  • Isolation amplifier;
  • Signal filter circuit.

If one phase current feedback is missing, the drive may falsely report motor disconnection or output phase loss.

7.4 Check the Connection Between Control Board and Power Board

A common issue in older drives is oxidized board connectors, poor ribbon-cable contact, or cracked solder joints. This is especially common in high-temperature, dusty, oily, or vibrating environments.

Check:

  • Oxidized connectors;
  • Loose ribbon cables;
  • Cracked solder joints;
  • Warped circuit boards;
  • Blackened pins;
  • Electrolytic capacitor leakage corrosion;
  • Conductive dust contamination.

For old drives, cleaning the boards, reseating connectors, and re-soldering suspicious joints may solve intermittent alarms.

8. Common Misjudgments During Repair

8.1 Looking Only at the Alarm Code and Ignoring Alarm Timing

The same A.F5 alarm can have different causes depending on whether it appears at power-on, after Servo ON, or during operation. Ignoring timing can lead to the wrong troubleshooting direction.

8.2 Checking Only the Encoder Cable Instead of the Motor Power Cable

The key circuit of A.F5 is not the encoder cable but the motor power circuit. The encoder cable can be inspected, but it should not be treated as the main target.

8.3 Assuming the Cable Is Good Because a Multimeter Shows Continuity

A half-broken drag-chain cable may appear conductive during static measurement but open during movement. For intermittent alarms, dynamic bending tests or temporary cable replacement are necessary.

8.4 Using a Megohmmeter Without Disconnecting the Drive

Megger voltage can damage drive electronics. When measuring motor or cable insulation, the drive side must be disconnected first.

8.5 Replacing the Drive Blindly

If the root cause is a motor cable break, short circuit, or motor winding fault, replacing the drive may not solve the problem and may even damage the replacement drive.

8.6 Ignoring Mechanical Jamming

Although A.F5 mainly indicates a motor connection abnormality, severe mechanical jamming may cause abnormal servo current and mislead troubleshooting. The mechanical axis, brake release, and load condition should also be checked.

9. Recommended Standard Troubleshooting Flow

For a Yaskawa SGDM servo drive with A.F5 alarm, the following sequence is recommended:

  1. Confirm that the displayed alarm is A.F5;
  2. Record when the alarm appears;
  3. Power off and confirm DC bus discharge;
  4. Check the drive U/V/W output terminals;
  5. Check the motor power wiring;
  6. Measure the three-phase motor winding resistance;
  7. Measure motor and cable insulation to ground;
  8. Inspect motor connector, terminal block, and intermediate contactor;
  9. Check whether drag-chain cable conductors are broken;
  10. Temporarily bypass intermediate wiring for testing;
  11. Use substitution testing to distinguish motor, cable, and drive;
  12. After confirming the external circuit is normal, inspect the drive internally;
  13. Check IGBT, gate drive circuit, current detection circuit, power board, and control board;
  14. Perform no-load testing after repair;
  15. Connect the motor and run at low speed;
  16. Finally restore machine load and test normal operation.

The principle is:

External before internal; simple before complex; low-risk checks before dismantling; root cause confirmation before replacing parts.

10. Key Tests After Repair

After repairing an A.F5 fault, it is not enough to confirm that the alarm disappears. A complete test should be performed.

10.1 Static Test

Check:

  • Drive powers on without alarm;
  • Control power is normal;
  • Main power is normal;
  • DC bus voltage is normal;
  • Cooling fan operates normally;
  • No abnormal sound or smell.

10.2 Servo Enable Test

After applying Servo ON, observe:

  • Whether A.F5 reappears;
  • Whether the motor becomes energized;
  • Whether the brake releases properly;
  • Whether the motor vibrates;
  • Whether current is abnormal;
  • Whether overcurrent, overload, or encoder alarms appear.

10.3 Low-Speed Run Test

Run the motor forward and reverse at low speed and observe:

  • Whether the rotation direction is correct;
  • Whether operation is smooth;
  • Whether there is abnormal noise;
  • Whether current is balanced;
  • Whether speed feedback is stable;
  • Whether stopping is normal.

10.4 Load Test

After restoring the machine load, test:

  • Acceleration and deceleration;
  • Positioning accuracy;
  • Long-term operation;
  • Whether drag-chain movement affects the alarm;
  • Motor and drive temperature rise;
  • Whether terminals become hot.

Only after the machine runs continuously without the alarm should the repair be considered complete.

11. Preventive Maintenance Recommendations

For older Yaskawa SGDM servo systems, regular maintenance can reduce the occurrence of A.F5 and similar alarms.

11.1 Tighten Terminals Regularly

Input terminals, output terminals, motor terminal boxes, and cabinet terminal blocks should be checked regularly. In high-power servo systems, loose terminals can cause heating, burning, and poor contact.

11.2 Inspect Drag-Chain Cables Regularly

Drag-chain cables are consumable parts. Bending points, fixing points, and moving sections should be inspected frequently. Cables beyond their service life should be replaced in advance.

11.3 Keep the Electrical Cabinet Clean

Dust, oil mist, and metal particles can contaminate circuit boards and terminals. Electrical cabinets should be kept clean, dry, and well ventilated.

11.4 Prevent Oil and Water from Entering the Motor

Servo motor connectors, motor terminal boxes, and cable entry points should be protected from coolant, oil, and moisture. This is especially important for machine tools, cleaning equipment, and food packaging machines.

11.5 Avoid Random Switching on the Output Side

Do not casually install contactors, switches, or plug-in structures on the U/V/W output side of the servo drive. If output switching is required by machine design, it must follow proper servo system rules and only switch when the drive is stopped and has no output.

11.6 Mark Wires Clearly After Maintenance

Many servo faults occur after incorrect reconnection. Before disconnecting wires, take photos, mark wire numbers, and record terminal positions. During reassembly, do not rely only on wire color. Always verify according to the drawing and terminal definition.

12. Conclusion

The A.F5 alarm on a Yaskawa SGDM servo drive is essentially a servomotor disconnection or output circuit abnormality alarm. It should not be simply interpreted as “the drive is bad,” nor should the troubleshooting focus only on the encoder or parameters. The correct analysis should focus on the motor power circuit, especially the U/V/W output cable, motor winding, terminal block, connector, drag-chain cable, intermediate contactor, and the internal output detection and power drive circuits of the SERVOPACK.

In practical repair work, if A.F5 appears after Servo ON, the external motor cable, motor winding, connector, and terminal contact should be suspected first. If A.F5 appears immediately after control power is applied, or if the external circuit is fully confirmed normal but the alarm remains, the internal power module, current detection circuit, gate drive circuit, and control board should be inspected.

For old SGDM servo drives, long service life often leads to aging electronic components, poor board contact, and deterioration of the power section. Therefore, successful troubleshooting requires both field electrical diagnosis and electronic repair capability. A systematic process should be followed: alarm timing analysis, external circuit inspection, motor winding measurement, dynamic cable testing, substitution verification, and internal drive inspection.

Although A.F5 appears to be a simple alarm code, it involves the servo system’s power output, motor connection, current detection, and protection logic. For maintenance personnel, the key is not only to remember the alarm code, but to understand the detection logic and fault chain behind it. Only then can the root cause be located quickly, repair efficiency improved, unnecessary part replacement avoided, and machine downtime reduced.

Posted on

Troubleshooting Schneider ATV310 F022 Fault During Constant-Speed Operation: Causes, Parameters, and Practical Solutions

1. Overview of the Fault Symptom

The Schneider Electric ATV310 variable frequency drive is widely used in small and medium-power industrial applications, including fans, pumps, conveyors, woodworking machines, packaging equipment, and general three-phase asynchronous motor control. Because the ATV310 is a compact and economical drive, many technicians assume that its fault codes are limited to common electrical problems such as overcurrent, overvoltage, undervoltage, motor overload, overheating, or output phase loss.

However, in real field service and repair work, one fault is frequently misunderstood: the drive runs normally at a constant speed, then suddenly stops and displays F022. The customer may describe the situation as follows:

The motor runs normally for some time.

The speed is stable, with no acceleration or deceleration at the moment of failure.

The drive suddenly stops.

The display shows F022.

Sending the run command again does not restart the drive.

Only powering off and restarting the drive makes it work again.

After running for a while, the same fault appears again.

This fault is often misdiagnosed as a control board failure, CPU crash, power supply problem, IGBT module fault, motor insulation issue, or internal overheating. In fact, according to the ATV310 fault definition, F022 is not a power-stage fault. It is related to Modbus communication monitoring.

Understanding the real meaning of F022 is the key to solving this problem correctly.

Schneider ATV310 variable frequency drive inside an electrical cabinet, with the front cover open and the red LED display showing F022 Modbus communication fault.

2. What F022 Really Means: Modbus Communication Interruption

On the ATV310, F022 means Modbus interruption. The possible cause is an interruption of communication on the Modbus network.

Although the ATV310 is an entry-level drive, it supports Modbus RTU communication. Through the communication port, a PLC, HMI, industrial computer, gateway, remote terminal, or other Modbus master device can read and write parameters, send run commands, and provide frequency references.

Once Modbus control or communication monitoring is enabled, the drive expects regular communication from the Modbus master. If the drive does not receive valid Modbus requests within the defined timeout period, it detects a communication fault and may stop with F022.

The logic is simple:

The drive believes that Modbus communication should be active.

No valid Modbus request is received within the preset timeout.

The drive detects a communication loss.

If the communication fault management parameter is set to stop the drive, the drive performs a freewheel stop and displays F022.

Therefore, F022 does not directly indicate a motor short circuit, output phase loss, overload, DC bus overvoltage, or IGBT damage. The first diagnostic direction should be communication wiring, communication parameters, command source settings, Modbus timeout, and communication fault management.

3. Why F022 Can Occur During Constant-Speed Operation

Many users ask why a communication fault appears when the motor is already running at a steady speed. They assume that Modbus is only required when starting, stopping, or changing speed.

This is not correct.

In a Modbus-controlled system, the PLC or HMI usually needs to communicate with the drive continuously. Even when the motor is running at a stable speed such as 30 Hz, 40 Hz, or 50 Hz, the master device may still need to send control words, frequency references, status requests, or communication keep-alive messages.

If this periodic communication is interrupted, the drive considers the control channel unreliable. In many industrial systems, loss of communication can be a serious safety and process risk. For example:

A pump may lose pressure or level control.

A fan may lose interlock control.

A conveyor may continue or stop unexpectedly.

The upper control system may no longer know the real drive status.

For this reason, the ATV310 provides Modbus communication fault monitoring. The drive can stop automatically when communication is lost.

Therefore, constant-speed operation does not prevent F022. As long as communication monitoring is active, Modbus loss can trigger F022 during starting, acceleration, constant-speed operation, or deceleration.

Female electrician wearing safety glasses and gloves repairing a Schneider ATV310 variable frequency drive inside an industrial electrical control cabinet.

4. Key ATV310 Parameters Related to F022

When troubleshooting F022, technicians should not only look at the fault code. Several parameters are directly related to this problem, especially 610, 611, 701, 702, 703, and 704.

4.1 Parameter 611: Modbus Communication Fault Management

Parameter 611 is the most direct parameter related to F022. It defines what the drive should do when an integrated Modbus communication fault occurs.

The common settings are:

611 = 00: Modbus communication fault ignored.

611 = 01: Freewheel stop when Modbus communication is interrupted.

If 611 = 01, the drive will stop and display F022 after a Modbus communication interruption. This is normally the safer setting for equipment controlled by PLC or HMI through Modbus.

If 611 = 00, the drive ignores the Modbus communication fault. In this case, communication loss will not stop the drive with F022.

However, setting 611 to 00 is not a universal repair method. It disables Modbus fault monitoring. If the equipment relies on Modbus for critical control, allowing the drive to continue running after communication loss may create a safety risk. This setting should only be used after confirming that Modbus is not used for essential control, or after a proper risk assessment.

4.2 Parameter 610: Disable Detected Faults

Parameter 610 is not only for Modbus. It belongs to the fault detection management menu and allows certain detected faults to be disabled or cleared through a logic input.

The ATV310 manual lists several faults that can be disabled and cleared through this function, including F022.

This means that F022 can also be affected by parameter 610. However, the logic is different from parameter 611.

611 directly manages the Modbus communication fault action.

610 assigns a logic input to disable or clear certain detected faults, including F022.

In practical terms, parameter 611 is the direct Modbus fault management setting, while parameter 610 is a broader external fault inhibition function. They are related, but they are not the same.

4.3 Parameter 704: Modbus Timeout

Parameter 704 is the Modbus timeout parameter. It defines how long the drive waits without receiving a Modbus request before detecting a Modbus fault.

If the PLC or HMI polling cycle is too long, or if the communication task is unstable, a timeout value that is too short can cause nuisance F022 faults.

For example, a PLC may stop polling the drive temporarily because of program execution delays, HMI screen switching, overloaded communication tasks, or a gateway delay. If the time between two valid Modbus requests exceeds the timeout value, the drive may detect F022 even though the cable is not physically disconnected.

Increasing parameter 704 can improve tolerance to temporary communication delays, but it does not solve severe communication instability. If there is real signal loss, noise, poor wiring, or master-side failure, increasing the timeout only delays the fault.

4.4 Parameter 701: Modbus Address

Parameter 701 is the Modbus address. Every drive on the same RS485 network must have a unique address.

If two or more ATV310 drives have the same Modbus address, the master device may receive conflicting responses. This can cause unstable communication, data errors, or intermittent F022 faults.

Address conflict is especially common after replacing a drive, copying parameters, or installing multiple new drives with factory settings.

4.5 Parameter 702: Modbus Baud Rate

Parameter 702 defines the Modbus baud rate. It must match the baud rate setting of the PLC, HMI, gateway, or other master device.

Common baud rates include 4.8 kbps, 9.6 kbps, 19.2 kbps, and 38.4 kbps. Many industrial systems use 9.6 kbps or 19.2 kbps.

If the baud rate is wrong, communication may fail completely. If settings are inconsistent after drive replacement or parameter reset, the system may become unstable.

4.6 Parameter 703: Modbus Format

Parameter 703 defines the Modbus communication format, including parity and stop bit configuration. Typical formats include 8E1, 8N1, or 8N2.

The drive and the master device must use the same format. Any mismatch in baud rate, parity, stop bits, or address can result in communication failure or intermittent F022.

5. Common Causes of F022 in the Field

5.1 Loose or Poor RS485 Connection

Poor communication wiring is one of the most common causes of F022. In a real industrial environment, vibration, dust, humidity, heat, and mechanical stress can weaken RJ45 plugs, terminals, adapters, or intermediate connectors.

Typical points to check include:

Loose RJ45 connector.

Poorly crimped communication plug.

Oxidized terminal block.

Loose A/B wires.

Broken shield wire.

Too many intermediate joints.

Communication cable pulled or bent repeatedly.

If F022 appears randomly during machine operation, especially on vibrating equipment, the first suspicion should be communication contact instability.

5.2 RS485 A/B Polarity Error or Incorrect Wiring

RS485 uses a differential pair, usually marked as A/B, D+/D-, or 485+/485-. Different manufacturers may use different naming conventions. A wiring mistake may cause complete communication failure, but in some cases the system may work intermittently through converters or gateways.

If the fault appears after installing a new drive, replacing a PLC or HMI, changing cables, or modifying the panel wiring, the A/B polarity should be checked carefully. Swapping the A/B wires is often a useful test when communication is unstable.

5.3 Electrical Noise from Motor Cables

The output cable from the drive to the motor is a strong source of high-frequency noise, especially when the motor cable is long, unshielded, poorly grounded, or when the switching frequency is high.

If the RS485 communication cable is routed together with motor cables, input power cables, contactor coil wires, or solenoid valve wires, interference can be coupled into the communication line. This may cause Modbus errors and F022.

Good practice includes:

Separate RS485 cables from power cables.

Avoid long parallel runs with motor cables.

Cross power cables at 90 degrees when necessary.

Use shielded twisted pair cable for RS485.

Ground the shield properly according to the installation design.

Use termination resistors where required.

Use RS485 isolators or repeaters in harsh environments.

5.4 PLC or HMI Communication Task Interruption

F022 is not always caused by the drive or the cable. The Modbus master can also be the source of the problem.

Examples include:

PLC program communication task stops temporarily.

HMI freezes or restarts.

Gateway or serial server reboots.

Communication polling is too slow.

Multiple devices compete for the same communication port.

PLC 24 VDC supply drops.

HMI screen switching overloads the communication task.

If F022 appears at the same time as HMI alarms, PLC communication errors, or gateway restarts, the master-side system must be inspected.

5.5 Duplicate Modbus Addresses

When several ATV310 drives are connected to the same RS485 network, duplicate Modbus addresses can cause random communication failures.

If two drives respond to the same request at the same time, the data on the bus becomes corrupted. One drive may sometimes appear online and sometimes offline. The system may show random F022 faults.

This problem is common when several drives are installed with default settings and the addresses are not changed individually.

5.6 Improper Modbus Timeout Setting

If parameter 704 is too short for the actual communication cycle, F022 may occur even though the network is basically functional.

Some PLC or HMI programs only write the run command once and then stop polling the drive. This is not suitable when communication monitoring is enabled. If the drive expects continuous Modbus activity, the master must keep sending valid requests within the timeout period.

If the application does not require continuous Modbus supervision, the communication fault monitoring strategy should be reviewed.

5.7 Drive Parameters Incorrectly Set to Modbus Control

Another common situation is that the customer does not use any RS485 communication at all, but the ATV310 still reports F022.

This usually means that the parameters were changed incorrectly. The drive may have previously been used in a Modbus-controlled machine and later moved to a simple terminal-control application. Or a technician may have restored or copied the wrong parameters.

If the drive command source or frequency reference source is set to Modbus while no Modbus master is connected, F022 may occur because the drive is waiting for communication that does not exist.

In this case, replacing the control board is unnecessary. The correct approach is to restore the command source and frequency reference source to keypad, terminal, or analog input mode.

6. Why the Drive May Require Power Cycling After F022

Customers often say that after F022 appears, the drive cannot be restarted until power is turned off and on again. This can happen for two reasons.

First, the fault has not been properly reset. Sending a run command again is not the same as resetting a fault. The cause must be removed first, and the fault must then be reset through the keypad, logic input, communication reset, or power cycling.

Second, the communication fault still exists. If the PLC is still not polling, the RS485 cable is still disconnected, or the HMI is still offline, the drive will detect F022 again immediately after reset.

Power cycling may temporarily restart the drive and communication interface, but it does not prove that the root cause is solved. If the communication problem remains, F022 will return.

7. Difference Between Parameters 610 and 611

Because both 610 and 611 can affect F022, technicians may ask which one should be changed.

The answer depends on the purpose.

Parameter 611 is the direct Modbus communication fault management parameter. It defines whether the drive ignores a Modbus fault or performs a freewheel stop.

Parameter 610 is a logic-input assignment for disabling detected faults. It can inhibit or clear several faults, including F022, through an external digital input.

Therefore:

Use 611 when the target is to define the drive’s response to Modbus communication loss.

Use 610 only when the application requires an external input to inhibit or clear selected detected faults.

For troubleshooting, 611 is the more direct parameter for F022. Parameter 610 is more suitable for special applications, commissioning, or temporary bypass logic. It should not be used casually as a permanent solution without safety review.

If the machine truly uses Modbus for run commands or speed reference, permanently ignoring or disabling F022 may be dangerous. If the communication path fails, the drive may continue running without proper supervision from the control system.

8. Practical Troubleshooting Procedure

Step 1: Confirm the Fault Code

First, confirm that the display really shows F022. On a seven-segment display, some fault codes can be misread. A photo or video is useful.

If the fault is confirmed as F022, the troubleshooting direction should be communication.

Step 2: Confirm Whether Modbus Is Used

Check whether the drive is connected to a PLC, HMI, remote terminal, gateway, serial converter, or industrial PC.

If Modbus is used, inspect the communication system.

If Modbus is not used, check whether the drive parameters were incorrectly set to Modbus command or Modbus reference.

Step 3: Check Parameters 701, 702, 703, and 704

Verify:

701: Modbus address.

702: Baud rate.

703: Communication format.

704: Modbus timeout.

For multiple drives on the same network, ensure that every drive has a unique address.

Step 4: Check Parameter 611

If 611 is set to 01, the drive will stop on Modbus communication loss. This confirms that F022 behavior is active.

If the site does not use Modbus control, setting 611 to 00 may be used to verify that the fault is caused by Modbus monitoring. However, safety risk must be evaluated first.

Step 5: Check Parameter 610

Check whether 610 is assigned to a logic input. If it is, confirm the status of that input.

A wrongly assigned or unstable logic input may cause fault inhibition or reset behavior that confuses diagnosis.

Step 6: Inspect the RS485 Physical Layer

Check all communication connectors, terminals, cable shields, intermediate adapters, and routing.

Pay attention to:

Loose plugs.

Broken cable.

Wrong A/B polarity.

Poor shielding.

Communication cable routed with power cable.

Missing termination resistor.

Long cable without repeater.

Grounding problems.

Step 7: Inspect the Master Device

Check the PLC, HMI, or gateway.

Look for:

Communication alarms.

PLC program errors.

HMI freezing.

Gateway restart.

Unstable 24 VDC power supply.

Excessive polling load.

Multiple masters on the same bus.

The drive may be reporting F022 only because the master device stopped sending valid requests.

Step 8: Perform an Isolation Test

If possible, run the drive locally from the keypad or from terminal control, without relying on Modbus. Let it run for a sufficient test period.

If F022 no longer appears, the motor and power stage are probably not the root cause. The problem is likely in the communication path or parameter configuration.

If F022 still appears during local operation, check whether communication monitoring is still enabled or whether an external device is still connected to the communication port.

9. When to Suspect Drive Hardware Failure

Most F022 cases are not caused by internal drive hardware failure. However, hardware should be considered if:

All communication parameters are correct.

The RS485 cable and master device are verified.

Another ATV310 works normally on the same network.

The faulty drive still reports F022 randomly.

The RJ45 communication port is physically damaged.

The control board has corrosion, moisture damage, or burn marks.

Strong voltage was accidentally applied to the communication port.

The RS485 transceiver circuit is suspected to be damaged.

Possible hardware problems include a damaged RJ45 connector, cracked solder joints, failed RS485 transceiver IC, damaged protection components, or control board supply issues. Still, hardware should only be suspected after excluding parameter and wiring problems.

10. Temporary Measures and Permanent Solutions

10.1 Temporary Measures

If the machine must be restarted urgently, the following temporary actions may be considered:

Power cycle the drive after removing the immediate fault condition.

Check and reconnect the RS485 cable.

Restart the PLC, HMI, or gateway.

Increase parameter 704 appropriately.

Set 611 to 00 only if Modbus monitoring is not required.

Run the drive locally for testing.

Use fault reset after communication is restored.

These actions may help resume production, but they do not necessarily solve the root cause.

10.2 Permanent Solutions

A proper long-term solution should focus on communication stability and correct control strategy:

Use shielded twisted pair cable for RS485.

Separate communication cables from power cables.

Improve grounding and shielding.

Use proper termination resistors.

Avoid duplicate addresses.

Avoid multiple Modbus masters on one bus.

Optimize PLC polling logic.

Ensure continuous periodic communication.

Set 704 according to actual communication timing.

Correctly configure command and reference sources.

Do not use Modbus control unless required.

Keep communication fault protection active where safety requires it.

11. Practical Field Judgment

The following questions help quickly identify the direction of diagnosis:

Is the drive connected to a PLC or HMI through Modbus?

If yes, inspect the communication network and master polling.

Is the drive controlled by Modbus for run and speed reference?

If yes, F022 is a critical control-path fault and should not be ignored casually.

Is there no Modbus connection at all?

If yes, check whether the parameters were incorrectly set for Modbus control or communication monitoring.

Does the drive work again after power cycling?

This indicates that the fault can be temporarily reset, but it does not prove that the root cause is fixed.

Does setting 611 to 00 stop the F022 fault?

This confirms that the fault comes from Modbus communication monitoring. It does not prove that the communication system is healthy.

Does the drive run normally in local keypad mode?

If yes, the motor and power module are unlikely to be the main problem. Focus on communication and parameter configuration.

12. Example Case: Fan Drive Stops with F022 at 50 Hz

A machine used an ATV310 drive to control a fan. The customer reported that the fan stopped randomly once or twice per day. The drive always displayed F022. After power cycling, the machine could run again.

At first, the customer suspected that the drive control board was defective. However, inspection showed that the drive was controlled by a PLC through Modbus. Parameter 611 was set to 01, and parameter 704 was set to 10 seconds.

The PLC program was supposed to poll the drive continuously. However, during certain HMI screen changes, the communication task became overloaded and the PLC did not send a valid Modbus request to the drive for more than 10 seconds. The ATV310 then detected Modbus timeout and stopped with F022.

The solution included:

Optimizing the PLC Modbus polling program.

Reducing unnecessary HMI data refresh.

Ensuring periodic transmission of the drive control word.

Separating the RS485 cable from motor cables.

Improving shield grounding.

Adjusting the Modbus timeout after testing.

After these corrections, the drive operated continuously without F022.

This case shows that F022 is often a system communication problem, not a drive power-stage failure.

13. Why F022 Should Not Be Casually Disabled

Some technicians may set 611 to 00 or use 610 to disable F022 immediately after seeing the fault. This may stop the machine from tripping, but it can create serious risk.

If the drive receives its run command and frequency reference through Modbus, loss of communication means the control system may no longer supervise the drive properly. If F022 is disabled, the drive may continue running even when the PLC or HMI has lost control.

Possible risks include:

A pump continues running during a low-level or high-pressure condition.

A fan loses interlock control.

A conveyor keeps moving after downstream blockage.

The HMI displays incorrect drive status.

An emergency-related process command is not transmitted correctly.

For this reason, disabling F022 should only be used for temporary testing or after a proper safety assessment. The preferred solution is to repair the communication problem and keep suitable communication fault protection active.

14. Recommended Troubleshooting Principles

For ATV310 F022 faults, the following principles are recommended:

Confirm the exact fault code first.

Check parameters before replacing hardware.

Check communication wiring before replacing the drive.

Perform local operation testing to isolate the issue.

Do not permanently disable communication fault monitoring without risk assessment.

If a temporary bypass is used, record the parameter change.

Restore proper fault monitoring before final commissioning.

For simple terminal-control applications that do not use Modbus, make sure the drive is not accidentally configured for Modbus command or reference. For automation systems using Modbus, make sure the master device communicates continuously and reliably.

15. Conclusion

The Schneider ATV310 F022 fault is essentially a Modbus communication interruption fault. It is different from overcurrent, overload, output short circuit, or IGBT overheating faults. Troubleshooting should focus on communication wiring, communication parameters, timeout settings, master polling, command source configuration, and fault management logic.

Parameter 611 directly defines the Modbus communication fault response. Parameter 610 can disable or clear selected detected faults, including F022, through a logic input. Parameter 704 defines the Modbus timeout. Parameters 701, 702, and 703 define the address, baud rate, and communication format.

When a customer reports that the ATV310 suddenly stops during constant-speed operation, displays F022, and requires power cycling before restart, the drive should not be judged faulty immediately. A correct diagnostic process should confirm whether Modbus is used, inspect parameters 701 to 704, 610, and 611, check the RS485 wiring and shielding, verify PLC or HMI communication, and perform local operation testing.

If Modbus is not used, F022 is often caused by incorrect parameter configuration. If Modbus is used, the fault is usually caused by RS485 interruption, master polling delay, electrical noise, address conflict, or timeout setting issues.

Parameters 611 or 610 can be used for temporary verification or special applications, but disabling F022 should not be treated as a permanent repair method without safety consideration. The reliable solution is to restore stable Modbus communication and configure the drive’s communication fault management according to the real control and safety requirements of the machine.

Posted on

Panasonic MCDJT3220 Servo Drive Alarm 49.0: Model Identification, Encoder Fault Analysis, and Practical Troubleshooting Guide

In industrial automation maintenance, it is very common for a customer to send only a servo drive nameplate photo or a short alarm video and ask the technician to identify the model, determine the series, and analyze the fault. For experienced servo technicians, the nameplate and alarm code often provide enough key information to establish the initial diagnostic direction. However, for non-specialists, different Panasonic servo drive series can look similar from the outside, and model names can easily be confused. As a result, MINAS LIQI, A4, A5, and A6 series drives are sometimes misidentified.

This article is based on a real field case involving a Panasonic AC Servo Driver. The nameplate shows the model as MCDJT3220, and the video appears to show the display flashing 49.0. Based on the nameplate, Panasonic servo model naming, and common field repair experience, this drive should not be identified as a MINAS A5 or MINAS A6 unit. It is a Panasonic MINAS LIQI series servo drive. The displayed alarm 49.0 should not first lead the technician toward the IGBT module, main power circuit, or motor U/V/W output stage. Instead, the main diagnostic direction should be the servo motor encoder feedback chain, especially the encoder itself, encoder cable, X2 encoder connector, and the encoder receiving circuit inside the drive.


Panasonic MCDJT3220 MINAS LIQI AC servo drive mounted inside an electrical control cabinet, showing the model label, connectors, and industrial wiring layout.

1. Nameplate Identification: This Is Not an A5 or A6 Drive, but a LIQI Series Drive

From the customer’s photo, several important details can be read from the drive nameplate:

  • Brand: Panasonic
  • Product type: AC Servo Driver
  • Model: MCDJT3220
  • Input power supply: 220–240V AC
  • Input phase: single phase
  • Output: 0–240V, three phase
  • Output current: 4.0A
  • Power rating: 750W

The most important information is the model number: MCDJT3220. This model belongs to the Panasonic MINAS LIQI series, not the MINAS A5 or MINAS A6 series.

Many maintenance technicians immediately think of Panasonic A4, A5, or A6 servo drives when they see a Panasonic servo unit, because these series are widely used in factory automation, packaging machines, CNC equipment, labeling machines, printing machines, and various motion control systems. However, Panasonic also has the LIQI series, which is generally positioned as an economical servo system for relatively simple positioning, speed control, light-load transmission, packaging machinery, small automation equipment, and similar applications.

From the model naming structure, MCDJT3220 is clearly different from common A5 or A6 model formats. Panasonic A5 and A6 drives often use model structures such as MBDHT, MCDHT, MADHT, or MDDHT. The LIQI series commonly uses model combinations such as MCDJT. Therefore, the nameplate alone is already sufficient to make a reliable identification: this is a Panasonic MINAS LIQI 750W servo drive.

This distinction is important for repair quotation, spare parts procurement, and technical diagnosis. Different Panasonic servo series may use different control interfaces, encoder protocols, motor matching rules, parameter software, and alarm definitions. If the drive is incorrectly treated as an A5 or A6 model, the technician may consult the wrong manual, select the wrong motor, misunderstand the alarm code, or follow an incorrect troubleshooting path.


2. Basic Electrical Parameters of the Panasonic MCDJT3220

Based on the nameplate, the main electrical specifications of this MCDJT3220 servo drive can be summarized as follows:

ItemSpecification
BrandPanasonic
Product typeAC Servo Driver
SeriesMINAS LIQI
ModelMCDJT3220
Input powerSingle-phase AC 220–240V
Input frequency50/60Hz
Input current6.6A
Output voltageThree-phase 0–240V
Output current4.0A
Rated power750W
Matching motorPanasonic LIQI series servo motor

This is a 750W servo drive with single-phase 220V-class input and three-phase output for a servo motor. A common misunderstanding should be avoided here: although the input power is single phase, the output to the motor is still three-phase U/V/W. Inside the servo drive, the AC input is first rectified into a DC bus, and then the inverter stage generates three-phase PWM output for the servo motor.

Therefore, this drive should not be treated as a simple single-phase motor controller. It should also not be considered equivalent to an ordinary VFD. A servo system has not only a main power circuit and motor U/V/W output, but also a very important encoder feedback loop. If the encoder feedback is abnormal, the servo drive cannot operate normally even if the main power section is still healthy.


Technician troubleshooting Panasonic MCDJT3220 servo drive alarm 49.0 by checking the X2 encoder connector, encoder cable, and motor encoder feedback circuit with a multimeter.

3. Alarm 49.0 Indicates the Encoder Feedback System Should Be the Primary Focus

In the customer’s video, the servo drive display appears to flash 49.0. According to Panasonic servo alarm logic, alarm 49.0 is generally related to encoder protection and is commonly described as:

Incremental Encoder CS Signal Error Protection

In practical terms, it can be understood as:

Incremental encoder CS signal error
or, more simply:

The encoder feedback signal is abnormal, and the servo drive cannot correctly read or identify the motor encoder feedback.

The key word here is encoder. The defining characteristic of a servo system is closed-loop control. The drive does not simply output voltage and current to the motor; it must also continuously receive feedback from the motor encoder to determine rotor position, speed, and direction. If the encoder feedback is incorrect, missing, unstable, or logically inconsistent, the drive cannot safely control the motor.

For this reason, alarm 49.0 should not be diagnosed first as a general “motor not running,” “drive power module failure,” or “IGBT failure” problem. The first diagnostic area should be the encoder feedback chain.


4. What Does an Encoder CS Signal Error Mean?

A servo motor usually has an encoder mounted at the rear end. The encoder converts the motor shaft position, speed, direction, and related feedback information into signals that are sent back to the servo drive. The servo drive uses this feedback for position loop, speed loop, and current loop control.

A CS signal error can be understood as an abnormality in encoder serial communication or status-check logic. During power-on or operation, the drive checks whether the encoder feedback data is valid. If the drive detects abnormal encoder data, communication check errors, missing signals, or logical inconsistency, it triggers encoder protection.

In actual repair work, an encoder CS signal error does not always mean that the encoder itself is definitely damaged. It only means that the drive is receiving abnormal encoder feedback. The root cause may be located anywhere in the feedback chain, including:

  1. Broken encoder cable;
  2. Poor contact at the encoder connector;
  3. Abnormal encoder power supply;
  4. Defective encoder inside the servo motor;
  5. Oil, water, or contamination entering the motor encoder section;
  6. Poor shielding or grounding of the encoder cable, causing electrical interference;
  7. Damaged X2 encoder interface on the drive;
  8. Damaged encoder receiving circuit inside the drive;
  9. Motor and drive mismatch;
  10. Incorrect wiring or modified encoder cable pin assignment.

Therefore, when facing alarm 49.0, the correct method is not to immediately replace the drive. The technician should isolate and check the feedback path step by step: drive → encoder cable → motor encoder.


5. Common Causes of Alarm 49.0

5.1 Encoder Connector Not Fully Inserted or Poor Pin Contact

This is one of the most common and easily overlooked causes in the field. After transportation, machine vibration, drive replacement, cable removal, or maintenance work, the encoder connector may become slightly loose. It may look inserted from the outside, but the locking mechanism may not be fully engaged, or one of the internal pins may not be making reliable contact.

After long-term use, oil, dust, moisture, oxidation, or contamination may also accumulate inside the connector. Encoder signals are low-voltage weak signals. Unlike main power wiring, a small amount of contact resistance or instability can already cause communication failure.

The technician should power off the equipment, wait for the servo drive to discharge, unplug the X2 encoder connector, and inspect the pins carefully. Look for bent pins, recessed pins, broken pins, blackened contacts, oil contamination, moisture, or corrosion. After inspection and cleaning, the connector should be fully inserted and locked before powering on again.

5.2 Internal Breakage or Intermittent Contact in the Encoder Cable

Servo motor encoder cables are usually multi-core cables with thin conductors and shielding. In machines using drag chains, reciprocating axes, robotic arms, feeding mechanisms, cutting axes, or moving carriages, encoder cables are repeatedly bent during operation. Over time, one or more internal conductors may break.

The difficult part is that the outer sheath may still look normal while an internal conductor is already cracked or intermittently open. The machine may work when stationary but alarm when the axis moves to a certain position. The alarm may also appear or disappear when the cable is lightly moved.

For this type of fault, visual inspection alone is not reliable. A multimeter can be used to check continuity pin by pin. During the continuity test, gently bend and move the cable, especially near the motor end, drag chain bending section, and connector root. If the resistance changes or the continuity jumps, the cable likely has an internal break or intermittent connection.

5.3 Abnormal Encoder Power Supply

The encoder normally requires a low-voltage supply from the servo drive, commonly 5V or another specified voltage depending on the system. If the encoder power supply is missing or pulled down, the drive cannot read encoder data correctly.

There are two typical types of encoder power supply problems.

The first type is that the drive does not output the encoder supply correctly. Possible internal causes include a damaged 5V supply circuit, protective resistor, regulator, fuse element, or related power component.

The second type is that the external encoder cable or encoder itself is shorted, pulling down the encoder power supply from the drive. In this case, if the technician replaces only the drive without identifying the external short, the replacement drive may still show the same alarm or may even suffer damage again.

During repair, the technician may disconnect the encoder cable and check whether the encoder supply voltage from the drive side returns to normal. Another effective method is to connect the drive to a known-good matching motor and encoder cable for comparison testing. When measuring the encoder connector, extreme care is required to avoid shorting adjacent pins with the meter probe. A megohmmeter or insulation tester must never be used on encoder signal lines, because the high test voltage can easily damage the encoder and the drive input circuit.

5.4 Defective Motor Encoder

If the encoder connector and cable are confirmed to be normal but alarm 49.0 remains, the motor encoder itself must be suspected. Servo motor encoder damage can be caused by many factors, including:

  • Water entering the motor;
  • Oil entering the encoder section;
  • Mechanical impact on the motor rear cover;
  • Aging of encoder electronic components;
  • Heavy dust contamination;
  • Poor shielding or grounding causing static discharge or interference damage;
  • Hot-plugging the encoder cable;
  • Long-term high-temperature operation causing encoder aging.

A defective encoder may cause an alarm immediately at power-on, or it may fail only after the motor warms up. A temperature-dependent encoder fault can be especially difficult to identify because the drive may work normally when cold and fail only after some operating time.

5.5 Motor and Drive Mismatch

A servo drive cannot be connected to any motor simply because the power rating appears similar. Different Panasonic servo series may use different encoder protocols, feedback resolution, signal formats, and motor identification logic. If the customer has replaced the motor, drive, or cable, it is essential to confirm that the motor model is compatible with the MCDJT3220 drive.

In field repair, this type of situation is very common. The original drive may have failed, and the customer may have found another drive with the “same power rating” as a replacement. Or the original motor may have been replaced by another motor with a similar appearance. For an ordinary VFD driving a three-phase induction motor, similar voltage and power ratings may sometimes be enough for a basic test. However, a servo system is different. If the encoder protocol or motor identification is not compatible, the drive may immediately alarm and refuse to run.

Therefore, when diagnosing alarm 49.0, the motor nameplate must also be checked. The technician should confirm the motor model, encoder type, and power rating, and verify that the motor is suitable for the MCDJT3220 LIQI drive.

5.6 Fault in the Drive’s Internal Encoder Interface Circuit

If a known-good matching motor and encoder cable are connected to the drive and alarm 49.0 still appears, then the internal encoder interface circuit of the drive becomes the main suspect.

The encoder interface circuit may include:

  • Encoder power supply circuit;
  • Input protection components;
  • Differential receiver or serial communication interface IC;
  • Pull-up and pull-down resistors;
  • Filtering capacitors;
  • Optocouplers or isolation components;
  • MCU or control-chip input section.

This part of the circuit is a weak-signal processing circuit and can be damaged by external short circuits, hot-plugging, incorrect encoder wiring, electrostatic discharge, water corrosion, or contamination. Once the encoder interface circuit is damaged, the main power stage of the servo drive may still be normal, but the drive will still alarm because it cannot read the motor feedback.

In such a case, the technician should not focus only on measuring the IGBT or the DC bus voltage. For alarm 49.0, the diagnostic focus should be the X2 encoder interface and its related receiving circuit.


6. Recommended Field Troubleshooting Procedure

When dealing with this alarm, it is best to follow a structured troubleshooting procedure instead of immediately disassembling the drive or replacing expensive components.

Step 1: Confirm That the Alarm Code Is Really 49.0

First, observe the display carefully and confirm that the code is indeed 49.0, not 4.9, 49, E49, or another similar-looking code. Some servo drive displays are small, and a flashing video can easily lead to misreading. Ask the customer to take a clear still photo or record a close-up video of the display.

Correct alarm identification is critical because different alarm codes lead to completely different diagnostic paths. Overvoltage, overcurrent, undervoltage, overload, encoder fault, and excessive position deviation are all different types of faults.

Step 2: Confirm the Drive Model and Motor Model

Check the drive nameplate and confirm that the model is MCDJT3220. Then ask the customer to provide a clear photo of the servo motor nameplate. Confirm whether the motor belongs to the correct Panasonic LIQI matching series.

If the motor model cannot be confirmed, the diagnosis remains incomplete. This is especially important if the customer has replaced the motor or drive before the alarm appeared.

Step 3: Power Off and Reinsert the X2 Encoder Connector

Turn off the main power and wait until the internal capacitors of the servo drive have discharged. Then unplug the X2 encoder connector. Inspect the connector and socket carefully for abnormal pins, contamination, corrosion, loose contact, or mechanical damage. After cleaning and inspection, reinsert the connector firmly and power on again to check whether the alarm disappears.

Servo drives contain a high-voltage DC bus internally. Do not touch the terminals immediately after power-off. Always wait for proper discharge time and follow safety procedures.

Step 4: Inspect the Encoder Cable

Check the encoder cable for visible damage, cuts, crushing, pulling, oil contamination, or water ingress. If the machine uses a drag chain, pay special attention to the bending section. If the alarm changes when the cable is gently moved, an intermittent cable fault is very likely.

If possible, the fastest method is to replace the encoder cable with a known-good cable of the same type.

Step 5: Perform Cross Testing

Cross testing is one of the most effective methods in servo repair.

If there is another identical machine or compatible servo system on site, connect the suspected drive to a known-good motor and encoder cable. Alternatively, connect a known-good drive to the original motor and encoder cable.

The judgment logic is as follows:

  • If the fault follows the motor and encoder cable, the motor encoder or cable is faulty;
  • If the fault follows the drive, the drive’s internal encoder interface is faulty;
  • If replacing the encoder cable solves the problem, the encoder cable is faulty;
  • If replacing the motor solves the problem, the motor encoder is faulty;
  • If replacing the drive solves the problem, the drive interface circuit is faulty.

Cross testing is more reliable than simple measurement because encoder signals are high-speed or serial weak signals. Some problems cannot be clearly detected with a standard multimeter.

Step 6: Measure the Encoder Power Supply

If the technician has proper electrical repair experience, the encoder supply voltage can be measured. If the encoder supply voltage is abnormally low, disconnect the encoder cable and measure again.

If the supply voltage returns to normal after disconnecting the encoder cable, the external cable or motor encoder may be shorted. If the supply voltage is still missing after the encoder cable is disconnected, the drive’s internal encoder power supply circuit may be faulty.

When measuring the encoder connector, avoid shorting the pins. Do not use a high-voltage insulation tester on encoder lines.

Step 7: Check Shielding, Grounding, and Interference

If the alarm does not appear immediately at power-on but occurs intermittently during operation, the technician should also consider electrical interference. In a servo system, the U/V/W motor power cable is a strong noise source, while the encoder cable carries weak feedback signals. These two cables should not be routed closely in parallel over a long distance.

The encoder cable should be an original or high-quality shielded cable, and the shielding should be grounded according to proper practice. If the customer has extended the encoder cable, replaced it with an ordinary multi-core cable, or routed it near power wiring, the probability of alarm 49.0 increases significantly.


7. Difference Between Alarm 49.0 and Main Power Circuit Faults

Many customers see a servo drive alarm and immediately assume that the drive is damaged or that the power module has failed. However, from a repair perspective, it is necessary to distinguish the type of alarm.

If the problem is related to the IGBT module, output short circuit, overcurrent, DC bus overvoltage, braking circuit, or current detection circuit, the alarm code will usually point toward the power circuit or current feedback circuit. Alarm 49.0, on the other hand, points toward encoder feedback. In many cases, the drive may not even begin high-power output before the alarm is generated during power-on self-check or before servo enable.

In other words, alarm 49.0 does not primarily indicate:

  • IGBT failure;
  • Motor winding short circuit;
  • Braking resistor failure;
  • Main capacitor failure;
  • Rectifier bridge failure.

These parts are not impossible to fail, but based on the alarm logic, they should not be the first diagnostic priority. The encoder feedback system should be checked first. Starting with IGBT removal or main circuit testing may waste time and may not address the real fault.


8. Diagnostic Priorities Based on Different Symptoms

8.1 Alarm 49.0 Appears Immediately at Power-On

If the drive displays 49.0 immediately after power-on, before running or servo enable, the most likely causes include:

  • Encoder connector not properly inserted;
  • Broken encoder cable;
  • Encoder supply voltage shorted or missing;
  • Defective motor encoder;
  • Motor and drive mismatch;
  • Damaged encoder interface circuit inside the drive.

This type of fault is usually stable and can often be located by connector inspection, cable replacement, and cross testing.

8.2 Alarm 49.0 Appears After Servo Enable

If the drive powers on normally but alarms after servo enable, the technician should consider encoder data reading, motor identification, feedback validity, and parameter compatibility. Possible causes include:

  • Poor encoder signal quality;
  • Motor and drive parameter mismatch;
  • Partial failure in the encoder signal channels;
  • Failure when the drive attempts to read motor feedback data.

8.3 Alarm 49.0 Appears After Running for Some Time

If the equipment can run but alarms after some operating time, the main suspects are:

  • Intermittent break inside a drag-chain cable;
  • Motor encoder failure after heating;
  • Vibration causing momentary connector contact loss;
  • Encoder cable interference from nearby power wiring;
  • Cable tension when the axis moves to a certain position.

This type of fault is best diagnosed dynamically. Run the axis at low speed while observing the cable bending sections, or move the axis position and gently move the cable while watching whether the alarm appears or clears.


9. Safety Precautions During Repair

Servo drive repair involves both high-voltage power circuits and low-voltage signal circuits. The drive has 220V AC input and an internal high-voltage DC bus. The following precautions are essential:

First, do not touch main circuit terminals immediately after power-off. The internal capacitors need time to discharge.

Second, do not hot-plug the encoder cable. The encoder interface is a weak-signal electronic interface. Hot-plugging may generate transient voltage spikes and damage either the encoder or the drive interface IC.

Third, do not use a megohmmeter on encoder lines. An insulation tester is suitable for checking motor winding insulation to ground, but not for encoder signal wires. Encoder wires are connected directly to electronic circuits, and high test voltage can destroy them.

Fourth, do not randomly modify the encoder cable pinout. Servo encoder wiring is not ordinary control wiring. Pin assignment, shielding, twisted pairs, and grounding all matter. Incorrect modification may cause alarms or damage the interface circuit.

Fifth, when measuring the encoder connector, prevent probe slips and pin short circuits. Encoder connector pins are often dense. A brief short between 5V, signal, and ground pins may create a new fault.


10. Repair Communication and Quotation Suggestions

For a repair service provider, it is not professional to simply tell the customer “the drive is bad” or “the motor is bad” when alarm 49.0 appears. A better explanation is that the current alarm points to the encoder feedback chain, and further testing is required to locate the exact faulty part.

A suitable communication process is:

  1. Confirm the drive model and alarm code;
  2. Explain that the drive is a LIQI series unit, not an A5 or A6 drive;
  3. Explain that alarm 49.0 is an encoder feedback signal fault;
  4. Ask the customer for the motor nameplate, encoder cable photos, and X2 connector photos;
  5. Ask the customer to reinsert the encoder connector and inspect the cable;
  6. If possible, perform cross testing with a known-good matching motor, cable, or drive;
  7. Determine whether the fault is in the motor encoder, encoder cable, or drive interface circuit.

This approach is more professional and helps avoid misunderstanding. In particular, if the customer sends only the drive for repair but keeps the motor and encoder cable on site, the repair provider should explain that if the real fault is in the motor encoder or cable, repairing the drive alone will not solve the on-site alarm.


11. Information the Customer Should Provide

To improve diagnostic accuracy, the customer should provide the following information:

  • Full front photo of the servo drive;
  • Clear drive nameplate photo;
  • Servo motor nameplate photo;
  • Close-up photo of the X2 encoder connector;
  • Photos of both ends of the encoder cable;
  • Power-on alarm video;
  • Whether the alarm appears immediately at power-on, after servo enable, or during operation;
  • Whether the drive, motor, or cable has been replaced before;
  • Whether the machine has experienced water ingress, oil contamination, impact, cable damage, or drag-chain failure;
  • Whether there is another identical machine available for cross testing.

The more complete the information, the more accurate the fault judgment will be.


12. Conclusion

The Panasonic MCDJT3220 is a MINAS LIQI series 750W AC servo drive with single-phase 220–240V input and three-phase 0–240V output. It is not a MINAS A5 or MINAS A6 drive. The customer’s video appears to show alarm 49.0, which should be understood as an encoder feedback abnormality, commonly related to incremental encoder CS signal error protection.

The troubleshooting focus should not begin with the IGBT, rectifier bridge, braking resistor, or main capacitor. Instead, it should focus on the following chain:

Drive X2 encoder interface → encoder cable → motor encoder → encoder power supply and receiving circuit.

In practical repair work, the most effective method is to inspect the connector and cable first, then perform cross testing among the drive, encoder cable, and motor. If the alarm disappears after connecting a known-good matching motor and encoder cable, the original motor encoder or cable is faulty. If the alarm remains, the drive’s internal encoder interface circuit is likely damaged.

For technicians and service engineers, the key point is this: when alarm 49.0 appears on this Panasonic servo drive, do not immediately assume that the power module is defective. A servo system is a closed-loop control system, and encoder feedback is the foundation of operation. If the encoder feedback is invalid, the drive will protect itself even when the main power circuit is still normal. Correct model identification, accurate alarm interpretation, and systematic feedback-chain troubleshooting are the most important steps for solving this type of Panasonic servo fault.