
Part I: Product Overview and Core Functions
1.1 Product Introduction
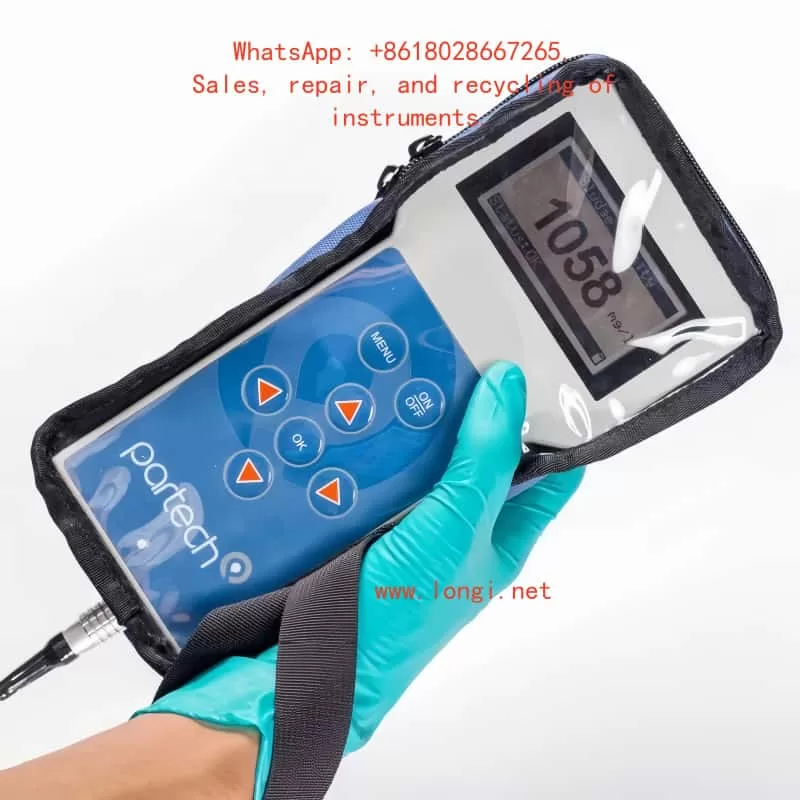
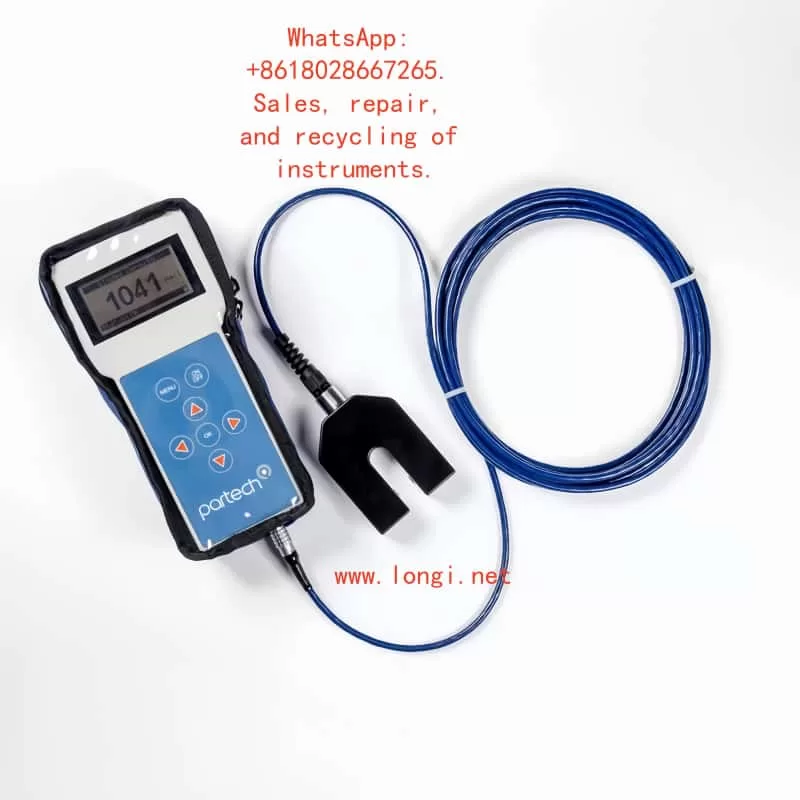
The Partech 740 portable sludge concentration meter is a high-precision instrument specifically designed for monitoring in sewage treatment, industrial wastewater, and surface water. It enables rapid measurement of Suspended Solids (SS), Sludge Blanket Level (SBL), and Turbidity. Its key advantages include:
- Portability and Protection: Featuring an IP65-rated enclosure with a shock-resistant protective case and safety lanyard, it is suitable for use in harsh environments.
- Multi-Scenario Adaptability: Supports up to 10 user-defined configuration profiles to meet diverse calibration needs for different water qualities (e.g., Mixed Liquor Suspended Solids (MLSS), Final Effluent (F.E.)).
- High-Precision Measurement: Utilizes infrared light attenuation principle (880nm wavelength) with a measurement range of 0–20,000 mg/l and repeatability error ≤ ±1% FSD.
1.2 Core Components
- Host Unit: Dimensions 224×106×39mm (H×W×D), weight 0.5kg, with built-in NiMH battery offering 5 hours of runtime.
- Soli-Tech 10 Sensor: Black acetal construction, IP68 waterproof rating, 5m standard cable (extendable to 100m), supporting dual-range modes (low and high concentration).
- Accessory Kit: Includes charger (compatible with EU/US/UK plugs), nylon tool bag, and operation manual.
Part II: Hardware Configuration and Initial Setup
2.1 Device Assembly and Startup
- Sensor Connection: Insert the Soli-Tech 10 sensor into the host unit’s bottom port and tighten the waterproof cap.
- Power On/Off: Press and hold the ON/OFF key on the panel. The initialization screen appears (approx. 3 seconds).
- Battery Management:
- Charging status indicated by LED (red: charging; green: fully charged).
- Auto-shutdown timer configurable (default: 5-minute inactivity sleep).
2.2 Keypad and Display Layout
- Six-Key Membrane Keyboard:
- ↑/↓/←/→: Menu navigation and value adjustment.
- OK: Confirm selection.
- MENU: Return to the previous menu or cancel operation.
- Display Layout:
- Main screen: Large font displays current measurement (e.g., 1500 mg/l), with status bar showing battery level, units, and fault alerts.
Part III: Measurement Process and Calibration Methods
3.1 Basic Measurement Operation
- Select Configuration Profile:
Navigate to MAIN MENU → Select Profile and choose a preset or custom profile (e.g., “Charlestown MLSS”). - Real-Time Measurement:
Immerse the sensor in the liquid. The host updates data every 0.2 seconds. - Damping Adjustment:
Configure response speed via Profile Config → Damping Rate (e.g., “Medium” for 30-second stabilization).
3.2 Calibration Steps (Suspended Solids Example)
- Zero Calibration:
Navigate to Calibration → Set Zero, immerse the sensor in purified water, and press OK to collect data for 5 seconds.- Error Alert: If “Sensor Input Too High” appears, clean the sensor or replace the zero water.
- Span Calibration:
Select Set Span, input the standard solution value (e.g., 1000 mg/l), immerse the sensor, and press OK to collect data for 10 seconds. - Secondary Calibration:
For delayed laboratory results, use Take Sample to store signals and later input actual values via Enter Sample Result for correction.
3.3 Advanced Calibration Options
- Lookup Table Linearization:
Adjust X/Y values in Profile Adv Config for nonlinear samples. - Constant Correction:
A/B/C coefficients for computational adjustments (requires vendor technical support).
Part IV: Profile Management and Customization
4.1 Creating a New Profile
- Startup Wizard: Navigate to MAIN MENU → New Profile Wizard.
- Step-by-Step Setup:
- Preset Type: Select “STW MLSS” or “User Defined”.
- Naming and User Info: Supports 21 characters (e.g., “Aeration Lane 1”).
- Units and Range: Options include mg/l, g/l, FTU, with automatic range scaling (e.g., mg/l→g/l conversion).
4.2 Parameter Customization
- Display Title: Modify via Profile Config → Measurement Title (e.g., “Final Effluent SS”).
- Security Settings: Enable password protection via Lock Instrument (default: 1000, customizable).
Part V: Maintenance and Troubleshooting
5.1 Routine Maintenance
- Sensor Cleaning: Wipe the probe with a soft cloth to avoid organic residue.
- Battery Care: Charge monthly during long-term storage.
- Storage Conditions: -20~60°C in a dry environment.
5.2 Common Faults and Solutions
| Fault Phenomenon | Possible Cause | Solution |
|---|---|---|
| “No Sensor” displayed | Loose connection or sensor failure | Check interface or replace sensor |
| Value drift | Calibration failure or low damping | Recalibrate or adjust damping to “Slow” |
| Charging indicator off | Power adapter failure | Replace compatible charger (11–14VDC) |
5.3 Factory Repair
Include fault description, contact information, and safety precautions.
Part VI: Technical Specifications and Compliance
- EMC Certification: Complies with EN 50081/50082 standards and EU EMC Directive (89/336/EEC).
- Accuracy Verification: Use Fuller’s Earth or Formazin standard solutions (refer to Chapters 20–21 for preparation methods).
- Software Version: Check via Information → Software Version and contact the vendor for updates.
Appendix: Quick Operation Flowchart
Startup → Select Profile → Immerse Sample → Read Data
For Abnormalities:
- Check sensor.
- Restart device.
- Contact technical support.
This guide comprehensively covers operational essentials for the Partech 740. Enhance efficiency with practical examples (e.g., “Bill Smith’s Profile Example” in Chapter 4). For advanced technical support, please contact us.