
Table of Contents
- Introduction
- Instrument Overview
- System Requirements and Installation
- User Interface and Basic Operations
- Data Acquisition and Processing
- Advanced Features and Applications
- Maintenance and Troubleshooting
- Frequently Asked Questions (FAQs)
- Conclusion
1. Introduction
This user guide is designed to provide comprehensive instructions for the Oxford EDS AZtec system, helping users to quickly get started and fully utilize the instrument’s various functions. The Oxford EDS AZtec is an advanced Energy Dispersive X-ray Spectroscopy (EDS) system widely used in materials science, geology, biology, and other fields for analyzing the elemental composition and distribution of samples.

2. Instrument Overview
2.1 Product Introduction
The Oxford EDS AZtec system integrates a high-performance EDS detector, advanced electronics, and powerful data analysis software to provide high-resolution, high-sensitivity elemental analysis. The system supports integration with Scanning Electron Microscopes (SEMs) and Transmission Electron Microscopes (TEMs) for micro-area elemental qualitative and quantitative analysis.
2.2 Key Features
- High-Resolution Detector: Utilizes an advanced Silicon Drift Detector (SDD) for superior energy resolution.
- Fast Data Processing: Powerful data processing capabilities support real-time and post-processing analysis.
- User-Friendly Interface: Intuitive operation interface simplifies complex analysis workflows.
- Multi-Functional Analysis: Supports point analysis, line scans, area scans, and other analysis modes.
- Automated Functions: Includes automated peak identification, background subtraction, etc., to enhance analysis efficiency.
3. System Requirements and Installation
3.1 System Requirements
- Hardware Requirements: Compatible with most modern SEMs and TEMs; specific configurations should refer to the instrument manual.
- Software Requirements: Windows 7/8/10 operating system; at least 4GB RAM and 500GB hard disk space recommended.
- Environmental Requirements: Stable working environment, avoiding strong electromagnetic interference and vibrations.
3.2 Installation Steps
- Hardware Installation:
- Properly install the EDS detector into the SEM/TEM sample chamber.
- Connect the cables between the detector and the control unit.
- Ensure all connections are secure and reliable.
- Software Installation:
- Insert the installation CD containing the AZtec software or download the installation package.
- Run the installation program and follow the prompts to complete the software installation.
- Enter the license key to activate the software.
- System Configuration:
- Launch the AZtec software and perform initial system configuration, including detector calibration and energy calibration.
- Set analysis parameters as needed, such as accelerating voltage and acquisition time.
4. User Interface and Basic Operations
4.1 User Interface Overview
The AZtec software’s user interface is divided into several areas, including the menu bar, toolbar, project view, data view, and status bar. Users can easily access various functions and data through these areas.
4.2 Basic Operation Workflow
- Create a New Project:
- Click on the “File” menu and select “New Project”.
- Enter the project name and save path, then click “OK”.
- Load and Position the Sample:
- Load the sample into the SEM/TEM and adjust it to the desired position.
- Use the image navigation function in the AZtec software to locate the analysis area.
- Data Acquisition:
- Select the analysis mode (point analysis, line scan, area scan, etc.).
- Set acquisition parameters (e.g., accelerating voltage, acquisition time, dead time correction).
- Click the “Start Acquisition” button to initiate the data acquisition process.
- Data Processing and Analysis:
- After acquisition, the software automatically processes the data, including peak identification and background subtraction.
- Use various tools to view and analyze the data, such as spectrum display and elemental distribution maps.
- Save and Export Results:
- Save the analysis results to the project file.
- Export data in formats such as Excel or CSV for further processing and analysis.
5. Data Acquisition and Processing
5.1 Data Acquisition Modes
- Point Analysis: Performs elemental analysis on a single point on the sample, suitable for rapid qualitative analysis.
- Line Scan: Performs continuous elemental analysis along a straight line on the sample, suitable for observing elemental distribution changes along the line.
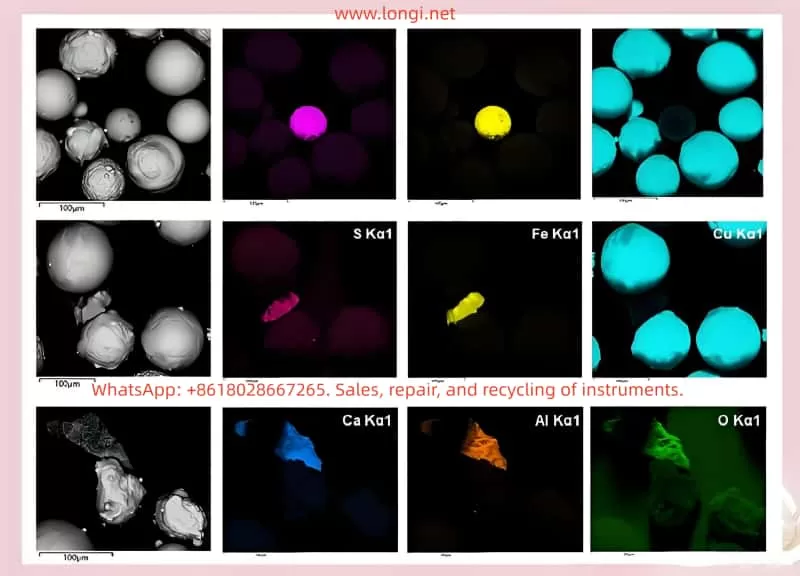
- Area Scan: Performs grid-based elemental analysis on a region of the sample, generating elemental distribution maps suitable for observing elemental distribution within the area.
5.2 Acquisition Parameter Settings
- Accelerating Voltage: Set according to sample type and analysis requirements.
- Acquisition Time: Set based on the desired signal-to-noise ratio and sample characteristics.
- Dead Time Correction: Enable dead time correction to ensure the accuracy of acquired data.
- Energy Calibration: Regularly perform energy calibration to maintain accurate energy resolution.
5.3 Data Processing Workflow
- Peak Identification: The software automatically identifies elemental peaks in the spectrum and labels them with element symbols.
- Background Subtraction: Apply an appropriate background subtraction algorithm to reduce background interference and improve analysis accuracy.
- Quantitative Analysis: Perform quantitative calibration using standard samples or samples with known concentrations to calculate the elemental content in the sample.
- Result Presentation: Display analysis results in the form of spectra, elemental distribution maps, etc., for intuitive understanding by users.
6. Advanced Features and Applications
6.1 LayerProbe Function
LayerProbe is a powerful tool within the AZtec software for analyzing the thickness and composition of multilayer film structures. Users can define parameters for each layer, such as material, thickness, and density, to simulate the actual X-ray emission spectrum of the sample. By comparing the simulated data with experimental data, users can optimize the simulation parameters to obtain precise thickness and composition information for each layer.
6.2 AutoPhase Function
The AutoPhase function automatically converts X-ray mapping data into phase maps, helping users quickly identify different phases in the sample. This function analyzes elemental distribution data through algorithms, automatically delineates phase regions, and calculates the area fraction and elemental composition of each phase.
6.3 Multi-Modal Combined Analysis
The AZtec software supports combined analysis with multiple modes such as EDS and EBSD (Electron Backscatter Diffraction), providing more comprehensive material characterization by simultaneously acquiring elemental composition and crystal structure information from the sample. Users can switch between different analysis modes within the same software interface to achieve seamless data integration and comprehensive analysis.
7. Maintenance and Troubleshooting
7.1 Routine Maintenance
- Clean the Detector Window: Regularly clean the detector window using dedicated cleaning tools to prevent contamination from affecting analysis results.
- Check Cable Connections: Ensure all cable connections are secure and reliable to avoid signal interruptions due to loose connections.
- Software Updates: Regularly check for and install software updates to obtain the latest features and performance improvements.
7.2 Troubleshooting
- No Signal Output: Check the cable connections between the detector and the control unit; verify that the detector parameters are correctly set in the software.
- Abnormal Data: Check sample preparation for compliance with requirements; recalibrate the energy scale; review and adjust acquisition parameter settings.
- Software Crashes: Try restarting the software and computer; check system resource usage (e.g., memory, CPU utilization); contact technical support for assistance.
8. Frequently Asked Questions (FAQs)
Q1: How do I choose the appropriate accelerating voltage?
A1: The choice of accelerating voltage depends on the sample type and analysis requirements. Generally, a higher accelerating voltage can improve X-ray excitation efficiency but may also increase background noise and the risk of sample damage. It is recommended to conduct experiments and optimizations based on sample characteristics and analysis objectives.
Q2: How can I improve the accuracy of quantitative analysis?
A2: The key to improving quantitative analysis accuracy lies in the calibration of standard samples and the optimization of acquisition parameters. Ensure the use of standard samples similar to the sample being tested for calibration; reasonably set acquisition parameters such as acquisition time and dead time correction; regularly perform energy calibration to maintain accurate energy resolution.
Q3: How do I handle outliers in the data?
A3: Outliers in the data may be caused by various factors, such as sample contamination or detector malfunctions. When handling outliers, first check the sample preparation and acquisition process for any issues; then, try using data smoothing or filtering methods to reduce the impact of outliers; for severely abnormal data points, consider directly excluding them or conducting further analysis to determine their causes.
9. Conclusion
This user guide provides a detailed introduction to the various functions, operation workflows, and maintenance and troubleshooting methods of the Oxford EDS AZtec system. By following the guidance in this guide, users can quickly get started and fully utilize the powerful analysis capabilities of the instrument, providing strong support for materials science research. We hope this guide serves as a valuable assistant for users in their work with the Oxford EDS AZtec system.