Posted on

User Guide for Shihlin SE2 Series Frequency Inverter

The Shihlin SE2 series frequency inverter is a high-performance device widely used in various industrial control systems. This article provides a detailed user guide for the Shihlin SE2 series frequency inverter, including an introduction to the operating panel functions, parameter settings, external terminal control, fault codes, and their resolution methods.

Front image of Shilin inverter SE2 series

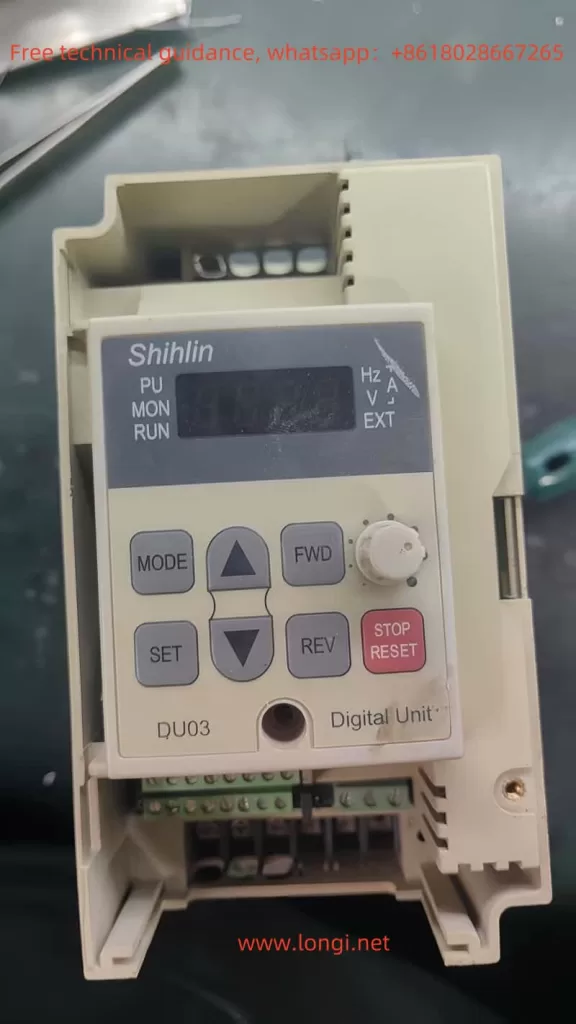
Introduction to Operating Panel Functions

Password Setting and Removal

The Shihlin SE2 series frequency inverter offers password protection to prevent unauthorized operation. The following are the steps to set and remove the password:

  1. Setting the Password:
  • Enter the parameter setting mode and locate the password setting option (usually P.294 and P.295).
  • Input the desired password and save the settings.
  1. Removing the Password:
  • Enter the parameter setting mode and locate the password setting option.
  • Set the password to the default value (usually 0000) and save the settings.

Parameter Access Restriction

To prevent unauthorized parameter modifications, you can set parameter access restrictions:

  1. Setting Parameter Access Restrictions:
  • Enter the parameter setting mode and locate the parameter access restriction option (usually P.77).
  • Set the parameter access restriction to “Read-only” or “Access Denied” and save the settings.

Parameter Initialization

In some cases, you may need to reset all parameters to their factory settings. The following are the steps for parameter initialization:

  1. Parameter Initialization:
  • Enter the parameter setting mode and locate the parameter initialization option (usually P.998).
  • Select “Restore Factory Settings” and save the settings.

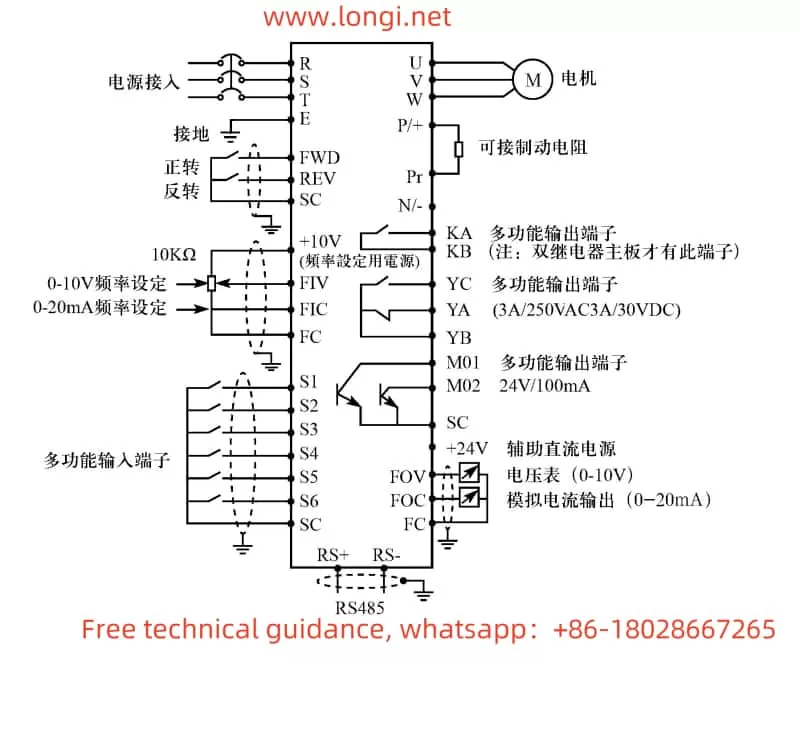
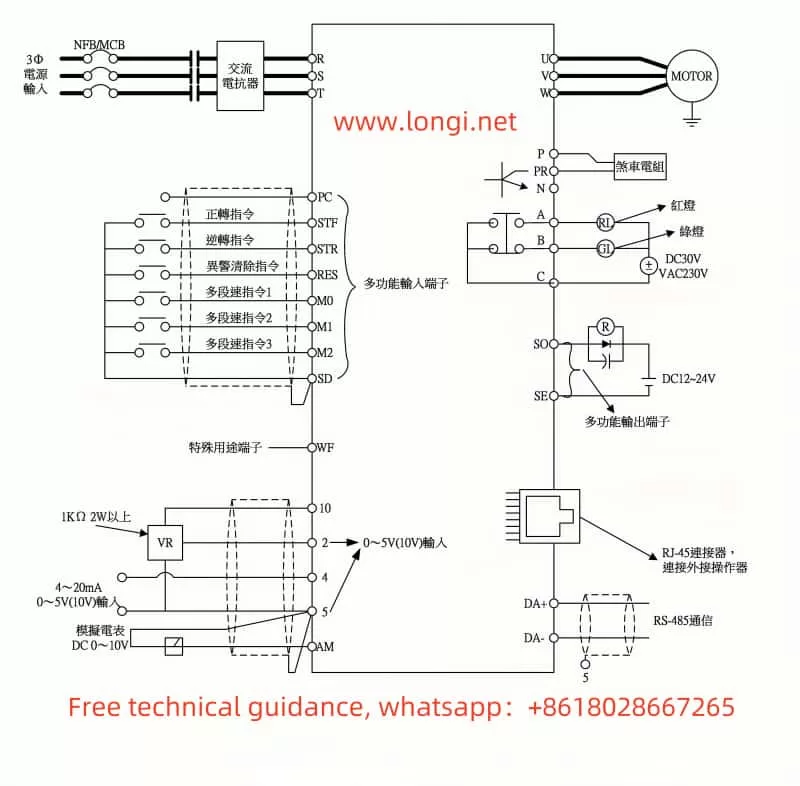
External Terminal Forward/Reverse Start/Stop and External Potentiometer Speed Control

The Shihlin SE2 series supports forward/reverse start/stop and speed control via an external potentiometer. The following are the specific setup steps and wiring methods:

External Terminal Forward/Reverse Start/Stop

  1. Setting Parameters:
  • Enter the parameter setting mode and locate the operation mode selection parameter (usually P.79).
  • Set the operation mode to “External Mode” (usually P.79=2).
  • Set the start terminal function (usually P.78) and select the external forward/reverse terminal.
  1. Wiring:
  • Connect the external start terminal (STF) and stop terminal (STR) to the corresponding terminals on the inverter.

External Potentiometer Speed Control

  1. Setting Parameters:
  • Enter the parameter setting mode and locate the operation mode selection parameter (usually P.79).
  • Set the operation mode to “External Mode” (usually P.79=2).
  • Set the target frequency source to external voltage/current signal (usually P.39).
  1. Wiring:
  • Connect the output terminal of the external potentiometer to the 4-5 terminal of the inverter.
Shilin inverter SE2 series standard wiring diagram

Fault Codes and Their Resolution

The Shihlin SE2 series provides a detailed list of fault codes to help users quickly identify and resolve issues. The following are some common fault codes, their meanings, and resolution methods:

Common Fault Codes

  1. Overcurrent Fault (OC0):
  • Meaning: The inverter detects a current exceeding the set value.
  • Resolution: Check if the motor and load are normal, and ensure the motor is not operating under overload.
  1. Overvoltage Fault (OV0):
  • Meaning: The inverter detects a voltage exceeding the set value.
  • Resolution: Check if the power supply voltage is stable, and ensure the power supply voltage is within the allowed range.
  1. Overheating Fault (OT0):
  • Meaning: The internal temperature of the inverter exceeds the set value.
  • Resolution: Check the heat dissipation of the inverter, ensure good ventilation, and add heat dissipation measures if necessary.
  1. Communication Fault (CM0):
  • Meaning: There is a communication anomaly between the inverter and the upper computer.
  • Resolution: Check if the communication cables are correctly connected, and ensure the communication parameters are set correctly.
  1. Earth Fault (ERR):
  • Meaning: The inverter detects an earth fault.
  • Resolution: Check the grounding of the inverter and ensure it is properly grounded.
  1. Phase Loss Fault (PHL):
  • Meaning: The inverter detects a phase loss in the power supply.
  • Resolution: Check the power supply for any phase loss and ensure all phases are properly connected.

Fault Resolution Steps

  1. Confirm the Fault Code:
  • View the fault code on the inverter’s display to determine the type of fault.
  1. Consult the User Manual:
  • Look up the fault code in the user manual to find the corresponding fault description and resolution method.
  1. Execute the Resolution Method:
  • Follow the instructions in the user manual to resolve the fault and restore the inverter to normal operation.

Conclusion

The Shihlin SE2 series user manual provides detailed operating instructions and fault resolution methods to help users quickly get started and resolve issues during operation. By correctly setting passwords, parameter access restrictions, parameter initialization, external terminal control, and handling fault codes, users can efficiently use and maintain Shihlin SE2 series products. This article aims to provide valuable references to help users better utilize Shihlin SE2 series products.

Posted on

TECO GS510 Series Inverter User Manual Operation Guide

The TECO GS510 series inverter is a high-performance variable frequency drive widely used in industrial automation, ventilation systems, pump equipment, and other fields. This article provides a detailed introduction to the operation panel functions of the GS510 series inverter, parameter initialization, encryption and decryption, parameter access restrictions, external terminal forward and reverse control, external potentiometer speed regulation, fault codes, and their meanings and solutions. Through this article, users can better understand the operation methods of the GS510 inverter, improve equipment utilization efficiency, and reliability.


GS510 working status

I. Operation Panel Function Introduction

1. Operation Panel Overview

The operation panel of the GS510 inverter mainly includes a digital operator and multifunctional terminals. The digital operator comes in two types: LCD display (JNEP-34) and LED display (JNEP-33). Users can choose according to their needs. The main functions of the operation panel include parameter setting, operation control, and fault display.

2. Parameter Initialization

  • Implementation Method:
    By setting the parameter Sn-03 to 1110 or 1111, most parameters of the inverter can be restored to the factory default settings.
  • Steps:
    1. Enter PRGM mode.
    2. Select the parameter Sn-03 and set the value to 1110 or 1111.
    3. After confirmation, the inverter will automatically initialize the parameters.
  • Note: After initialization, the parameters Sn-01, Sn-02, Sn-13, and Sn-23 will not be reset.

3. Encryption and Decryption

  • Encryption Function:
    The GS510 inverter supports parameter encryption to prevent unauthorized personnel from arbitrarily modifying parameters.
  • Encryption Method:
    1. Enter PRGM mode.
    2. Set the parameter Sn-00 to the password value (e.g., 1234).
    3. After confirmation, the inverter enters the encrypted state.
  • Decryption Method:
    1. Enter PRGM mode.
    2. Enter the password value (e.g., 1234).
    3. After confirmation, the inverter exits the encrypted state.

4. Parameter Access Restriction Settings

  • Access Restrictions:
    By setting the parameter Sn-03, the access rights of parameters in different modes can be restricted.
  • DRIVE Mode:
    • Sn-03 = 0000: An, bn parameters can be set, Sn, Cn parameters can only be viewed.
    • Sn-03 = 0101: Only An parameters can be set, other parameters can only be viewed.
  • PRGM Mode:
    • Sn-03 = 0000: All parameters can be set.
    • Sn-03 = 0101: Only An parameters can be set, other parameters can only be viewed.

TECO G510 Label Wiring Diagram

II. External Terminal Control

1. External Terminal Forward and Reverse Control

  • Terminal Connection:
    External forward and reverse control requires the use of control circuit terminals 1 (forward) and 2 (reverse).
  • Wiring Method:
    1. Connect the forward control signal to terminal 1.
    2. Connect the reverse control signal to terminal 2.
  • Parameter Settings:
    1. Set the second bit of parameter Sn-05 to 0, indicating acceptance of external terminal control.
    2. Set the first bit of parameter Sn-03 to 0, indicating that the frequency command comes from the control circuit terminal.

2. External Potentiometer Speed Regulation

  • Terminal Connection:
    External potentiometer speed regulation requires the use of control circuit terminals 13 (voltage type) or 14 (current type).
  • Wiring Method:
    1. Connect the output signal of the potentiometer to terminal 13 (voltage type) or 14 (current type).
    2. Ensure that the output range of the potentiometer matches the input range of the inverter.
  • Parameter Settings:
    1. Set the first bit of parameter Sn-03 to 0, indicating that the frequency command comes from the control circuit terminal.
    2. Set parameter bn-05 to the gain value of the potentiometer, and bn-06 to the offset value of the potentiometer.

III. Fault Codes and Solutions

1. Meaning of Fault Codes

The GS510 inverter displays fault codes through the digital operator to help users quickly identify problems. The following are common fault codes and their meanings:

Fault CodeMeaning
OVOvervoltage fault, main circuit DC voltage exceeds 820V (440V level).
UVUndervoltage fault, main circuit DC voltage below 380V (440V level).
OL1Overload fault, output current exceeds 150% of the rated current.
OCOvercurrent fault, output current exceeds 200% of the rated current.
OHOverheating fault, internal temperature of the inverter is too high.
GFGround fault, electronic circuit detects ground current.

2. Fault Handling Methods

  • Overvoltage (OV) / Undervoltage (UV):
    Check if the input voltage is normal and ensure the stability of the power supply.
  • Overload (OL1) / Overcurrent (OC):
    Check if the load exceeds the rated capacity of the inverter. Reduce the load or replace it with a suitable inverter if necessary.
  • Overheating (OH):
    Check the heat dissipation conditions of the inverter and ensure good ventilation. Install a cooling fan if necessary.
  • Ground Fault (GF):
    Check if the ground wire is correctly connected and ensure that the inverter and motor are grounded separately.

IV. Conclusion

The TECO GS510 series inverter is a powerful and flexible variable frequency drive. By reasonably setting parameters and correctly wiring, various control methods can be realized to meet the needs of different application scenarios. This article provides a detailed introduction to the operation panel functions, parameter initialization, encryption and decryption, parameter access restriction settings, external terminal control, and fault handling methods of the GS510 inverter. It aims to help users better understand the operation methods of the GS510 inverter, improve equipment operation efficiency and reliability. It is hoped that this article will provide valuable reference for users and contribute to the efficient operation of the equipment.

Posted on

User Guide for WTW Trescon OA110 NH4-N Ammonia Nitrogen Analysis Module Manual

I. Module Debugging and Connection

The debugging and connection of the WTW Trescon OA110 NH4-N Ammonia Nitrogen Analysis Module are fundamental to ensure its normal operation. The debugging process includes checking the product delivery list, expanding the analysis module if necessary, connecting the module to the host, and performing initial debugging.

First, users need to verify the product delivery list to ensure that all accessories such as the analysis module, electrodes, tubing, overflow tank, etc., are complete. Next, depending on requirements, users may decide to expand the analysis module. During expansion, it is necessary to install the permeate fluid sampling device and prepare the corresponding reagents. When connecting the analysis module, users need to insert the module’s plug into the corresponding power socket, connect the discharge conduit and ventilation pipe, and install the electrode. Before electrode installation, preprocessing is required, including cleaning the electrode, adding electrolyte, and other steps.

During the initial debugging phase, users need to turn on the power supply, wait for the module to preheat, select the test mode, and perform initial settings such as filling the tubing through the Service menu.

Trescon OA110 NH4-N Replacement T-piece Diagram

II. Parameter Settings

Parameter settings are crucial for the precise operation of the analysis module. Users can activate various parameter options through the main menu for viewing or modification. Key parameters include calibration data, maintenance, AutoCal (automatic calibration), AutoClean (automatic cleaning), display format, attenuation, interval program, AutoAdapt (automatic adaptation), test interval, and dilution factor. When setting parameters, users need to enter a PIN code to confirm changes, and changes to some important parameters will cause the module to enter stop mode.

III. Module Operation

Module operation includes testing, calibration, displaying calibration data, viewing/changing parameters, etc. Testing can be conducted in continuous or intermittent modes, which can be selected in the interval program menu. The calibration process is automatically completed by the AutoCal system, and users can manually initiate it or set the automatic calibration interval. When displaying calibration data, the module will show the detailed parameters of the last calibration. Users can also view or change various parameter settings through the corresponding menus.

IV. Maintenance

Regular maintenance is crucial to ensure the long-term stable operation of the analysis module. Maintenance includes initiating the AutoClean program, filling tubing, replenishing cleaning solution, replacing silicone tubing, replacing membranes/electrodes, etc. The AutoClean program can automatically clean the system, and users can also manually initiate it. When filling tubing, specific reagents and cleaning solutions need to be used following the step-by-step operation. When replenishing cleaning solution, standard solutions, and reagents, users need to ensure that the containers are connected and filled with the corresponding liquids.

When replacing silicone tubing, users need to first empty the system, then replace or move the silicone tubing, and refill the tubing. When replacing membranes/electrodes, users need to first disconnect the electrode, replace the new membrane or electrode, reconnect it, and recalibrate. In addition, users also need to regularly inspect and replace wear parts such as T-pieces.

Schematic diagram of WTW Trescon OA110 NH4-N operation

V. Error Messages and Troubleshooting

During operation, the analysis module may encounter various error messages, such as reagent blockage, reagent depletion, calibration failure, etc. The module will display error messages on the screen and automatically enter stop mode. Users need to take corresponding measures based on the error message prompts, such as checking if the tubing is twisted, replacing reagent bottles, recalibrating, etc. If the error message cannot be resolved, users can contact the WTW customer service department for assistance.

For example, when the screen displays “Reagent Blockage,” users need to first check if the tubing is twisted or pressed by other objects. If the problem persists, the connecting tubing needs to be replaced. If “Calibration Failure” is displayed, users need to check the electrode status and replace the electrode or membrane if necessary, then recalibrate.

In summary, the WTW Trescon OA110 NH4-N Ammonia Nitrogen Analysis Module manual provides users with detailed guides for debugging, connection, parameter setting, operation, maintenance, and error handling. Users need to carefully read and follow the instructions in the manual to ensure the normal operation of the analysis module and the accuracy of test results.

Posted on

WTW TresCon UNO Nitrogen and Phosphorus Analyzer User Manual Operation Guide

I. Analyzer Structure, Function, and Safe Operation

The WTW TresCon UNO Nitrogen and Phosphorus Analyzer is a high-performance single-module analyzer widely used in sewage treatment plants and environmental monitoring. The analyzer features a compact structure and powerful functions, consisting primarily of a controller, analytical modules, reagent trays, overflow tanks, and mounting brackets.

Brief Introduction to Analyzer Structure:

  • Controller: Serves as the control and operation unit of the instrument, equipped with a flat display and touch buttons for dialogue-based menu operation.
  • Analytical Modules: Can be installed with modules for testing ammonia nitrogen (NH4-N), nitrite nitrogen (NO2-N), nitrate nitrogen (NOx-N), and phosphate (PO4-P), meeting various testing needs.
  • Reagent Tray: Used for storing reagents required by the analytical modules, ensuring convenient reagent management and replacement.
  • Overflow Tank: Ensures sufficient but not excessive sample volume, with an optional control valve for automatic cleaning.

Safe Operation Procedures:
Before using the TresCon UNO analyzer, it is crucial to carefully read the safety regulations and understand the boundaries between permitted and prohibited operations. During operation, wear appropriate personal protective equipment such as safety goggles, gloves, and protective clothing. Immediately stop using the instrument and contact professional maintenance personnel in case of faults or abnormalities.

II. Initial Commissioning Process

Initial commissioning is a crucial step to ensure the normal operation of the analyzer. Before commissioning, check if the wastewater connection conduit, tray discharge outlet, sample inlet pipeline, and electrical connections comply with specifications. During commissioning, turn on the power supply, wait for the analytical module to heat up to the set temperature, and then enter the measurement mode. Adjust system parameters such as ID number, PIN code, date, and time according to actual needs.

III. Detailed Operation Procedures

Basic Operating Principles:
The TresCon UNO analyzer is operated through the control buttons and display on the controller. The display shows measurement values, menu options, and related parameters, while the control buttons are used for menu switching, input confirmation, measurement initiation, etc.

Test Value Settings:
Users can set daily, weekly, and monthly reports to view measurement data within specific time periods. Additionally, composite sample averages can be calculated, and data storage and print intervals can be set.

Controller Settings:
In controller settings, users can customize the display format of measurement values and screen information, set recorder output parameters, name analytical modules, and change screen language. For example, users can set relays as frequency controllers, pulse-width controllers, or high/low-point controllers to achieve different monitoring and control functions.

Overflow Valve Control:
For overflow tanks equipped with controllable discharge valves, users can set the valve opening time and interval on the controller to achieve automatic cleaning.

IV. Detailed Maintenance Procedures

Recorder Testing:
Users can set the default output values for the recorder and check its operating status. In the maintenance mode, users can test the output current of each recorder individually to ensure it is within the normal range.

Relay and Valve Testing:
In maintenance mode, users can individually turn on or off relays and valves to check their responses. Simultaneously, the interface test function can be used to send test strings to the specified interface to verify its normal communication.

Interface Testing:
The TresCon UNO analyzer provides RS232 and RS485 interfaces for remote monitoring and data transmission. During maintenance, it is necessary to test the connection stability and data transmission accuracy of these interfaces.

Button and Display Testing:
Button testing is used to check the response of each button, ensuring no失效buttons. Display testing involves displaying different colors row by row to check the integrity and color accuracy of the display screen.

Furthermore, users need to regularly clean and maintain the analyzer, checking the cleanliness and integrity of components such as reagent trays, overflow tanks, and mounting brackets. When necessary, contact WTW-authorized service engineers for professional maintenance and servicing.

In summary, the WTW TresCon UNO Nitrogen and Phosphorus Analyzer User Manual provides detailed operation guides and maintenance procedures. By following the guidance in the manual, users can ensure the normal operation and accurate measurement of the analyzer, providing strong support for environmental monitoring and water quality management.

Posted on

RB5000 Series Inverter User Manual Operation Guide

I. Introduction to Operation Panel Functions and Password & Parameter Settings

The operation panel of the Ribbo Inverter RB5000 series is designed to be intuitive and user-friendly, facilitating various operations and settings. The panel mainly includes keys such as PRG/DRIVE, ▲▼, SET, RUN, STOP, JOG, MENU, and multiple indicator display windows.

RB50000 front

Password Setting and Cancellation: The RB5000 series inverter does not directly mention a password setting function, but certain parameters in the High-level Parameter Group (HP) may involve access restrictions. To set similar password-like access restrictions, the HP-03 parameter can be modified to set the parameter group modification permissions. For example, setting HP-03 to a non-zero value will restrict access and modification to the AP, LP, HP, and PP parameter groups.

Parameter Access Restriction: By setting the HP-03 parameter, users can restrict access and modification permissions to the inverter parameters. For instance, when HP-03=0, all parameter groups can be viewed and modified; when HP-03=1, only the AP parameter group can be viewed and modified, while the other parameter groups can only be viewed.

Restoring Factory Default Settings: To restore the inverter parameters to their factory settings, the HP-03 parameter can be set to 07 or 08, which will not only restore all parameters to their factory defaults but also set the inverter to two-wire or three-wire start/stop control mode.

II. Terminal Forward/Reverse Control and External Potentiometer Speed Regulation

Terminal Forward/Reverse Control: The RB5000 series inverter supports motor forward/reverse control through external terminals. First, the control mode needs to be set to terminal control by setting the HP-04 parameter to 1. Then, depending on the requirements, the HP-03 parameter can be set to select two-wire or three-wire control mode. In two-wire control mode, terminal X1 is the forward start/stop command, and terminal X2 is the reverse start/stop command. In three-wire control mode, terminal X1 is the forward start command, terminal X2 is the reverse start command, and terminal X5 is the stop command.

External Potentiometer Speed Regulation: To regulate speed using an external potentiometer, the frequency command source needs to be set to external analog input by setting the HP-05 parameter to 1. Then, connect the external potentiometer to the VS terminal (voltage input, 0-10V) and GND terminal (common ground). Depending on the output characteristics of the potentiometer, the LP-05 (analog voltage frequency command gain) and LP-06 (analog voltage frequency command offset) parameters may also need to be adjusted to ensure that the speed regulation range matches the potentiometer output range.

RB5000 standard wiring diagram for Ribo Paint frequency converter

III. Fault Codes and Troubleshooting

The RB5000 series inverter features comprehensive fault protection and alarm functions. When a fault occurs, the inverter will display a fault code through the LED to help users quickly locate the problem. Below are some common fault codes, their meanings, and troubleshooting methods:

  • UE1 (UE): Under-voltage on the DC side of the main circuit. Possible causes include insufficient power supply capacity, excessive voltage drop in power supply lines, and power contactor failure. Solutions include checking the power supply voltage, power supply lines, and contactor.
  • OE: Over-voltage on the DC side of the main circuit. Possible causes include too short a deceleration time, excessively high input voltage, or voltage spikes. Solutions include increasing the deceleration time, checking the input voltage, and ensuring power supply stability.
  • OH: Internal overheating of the inverter. Possible causes include a malfunctioning cooling fan, poor ventilation, and blocked heat dissipation channels. Solutions include checking the cooling fan, improving ventilation, and clearing heat dissipation channels.
  • OC: Output current of the inverter exceeds 200% of the rated value. Possible causes include too short an acceleration time, excessively large motor capacity, output short circuit or grounding. Solutions include increasing the acceleration time, checking the motor and output lines.
  • OL1: Motor output overload. Possible causes include improper setting of the rated current and long-term motor overload. Solutions include adjusting the rated current setting and checking the motor load.

When a fault occurs, users should refer to the fault code and fault phenomenon, combined with the fault analysis and troubleshooting methods in the user manual, to troubleshoot and resolve the issue step-by-step. If the problem cannot be resolved independently, users can contact Ribbo Electric’s customer service center or distributor for assistance.

IV. Conclusion

The Ribbo Inverter RB5000 series user manual provides a detailed operation guide and troubleshooting methods, helping users better understand and use the inverter. Through this guide, users should be able to master the basic functions of the operation panel, parameter setting methods, terminal control and external speed regulation implementation, as well as fault code interpretation and troubleshooting. In practical applications, users should strictly follow the operating instructions and safety precautions in the user manual to ensure the normal operation and safe use of the inverter.

Posted on

User Manual Guide for the Fuji High Voltage Inverter FRENIC4600FM6e Series

Introduction

The FRENIC4600FM6e series high voltage inverter from Fuji Electric is a device specifically designed to drive high-voltage motors, widely used in various industrial applications such as water pumps, fans, compressors, and more. This inverter not only provides efficient motor control but also offers a wealth of features and flexible configuration options. To ensure users can fully utilize the inverter’s functions, it is essential to understand and operate the user manual correctly. This article provides a detailed guide to using the FRENIC4600FM6e Series Inverter User Manual, covering wiring, parameter settings, control modes, fault diagnostics, parameter backups, and more, helping users operate and maintain the device more effectively.

FRENIC4600FM6e Structure Diagram

1. Inverter Wiring Guide

Wiring the inverter correctly is fundamental to ensuring its proper operation. For the FRENIC4600FM6e Series, users need to properly connect the power supply, motor, and various control terminals. The following are key points for wiring:

  1. Power Input: The inverter requires a three-phase high voltage input, commonly 3φAC 3.0kV, 3.3kV, 6kV, etc. When connecting the power supply, users must ensure that the input voltage matches the inverter’s rated voltage.
  2. Motor Connection: The inverter outputs three-phase voltage to the motor terminals U, V, and W, driving the motor. When wiring, it is important to ensure that the motor’s rated voltage matches the inverter’s output voltage.
  3. Control Terminals:
    • DI Terminals (Digital Input): Used for control signals such as start/stop, forward/reverse, etc.
    • DO Terminals (Digital Output): Outputs operational status, fault information, and more.
    • AI Terminals (Analog Input): Used for analog frequency command input signals.
    • AO Terminals (Analog Output): Outputs analog frequency, current, and other data.

When wiring, ensure all terminals are securely connected, and pay attention to the specific function of each terminal to avoid miswiring, which could lead to device failure.

RRENIC4600 version status display

2. Parameter Settings and Initialization

  1. Basic Parameter Settings
    • No.1~12: Set operating frequency, output voltage, and other parameters. Users can adjust these settings based on the motor and load requirements to ensure the device operates under optimal conditions.
    • No.28~40: Set acceleration and deceleration times, determining the smoothness of motor start and stop.
    • No.173: Set the function of external terminals (such as DI terminals) for start/stop, forward/reverse, and other control signals.
  2. Initialization Settings The FRENIC4600FM6e Series offers a factory reset function. Users can restore the inverter to its default settings using No.200, which resets the inverter’s parameters to their factory default configuration. This operation is useful when resetting parameters or correcting configuration errors.
  3. Parameter Backup Before performing initialization or other operations, it is advisable to back up the parameters to prevent losing important custom configurations. Users can back up and restore the parameter settings using Loader software. The steps are as follows:
    • Connect Loader to the inverter.
    • In Loader, select the option to back up current settings.
    • Choose a file location for storing the backup file. The backup file can be saved on a computer and used for future recovery operations.
    • To restore the parameters, load the backup file and restore the previous configuration.
RRENIC4600 parameter settings

3. Control Modes and Password Settings

The FRENIC4600FM6e supports multiple control modes, including panel control and external terminal control. Users can select the appropriate control mode based on their needs.

  1. Panel Control vs. External Terminal Control
    • Panel Control: Users can directly set frequency, start/stop the motor, and more via the LCD panel.
    • External Terminal Control: Through DI terminals, external control signals can start or stop the inverter. Users need to configure the terminal functions via No.173 to ensure proper signal transmission.
  2. Password Protection and Parameter Access Restrictions To prevent unauthorized operations, the inverter supports password protection and parameter access restrictions:
    • No.12: Set administrator and user passwords. Different passwords provide different access levels—administrators can modify all parameters, while users are restricted.
    • No.13~14: Set parameter access restrictions, preventing critical parameters from being accidentally changed or modified by unauthorized personnel.

By using password protection and access restrictions, users can effectively safeguard the operation and configuration of the inverter, preventing operational errors or unauthorized modifications.

FRENIC4600FM6e Structure Diagram

4. Fault Diagnostics and Solutions

During operation of the FRENIC4600FM6e Series, users may encounter various faults. The inverter provides LCD panel or fault codes to offer fault information, helping users quickly locate the problem.

  1. Common Fault Codes and Solutions:
    • E.F. Overload Fault: Check if the motor load is too high. Avoid overload conditions.
    • E.U. Phase Loss Fault: Check the power supply wiring to ensure there is no missing phase.
    • E.O. High Voltage Fault: Adjust the output voltage settings and check for motor problems.
    • E.C. Low Battery Voltage: Replace the internal battery of the inverter.
    • E.P. Over Temperature Fault: Check if the cooling system is working properly and clean the heat sinks.
  2. Troubleshooting Steps:
    • Check Power Supply and Cables: Ensure the power supply is stable, and the cable connections are secure and undamaged.
    • Check Motor Load: Ensure the motor load does not exceed the rated capacity.
    • Check Cooling System: Clean fans and heat sinks regularly to ensure the inverter operates within the appropriate temperature range.
RRENIC4600 shutdown status

5. Summary

The FRENIC4600FM6e High Voltage Inverter is a high-performance motor control device equipped with various features such as parameter settings, control modes, password protection, fault diagnostics, and more. By understanding and correctly operating the functions outlined in the user manual, users can effectively configure, operate, and maintain the device. Whether backing up parameters using Loader, setting password protection, diagnosing faults, or configuring control modes, making proper use of these functions ensures long-term stable operation, improved efficiency, and enhanced safety.

This guide aims to help users better understand and use the FRENIC4600FM6e Series Inverter, maximizing its performance advantages in real-world applications.

Posted on

Analysis and Solutions for Siemens S120/S150 Drive F07802 Fault Code

In Siemens SINAMICS S120 and S150 series drives, the F07802 fault code indicates that the rectifier unit or power module is not ready. This fault typically occurs during the drive’s startup process, signaling that the drive has not received a readiness feedback from the power module within the expected time frame. Understanding the meaning of this fault and its solutions is crucial for ensuring the drive operates correctly.

F07802 actual display

1. Fault Meaning

The F07802 fault code signifies that after the internal enable command, the drive has not received a readiness signal from the rectifier or power module. Possible causes include:

  • Short Monitoring Time: The drive’s waiting period for the power module to become ready is insufficient, leading to a timeout.
  • Absence of DC Bus Voltage: The DC bus voltage has not been established, preventing the power module from starting.
  • Faulty Rectifier or Power Module: The associated components have hardware faults, rendering them inoperative.
  • Incorrect Input Voltage Settings: The drive’s input voltage parameters are misconfigured, causing the power module to fail to start.
CU320-2

2. Fault Diagnosis and Solutions

To address the above potential causes, consider the following steps:

  • Extend Monitoring Time (P0857): In the drive’s parameter settings, appropriately increase the monitoring time for the power module to ensure there is sufficient time during startup for the power module to become ready.
  • Check DC Bus Voltage: Use a multimeter to measure the DC bus voltage, ensuring it is within the normal range. If the voltage is abnormal, inspect the DC bus wiring and connections for looseness or poor contact.
  • Inspect Rectifier and Power Module: Examine the status indicators of the relevant components to confirm they are functioning correctly. If indicators are abnormal or absent, the components may need replacement.
  • Verify Input Voltage Settings (P0210): In the drive’s parameter settings, confirm that the input voltage parameters match the actual supply voltage. Mismatched settings can prevent the power module from starting.

3. Preventive Measures

To prevent the occurrence of the F07802 fault, it is advisable to implement the following measures:

  • Regular Maintenance: Periodically inspect the drive’s electrical connections and component statuses to promptly identify and address potential issues.
  • Correct Parameter Configuration: Ensure all parameters, especially those related to voltage and monitoring time, are correctly configured in the drive’s settings.
  • Stable Power Supply: Maintain a stable power supply system for the drive, avoiding voltage fluctuations or power outages.
  • Operator Training: Provide regular training for operators to enhance their ability to identify and resolve drive faults.
F07802 processing method

4. Conclusion

The F07802 fault code is a common startup fault in Siemens SINAMICS S120 and S150 series drives. By appropriately extending the monitoring time, checking the DC bus voltage, verifying input voltage settings, and performing regular maintenance, this fault can be effectively prevented and resolved. During the troubleshooting process, always adhere to electrical safety protocols to ensure the safety of personnel and equipment.

Posted on

Operation Guide for the Tai’an Inverter N2 Series User Manual

I. Introduction to the Operation Panel Functions

The operation panel of the Tai’an Inverter N2 series is designed to be intuitive and feature-rich, facilitating various settings and monitoring for users. The panel primarily includes the following function keys and indicator lights:

  • FREQ.SET: Used to set the output frequency.
  • ▲▼: Increase or decrease the set value.
  • READ: Read the current display content.
  • ENTER: Confirm the settings.
  • RUN: Start the inverter.
  • STOP: Stop the inverter.
  • DSP: Switch between display contents, such as frequency, speed, linear velocity, etc.
  • FUN: Enter the function setting mode.
  • FWD/REV: Forward/Reverse indicator lights, showing the current operating direction.
  • Hz/RPM/VOLT/AMP: Indicate frequency, speed, voltage, and current, respectively.
N2 standard wiring diagram

II. Password Setting and Parameter Access Restrictions

To ensure the security of the inverter settings, the N2 series provides a password protection function. Users can follow these steps to set and remove passwords:

  1. Setting a Password:
    • Enter the function setting mode (FUN).
    • Use the ▲▼ keys to select the password setting option.
    • Enter the password value using the FREQ.SET key.
    • Press the ENTER key to confirm.
  2. Removing a Password:
    • Enter the function setting mode (FUN).
    • Select the password setting option.
    • Set the password value to 0 and press the ENTER key to confirm.
  3. Parameter Access Restrictions:
    • Users can restrict access to frequency parameters by setting parameter F_004. When F_004 is set to XXX1, frequency parameters are locked and cannot be modified.
  4. Parameter Initialization:
    • Users can initialize the inverter parameters by setting parameter F_123. Setting F_123 to 1111 or 1110 will restore the inverter to its factory settings.
N2 front

III. External Terminal Forward/Reverse Control and External Potentiometer Speed Regulation

The N2 series inverter supports forward/reverse control and external potentiometer speed regulation through external terminals. Specific settings and wiring are as follows:

  1. Forward/Reverse Control:
    • Parameter Setting: Set F_003 to XX01 (forward/reverse mode).
    • Terminal Wiring: Connect the forward control signal to terminal 3 of TM2, the reverse control signal to terminal 4, and the common terminal to terminal 5.
  2. External Potentiometer Speed Regulation:
    • Parameter Setting: Set F_011 to 1 (frequency instruction set by the potentiometer on the panel) or 2 (frequency instruction set by the potentiometer or analog signal on the TM2 multifunction terminal).
    • Terminal Wiring: Connect the output terminal of the external potentiometer to terminal 13 of TM2 (analog input point), and the common point of the analog signal to terminal 14.
N2 side

IV. Fault Codes and Solutions

During operation, the N2 series inverter may display various fault codes. Users need to take corresponding measures based on the code meanings:

  1. OC (Overcurrent):
    • Meaning: The output current of the motor or inverter exceeds the rated value.
    • Solution: Check if the motor is overloaded, adjust the acceleration time or V/F curve, and ensure that the motor matches the inverter capacity.
  2. OL1 (Motor Overload):
    • Meaning: The motor overload protection has activated.
    • Solution: Check if the load is too heavy, adjust the motor protection parameters F_069 and F_070, and ensure that the motor operates within the rated load.
  3. OL2 (Inverter Overload):
    • Meaning: The output current of the inverter exceeds the rated value for an extended period.
    • Solution: Check if the load is too heavy, adjust the acceleration time, or increase the inverter capacity.
  4. OV (Overvoltage):
    • Meaning: The DC bus voltage of the inverter is too high.
    • Solution: Check if the power supply voltage is too high, adjust the deceleration time, or install a braking resistor.
  5. LV (Low Voltage):
    • Meaning: The input power supply voltage is too low.
    • Solution: Check if the power supply voltage is normal and adjust the allowable instantaneous stop time parameter F_031.
  6. OH (Heat Sink Overheat):
    • Meaning: The temperature of the inverter heat sink is too high.
    • Solution: Check if the ventilation conditions are good, clean the heat sink dust, reduce the load, or increase the inverter capacity.

Through this operation guide, users can better understand and use the Tai’an Inverter N2 series, ensuring the normal operation and efficient energy saving of the inverter. In practical applications, users should also reasonably set the inverter parameters according to specific loads and process requirements to achieve the best control effect.

Posted on

Schneider Inverter Error Code 0004Hex and Safety Function Error: What Is the Problem and How to Solve It?

During operation, Schneider inverters may display a “Safety Function Error” along with the error code “0004Hex.” This error code can cause confusion for many technicians. This article will provide a detailed explanation of the issue, common solutions, and possible hardware failure causes.

 Error Code 0004Hex

1. Meaning of Error Code 0004Hex

In Schneider inverter manuals, error code “0004Hex” typically indicates a “Safety Function Error.” This type of fault is often related to safety functions inside or outside the inverter, such as emergency stop, door protection, emergency braking, and other safety features. In this case, the inverter may disable or limit certain functions to ensure the safety of both equipment and personnel.

A “Safety Function Error” does not necessarily mean the inverter has a hardware failure. It may be caused by improper configuration, wiring errors, or the triggering of an external safety system. The specific cause of the fault needs to be determined by checking the inverter’s settings and the configuration of external safety circuits.

2. Meaning of Safety Function Error and Solutions

1. Parameter Issues

The first step is to verify if the error is due to incorrect configuration of the inverter’s safety function parameters. These parameters control how the inverter responds to safety features, such as emergency stops, door switches, etc. If these parameters are not configured correctly or are set to inappropriate values, the inverter may trigger the “Safety Function Error.” To resolve this issue, check and adjust the relevant safety parameters.

Common safety functions in Schneider inverters include:

  • SS1: Safety Stop
  • SS2: Safety Stop 2
  • SLS: Safe Limited Speed
  • SIL: Safety Integrated
  • SFC: Safety Function Control

These safety functions can typically be found in the parameter setting menu. For example, if the “Safety Stop” (SS1) function is not correctly enabled, or the safety stop time is set too short, it may trigger this error.

Solution:

  1. Enter the inverter’s programming mode.
  2. Navigate to the safety function parameters in the menu.
  3. Ensure that the relevant safety functions are enabled and that the parameters are set appropriately.
  4. Adjust the parameters and save the configuration.
2. External Terminal Wiring Issues

Another potential cause is an issue with external safety terminal wiring. Inverters often connect to external safety devices, such as emergency stop switches and door switches, through terminals. If the wiring to these external devices is faulty, the inverter may incorrectly interpret it as a safety issue and display the error.

To troubleshoot terminal wiring issues, first ensure that the relevant safety terminals are correctly connected and that the safety signals are being read properly. Common safety terminals and their corresponding functions are:

  • Terminal 10 (STO): Safe Stop
  • Terminal 11 (SS1): Safety Stop
  • Terminal 12 (SLS): Safe Limited Speed

When inspecting these terminals, pay special attention to:

  1. Terminal Short Circuits: If there is a short circuit between terminals, the inverter will consider the safety function to have been triggered, resulting in the error.
  2. Loose or Incorrect Wiring: Loose or incorrectly wired connections can cause the inverter to fail in detecting safety signals.

Steps to troubleshoot:

  1. Ensure that the wiring to terminals 10, 11, 12, etc., is secure and there are no short circuits.
  2. To test terminal functions, you can temporarily short-circuit certain terminals to check whether the inverter responds correctly.
  3. Clear the fault and restart the inverter to check if the safety function error persists.
3. Mainboard or Drive Board Hardware Faults

If the above methods do not resolve the issue, hardware failure could be the cause of the “Safety Function Error.” There may be issues with the circuits on the mainboard or drive board that are responsible for detecting safety functions. If these circuits fail (e.g., due to sensor damage, poor contact, etc.), the inverter may fail to properly recognize safety signals and trigger the error.

In this case, the solution includes:

  1. Inspecting the Hardware Circuits: Check the circuits on the mainboard or drive board related to safety functions, including sensors, wiring, and connectors, to ensure they are not damaged or loose.
  2. Replacing Faulty Components: If a component on the circuit board is damaged, try replacing it. For severe issues with the mainboard or drive board, replacing the entire board may be necessary.
  3. Conducting Board Diagnostics: Use Schneider’s diagnostic tools to check if the board is functioning correctly, especially the parts related to safety functions.

If hardware failure is confirmed and the board cannot be repaired, it is best to contact Schneider’s after-sales service for further assistance or to replace the parts.

ATV610

3. Conclusion

When a Schneider inverter displays a “Safety Function Error” and the error code “0004Hex,” the first step is to check for parameter configuration errors and external terminal wiring issues. If these checks do not resolve the problem, hardware failure in the mainboard or drive board may be the cause. Depending on the situation, solutions may include adjusting parameters, inspecting wiring, short-circuiting terminals, or replacing faulty hardware.

With thorough troubleshooting and proper handling, most “Safety Function Errors” can be resolved. If the issue persists, it is recommended to contact Schneider’s technical support for professional assistance.

Posted on

Burmagor Inverter TD300 Series User Manual Guide

I. Introduction to Operation Panel Functions

The Burmagor Inverter TD300 series is equipped with an intuitive and user-friendly operation panel, facilitating various settings and operations for users. The following is an introduction to the main functions of the operation panel:

TD300 front

1.1 Setting and Eliminating a Password

To ensure the security of inverter settings, the TD300 series inverter provides a password protection function. Users can restrict access to the inverter by setting a password. The method for setting a password is as follows:

  1. Enter the parameter setting interface.
  2. Locate the parameter related to password setting (please refer to the user manual for the specific parameter number).
  3. Input the desired password value.

To eliminate an already set password, simply reset the password parameter to its default value.

1.2 Setting Parameter Access Restrictions

In addition to password protection, the TD300 series inverter also supports restricting access to parameters. Users can lock specific parameters as needed to prevent unauthorized modifications. The method for setting parameter access restrictions is as follows:

  1. Enter the parameter setting interface.
  2. Locate the parameter related to parameter locking (such as F1.18).
  3. Set this parameter to the locked state.
TD300 series standard wiring diagram

1.3 Parameter Initialization Setting

When it is necessary to restore factory settings or resolve certain parameter setting errors, users can use the parameter initialization function. The specific operation steps are as follows:

  1. Enter the parameter setting interface.
  2. Locate the parameter related to parameter initialization (such as F1.17).
  3. Set this parameter to the initialization value (usually 8), and the inverter will return to its factory settings.

II. Terminal Forward/Reverse Start/Stop and External Potentiometer Speed Control

The TD300 series inverter supports terminal forward/reverse start/stop and external potentiometer speed control functions. The following are the steps and parameters required to implement these functions:

2.1 Terminal Forward/Reverse Start/Stop

To implement the terminal forward/reverse start/stop function, the following parameters need to be set:

  • F1.02: Operation setting selection. Set to 1 (IO terminal), indicating that the operation command is given by the IO port.
  • F3.15-F3.16: Multi-function input terminal settings. Define the FWD terminal as forward (e.g., F3.15=6) and the REV terminal as reverse (e.g., F3.16=7).

In terms of wiring, external control signals need to be connected to the FWD and REV terminals, and the forward/reverse start/stop is achieved by controlling the on/off state of these two terminals.

2.2 External Potentiometer Speed Control

To implement the external potentiometer speed control function, the following parameter needs to be set:

  • F1.01: Frequency setting selection. Set to 3 (keypad potentiometer setting mode), indicating that the operating frequency of the inverter is controlled by the potentiometer on the operator.

In terms of wiring, the output terminal of the external potentiometer needs to be connected between the +10V and FIV terminals of the inverter. By adjusting the knob of the potentiometer, the output frequency of the inverter can be changed, thereby achieving speed control.

TD300 Side

III. Fault Codes and Their Handling

The TD300 series inverter has a comprehensive protection function. When a fault occurs, it displays the corresponding fault code. The following are some common fault codes, their meanings, and handling methods:

3.1 OC1/OC3 (Overcurrent during acceleration/operation)

  • Meaning: There is an overcurrent phenomenon in the motor or output circuit.
  • Handling methods:
    1. Check if the motor and output circuit are short-circuited or grounded.
    2. Extend the acceleration time (F1.07).
    3. Reduce the torque boost setting value (F2.08).
    4. Check if the grid voltage is stable.

3.2 OU1/OU3 (Overvoltage during acceleration/operation)

  • Meaning: The output voltage of the inverter is too high.
  • Handling methods:
    1. Extend the deceleration time (F1.08).
    2. Install a braking unit and braking resistor.
    3. Check if the power supply voltage is too high.

3.3 LU0/LU1/LU2/LU3 (Low voltage during standby/acceleration/deceleration/operation)

  • Meaning: The power supply voltage is too low.
  • Handling methods:
    1. Check if the power supply voltage is normal.
    2. Check if the power supply circuit has poor contact or is open-circuited.

3.4 OL0/OL1/OL2/OL3 (Overload during no operation/acceleration/deceleration/operation)

  • Meaning: The motor load is too heavy.
  • Handling methods:
    1. Reduce the load or increase the inverter capacity.
    2. Extend the acceleration time (F1.07).
    3. Check if the motor is stalled or seized.

IV. Conclusion

This article provides a detailed introduction to the operation panel functions of the Burmagor Inverter TD300 series, the setting methods for terminal forward/reverse start/stop and external potentiometer speed control, as well as common fault codes and their handling methods. By reasonably using these functions and settings, users can better control and maintain the inverter, ensuring stable operation of the equipment. At the same time, in the event of a fault, users can quickly resolve the issue based on the provided handling methods, reducing downtime and improving production efficiency.